Folioz Orientation
Folioz is a SSHRC funded research platform and is powered by Mahara. Mahara is provided freely as open source software (under the GNU General Public License). What makes Folioz different from other ePortfolio systems is that you control which items and what information (Artefacts) within your portfolio other users see.
- Introduction
- Navigation
- Your Dashboard
- Main menu navigation
- User menu navigation
- User-specific information
- Your profile page
- Pages
- What are Pages?
- Your Overview Page
- Add a page
- Editing a Page
- Edit an existing page
- View a page
- Deleting a page
- Files
- Managing Files
- File browser
- Upload a file
- Upload multiple files
- Edit a file or folder
- Rotate an image
- File quota
- Blocks
- Content chooser
- Files, images and video
- Journals
- General
- Personal info
- External content
- Blocks in various pages
- Collections
- Sharing your ePortfolio
- Share Overview
- Edit access to your profile page
- Edit access for users with an account
- Edit access for users without an account
- Privacy
- Skins
- SmartEvidence
- Troubleshooting
- Institutions
- Glossary
- Updates
- Change Logs
- Exporting your eportfolio
Introduction
What is Folioz?
If you’re wondering what Folioz or an ePortfolio is, why you might want one and what it can do for you, then read on. You’re about to find out.
At the simplest level, Folioz is two things: an ePortfolio and a social networking system combined. An ePortfolio is a system in which students can record “evidence of lifelong learning” – such as essays, artwork or other such things they produce that can be stored digitally. Such things are known as artefacts in Folioz. Social networking systems need little introduction – think Bebo, Facebook or MySpace (back in the old days). Basically, they give a way for people to interact with their friends and create their own online communities.
But Folioz is much more than just a place to store files. Folioz also includes blogging, a résumé builder, and web services to integrate with other platforms.

Folioz framework
Folioz is built with Mahara, an open source e-portfolio application.

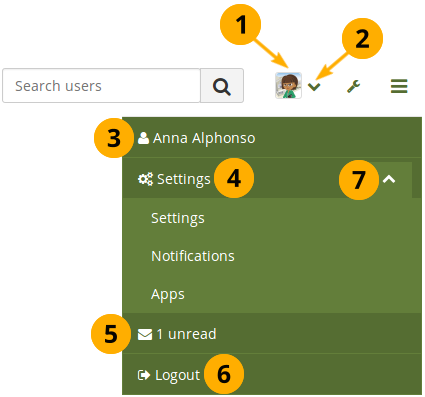
With Folioz, you control which items and what information within your portfolio other users see. Such items and information are termed artefacts. To facilitate this access control, all artefacts you wish to show to other users need to be arranged into one area. In Mahara this compilation of selected artefacts is called a ‘page’. You can have as many pages as you like, each with a different number of artefacts, intended purpose and audience. Your audience, or the people you wish to give access to your page, can be added as individuals or as a member of a group. It can even be made publicly available.
For example you could create:
- a page for your friends and family that includes holiday photos and a personal journal
- a page for your tutor, which includes assessments and your reflective learning journal
- a page to showcase your best pieces of work and your résumé for potential employers
- …
A single page or a collection of pages can make up your portfolio. Unless artefacts are placed in a page, they are not visible to anybody but you. You can use files that you uploaded or journal entries you wrote in as many pages as you wish. You only need one copy of your artefact.
Imagine you collected all your artefacts in a shoe box. Whenever you have a new artefact, you add it to the shoe box. When you are ready to create your portfolio, you take a look at the artefacts in your shoe box and choose those that you want to make available on a portfolio page. You can arrange the artefacts on that page to your liking.
Accessibility
Folioz aims to be usable by as many individuals as possible, including those with disabilities or special needs. Creating accessible web content is a requirement in many countries. In order to provide international guidelines, the Web Content Accessibility Guidelines (WCAG) were created. There are three conformance levels under the WCAG 2.0, the latest edition of the guidelines: A, AA, and AAA. Each level requires conformance with previous levels and includes its own specific guidelines for how websites should be made accessible.
With the latest version of Folioz has reached level AA for user-facing areas of the system. The administration of Folioz is predominantly on level AA as well. We endeavour to keep up level AA to continue to provide good navigation of the site to everybody.
We can only control the accessibility of the navigation and overall platform. People uploading or creating content are responsible themselves to make their content accessible.
If you are a screen reader user, you can use the following access keys to navigate the main menu items in Folioz:
Regular user interface:
- d:Dashboard
- c: Content
- p: Portfolio
- g: Groups
- a: Administration
Implementation: key principles for success
The exemplars within this toolkit were judged to meet the five key principles for successful e-portfolio implementation that was an outcome of a prior study of effective practice (Joyes and Gray, 2010).
The key to effective practice as shown in the e-portfolio implementation model in figure 1 is to:
- Recognise that e-portfolio implementation involves a developmental journey for all those involved
- Apply the e-portfolio implementation principles throughout this journey

Figure 1: The e-portfolio implementation model - the key implementation principles applied across one instance of adoption
The table of e-portfolio implementation guidance for practitioners below sets out the key issues for practitioners together with statements of effective practice that are related to a consideration of the e-portfolio implementation principles. The statements of effective practice are supported by some links to the case studies and to resources and events that were noted to support the development of effective practice. This may be a helpful point of reference when thinking through your own implementation. However, you will know your own context best - the key for success is the application of the principles to your context. Further guidance may be found within Effective Practice with e-Portfolios (JISC, 2008) and the e-Portfolios infoKit (JISC, 2008).
Table 1: e-portfolio implementation guidance for practitioners
|
e-Portfolio implementation principles |
The key issues from a practitioner perspective |
Statements of effective practice with links to examples from the e-portfolio implementation case studies |
|
1. Purpose needs to be aligned to context to maximise benefits. |
The diversity of purposes for e-portfolios can lead to misunderstandings and ineffective implementation. There needs to be clarity over this at the start the implementation. |
|
|
2. Learning activity needs to be designed to suit the purpose. |
Familiarity with the e-portfolio tool is needed in order to understand what learning activities it can support. This enables:
|
|
|
3. Processes need to be supported technologically and pedagogically. |
Support for the technology can be offered centrally and e-portfolio tools may offer some generic pedagogic support, e.g. for action planning.
However what is required for processes such as reflection and presentation may vary across courses and so there is a need for course specific support.
It is important not to underestimate the level of support needed for both staff and students who may lack technical and/or the 'new' learning skills such as reflection. |
|
|
4. Ownership needs to be student centred. |
Both learners and those they need to share their e-portfolios with, need to access the e-portfolios to support the learning activity and understand the expected learning outcomes; but the e-portfolio in process needs to be private to the individual learner. How can the learner understand the value of the learner centred part of this process until they have experienced it? How can access be provided in all contexts including work based learning ones? |
|
|
5. Transformation (disruption) needs to be planned for.
|
The benefits and implications of using the e-portfolio in a particular context are unlikely to be fully understood by others outside that context. This means that in spite of all the guidance and support that is available, a careful consideration of the ways the context may be unique and ongoing feedback from users is needed to ensure effective implementation. |
|
Source: https://epip.pbworks.com/w/page/40808690/Implementation%20guidance%20for%20practitioners
References
JISC (2008) Effective Practice with e-Portfolios
JISC (2008) e-Portfolios infoKit http://www.jiscinfonet.ac.uk/e-portfolios
Joyes, G. and Gray, L. (2010) The trouble with e-portfolio implementation: A threshold concepts perspective In The PDP newsletter Issue 20

Navigation
Your Dashboard
Overview
You can change certain aspects of your dashboard, namely the user-specific information, but a lot of what you see is static to allow you to quickly access other parts of Folioz.
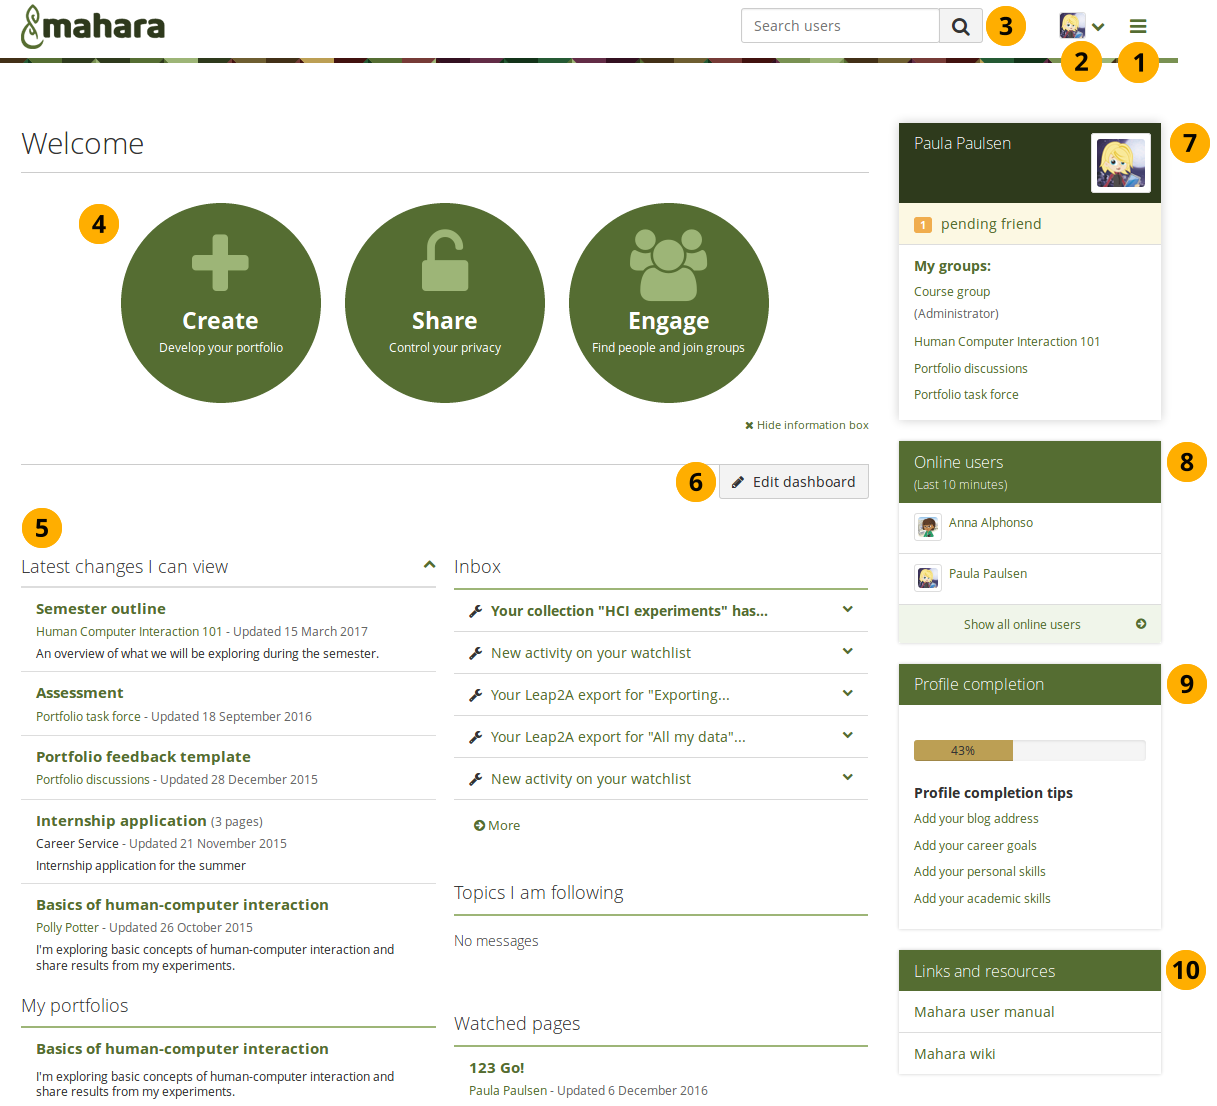
Your homepage is your dashboard from which you can access a number of areas in Mahara conveniently.
Main menu navigation
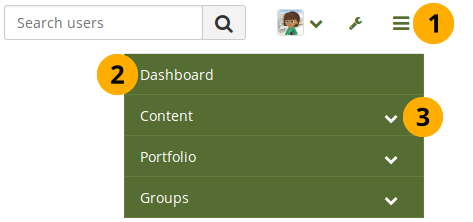
User menu navigation
-
Click your profile picture to be taken to your profile page.
-
Click the Arrow down icon in the user menu to see additional options.
-
Your name: Your name is displayed to indicate who is logged in esp. when viewing portfolio pages where the profile block is not visible. You can click on it to go to your profile page.
If an administrator masquerades as another user, this name helps to check quickly, in which account actions are undertaken.
-
Settings: Top level navigation item that gives you access to more options:
- Settings: This link gives you access to your account settings and notifications
- Notifications: Change your notification preferences.
- Apps: See which apps you have connected to your account.
-
Inbox: Go to your Mahara inbox to check for new messages. When you have unread messages, the counter displays the number of unread messages.
-
Logout: Link to log out of your current session.
-
Click the Arrow down icon to reach the second level navigation. You can then click the Arrow up icon to close the second level navigation.
User-specific information
The default dashboard includes the following blocks:
- Latest changes I can view
- My portfolios
- Inbox
- Topics I’m following
These blocks are filled with content once you start using Folioz and create pages, receive messages from other users, have access to others’ portfolio pages and use the forums for discussions. You can customize these blocks to your liking by editing your dashboard. Click the Edit dashboard button directly on your dashboard or go to Portfolio in the navigation menu, click the Edit button next to the dashboard page and change the blocks like you would change them on any page in Folioz.
Refer to the page editor for more information on adding and removing blocks from a page.
Your profile page
Your profile page is not visible to other users on Folioz by default except for those in the same institutional space. You can also make it visible to anybody on the Internet.
Per default only the following information is put onto your profile page:
- Your display name (or real name if you do not have a display name)
- Your pages that are visible to the person viewing your profile page
- Your groups
- Your wall
- Your friends
We advise you not to use your profile page as your portfolio because you cannot control who can look at the information you make available on your profile. At minimum it is everybody in your institution or who has an account on Folioz. At maximum it can be everybody online. Always remember to think about your own personal security before releasing contact information on a publicly available page or even just for other Folioz users.
Once you have made your profile page or any portfolio page public, Google and other search engines can index and cache it. Even if you take the public access away at some point, the cached version may still be available online. Pages that are made available via a secret URL are not found by search engines unless you link to them from another page.
Use regular pages to create your portfolio and your profile page as a business card or brief introduction to you without disclosing lots of details.
You can edit your profile page like any other page. You can find more information about editing a page in the page editor.
Pages
What are Pages?
A page contains a selection of artefacts which you arrange and present to others. These may include:
- selected files
- résumé details
- text (your added commentary, instructions or orientation)
- journal posts
- video and audio files
- RSS feed to an external blog
- etc.
You can re-use the artefacts that you collected under Content in as many pages as you wish.
The same artefacts can appear in multiple pages
Your Overview Page
On the landing page of Portfolio, you can do the following.
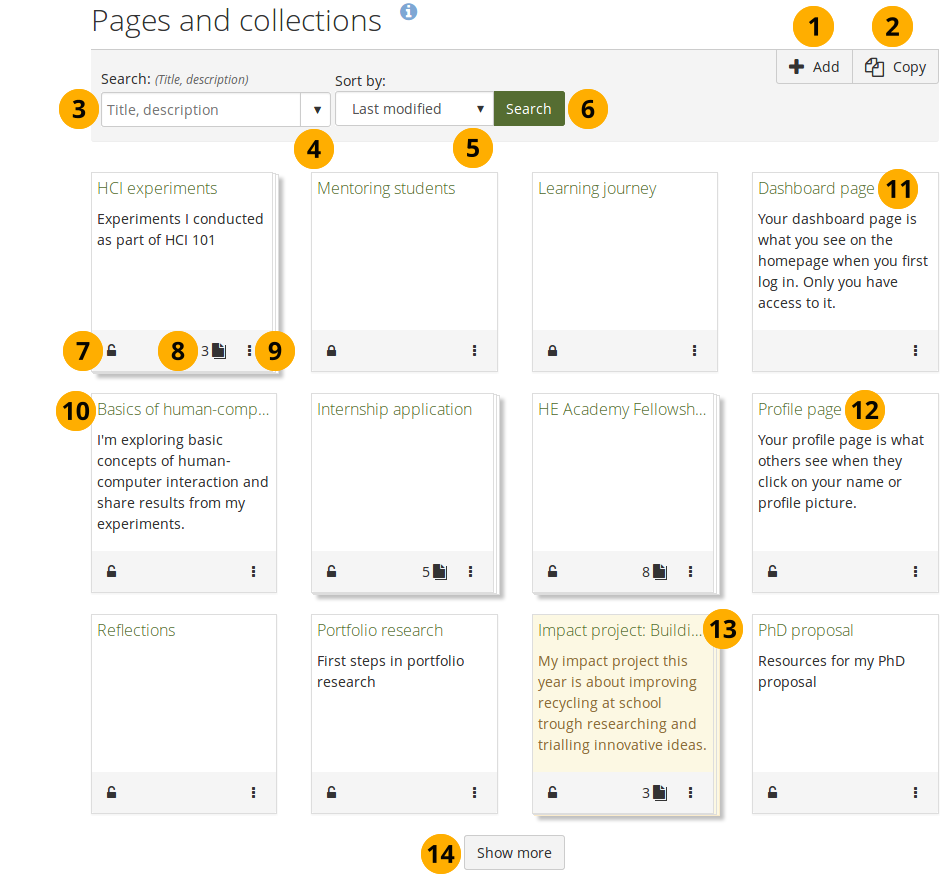
The landing page of your portfolio
-
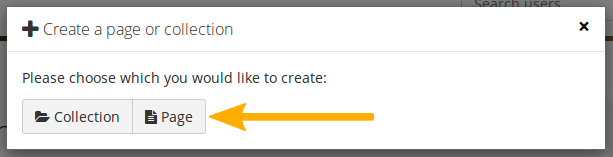
Click the Add button to start a new page or collection from scratch.
A modal opens in which you can choose whether to create a page or collection.
-
Click the Copy button to choose an existing page or collection of yours or from another user as basis for a new portfolio.
-
Search: Type your search term into the search field.
-
Use the drop-down arrow to limit your search. The available options are:
- Title, description, tags: Search for your search term in the title, descirption, and tags of your portfolios.
- Title, description: This is the default option. It searches in the title and description of your portfolios.
- Tags: Search only within the tags of your portfolios.
-
Sort by: Decide on the sort order in which you wish to display your portfolios.
- Alphabetical: Portfolios are displayed in alphabetical order.
- Date created: List the portfolios in chronologically reverse order with the newest portfolios first.
- Last modified: Display the portfolios in the order of their last modification with the most recent portfolios that have been changed first. This is the default display option.
- Last viewed: Show the portfolios in the order in which they were viewed by you and others starting with the most recently viewed portfolios.
- Most visited: Display the portfolios that have been visited most first in the list.
- Most feedback: List the portfolios in descending order based on the amount of feedback they have received.
The search option and the sort order that you choose do not change when you navigate away from the overview page or log out. When you change either setting, that new one will be used until you change it again.
-
Click the Search button to search your portfolios based on your search term and / or sorting criteria.
-
Click the Locked icon or the Unlocked icon to manage the access to your portfolio.
-
Collections display the number of pages that they contain.
-
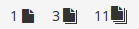
Click the More options icon to reach more options for the page or collection.
-
If you are on a computer, you can hover over the title of a portfolio and see it in its full length if it needed to be shortened.
-
Dashboard page: Click the More options icon to make changes to your dashboard page. You cannot delete your dashboard page though.
-
Profile page: Click the More options icon to make changes to your profile page. You cannot delete your profile page, but you can decide on different sharing options.
-
When you submitted a portfolio to a group, you cannot change a great number of the page’s content or delete it until the page is released again. It is displayed with a different colored background to differentiate it quickly from non-submitted portfolios.
-
Click the Show more button to display more portfolios.
Icons on the overview page
The page and collection information boxes display a number of icons, which are described in more detail here.
Share your portfolio with others
If you have not yet shared your portfolio with somebody else, you see the Locked icon .
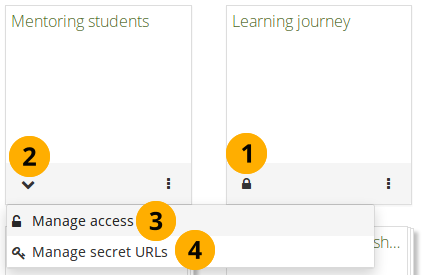
- Click the Locked icon to start sharing your portfolio.
- The icon turns into a downwards facing menu chevron . A drop-down menu opens.
- Click the Manage access option to share your portfolio with others on the site. You are taken to the Edit access screen where you can choose with whom to share your portfolio.
- Click the Manage secret URLs option to create a secret URL for your portfolio. You are taken to the Secret URLs screen where you can set up one or more secret URLs.
Review existing sharing permissions
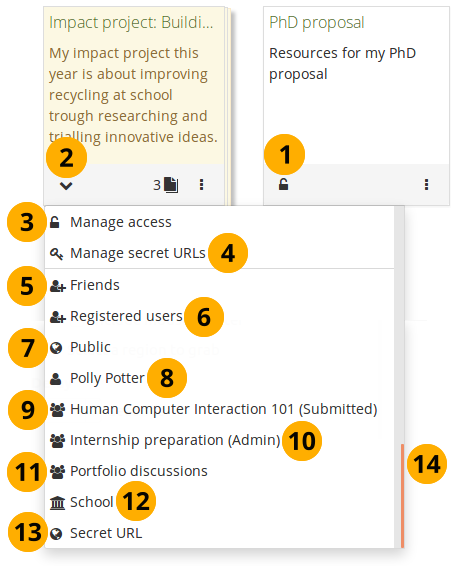
Review with whom you already shared your portfolio
- Click the Unlocked icon to see with whom you have already shared your portfolio.
- The icon turns into a downwards facing menu chevron . A drop-down menu opens.
- Click the Manage access option to edit the existing sharing settings for your portfolio. You are taken to the Edit access screen where you can choose with whom to share your portfolio.
- Click the Manage secret URLs option to create or edit a secret URL for your portfolio. You are taken to the Secret URLs screen where you can set up one or more secret URLs.
- Friends: If you shared your portfolio with all your friends.
- Registered users: If you gave all people with an account on Folioz instance access to your portfolio.
- Public: If you made your portfolio available to everyone on the internet.
- Name of a person: If you shared your portfolio with a specific person.
- Group name (Submitted): If you submitted this portfolio to a group.
- Group name (Admin / Members / Tutors): If you shared your portfolio with only a certain type of group members in that group.
- Group name: If you shared your portfolio with an entire group.
- Institution name: If you shared your portfolio with all people in your institution.
- Secret URL: If you set up a secret URL for your portfolio.
- The drop-down menu has a scrollbar so you can view all people or groups of people with whom you shared your portfolio.
Start or end dates or whether copying is allowed are not displayed in the drop-down menu. You need to go to the Share screen to see that additional information.
Access pages within a collection
You can view how many pages are part of a collection and what their titles are by clicking the Pages icon .
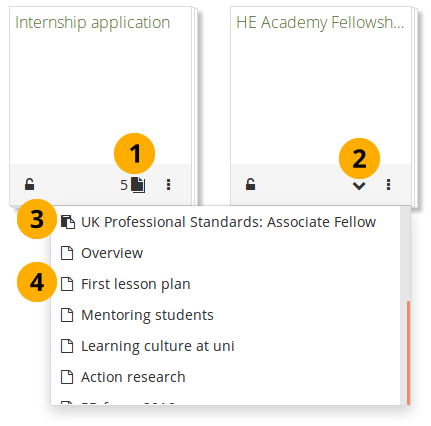
View a list of pages within a collection
-
Click the Pages icon .
The icon depends on how many pages are in your collection:
- 0-2: One sheet of paper.
- 3-10: Two stacked sheets of paper.
- 11 or more: Three stacked sheets of paper.
-
The icon turns into a downwards facing menu chevron . A drop-down menu opens.
-
If you have a SmartEvidence collection, you see that listed first with the SmartEvidence page icon .
-
All other pages are are listed with the Single page icon .
-
Click the page you want to view.
More options
You can find additional options for pages or collections via the More options icon .
More options for pages and collections
-
Click the More options icon to see additional editing options.
-
The icon turns into a downwards facing menu chevron . A drop-down menu opens.
-
If you view the options for a collection, click Manage to add or remove pages from your collection.
-
Click Edit to edit the general information of a page or collection such as title, description, and tags.
-
Click Delete to delete the page or delete the collection.
If you delete a collection, the pages and artefacts within it are not deleted.
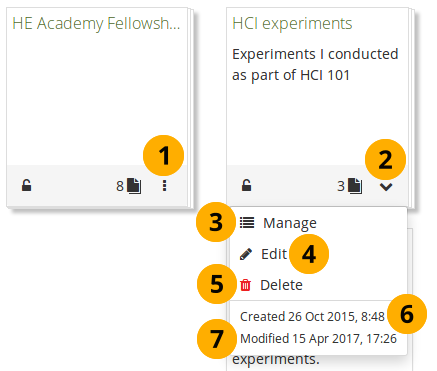
-
Created: The date and time when you set up the page or collection.
-
Modified: The last time you made a change to the page or collection.
If you submitted a portfolio, you cannot edit or delete the page or collection until it has been released. Therefore, you don’t see those options anymore. However, you see when you submitted the portfolio to which group.
See submitted date and group
Add a page
You add a new page in your portfolio when you want to display artefacts together, e.g. for presenting them to others, for showing your progress in a project etc.
Create a portfolio page
-
On the Pages and collections page, click the Add button. In the modal that comes up, click the Page button. You are taken to the Settings.
-
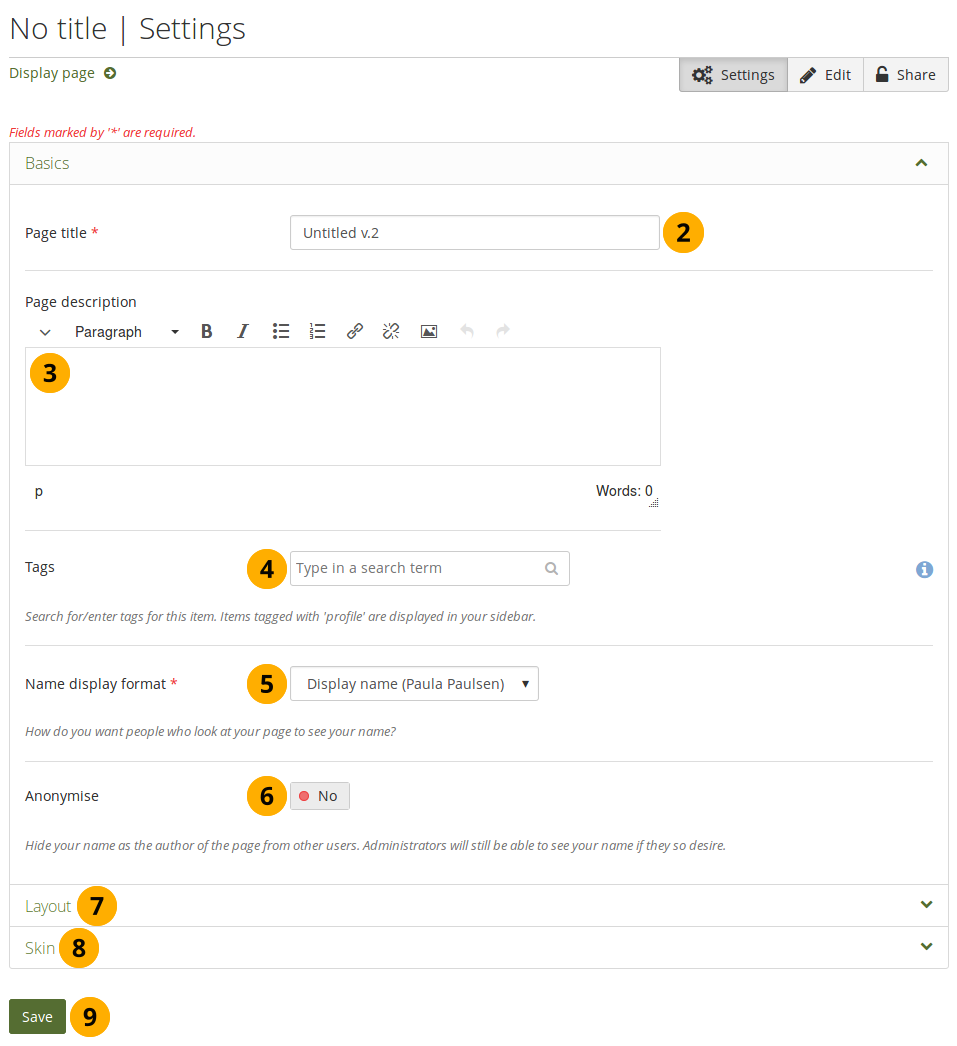
Page title: Provide a title for your page. This field cannot be left empty. If you do not enter a title, the default “Untitled” will appear.
The page title, description, and tags appear in the Basics panel. If you cannot see them, click the icon to make them visible.
-
Page description: Write a brief description summarizing your objective of this page. It will appear on the page itself.
-
Tags: Enter tags to find your page more easily at a later stage. You can choose from your existing tags by starting to type a letter and then selecting the tag you want to use. You can also type a new tag, and it is added to your list of tags.
You can find more information on how to use the tag selector in the “Tags” section.
-
Name display format: Choose how you want your name to appear on the page to others.
-
Anonymise: If the site administrator allowed anonymous pages, you can choose this option here. Instead of your (display) name, “Author’s name hidden” will be displayed to everyone. Administrators and staff can still see your real name.
-
Layout: Click the icon to display all layout options. You can change the layout to decide the overall distribution of your blocks on the page.
-
Skins: Click the icon to select a skin for your page.
-
Click the Save button to save your changes and to continue to the Edit content part.
Editing a Page
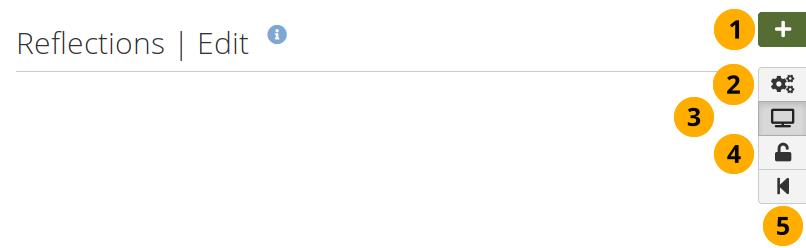
Navigation bar
You can add and remove content from a portfolio page on the Edit page screen.
-
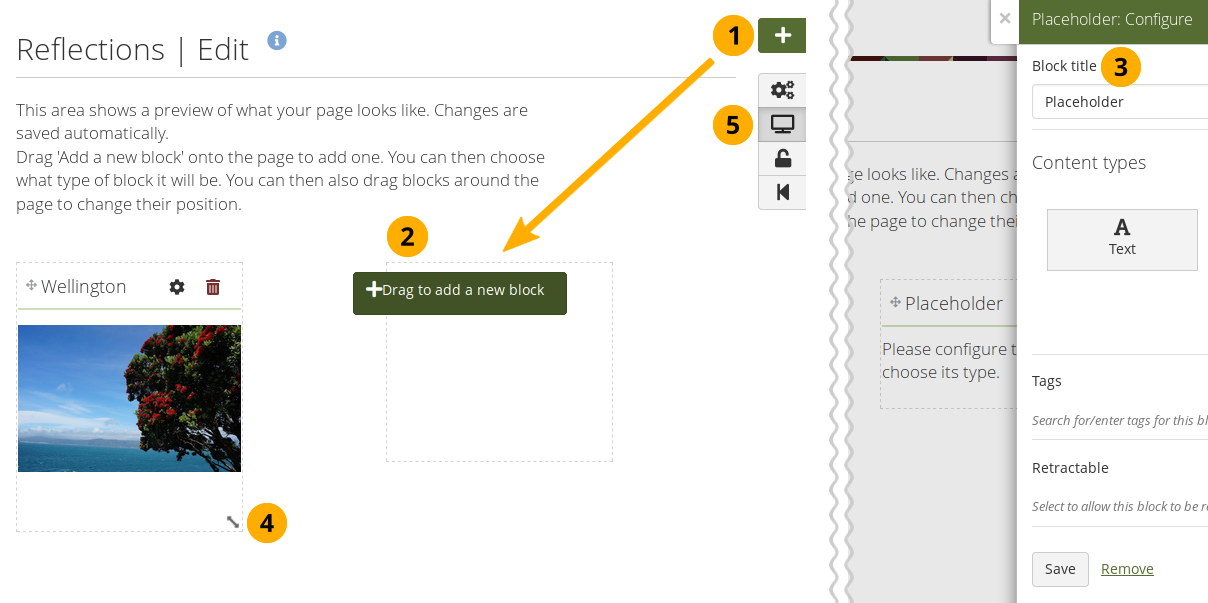
Click the Drag to add a new block button onto the page to place a block.
-
Click the Settings button to add and modify page settings like title and description and skin.
-
Click the Display page button to review your page to see how others, who have access to it, will see it. When you are in edit mode, this button is highlighted.
-
Click the Share button to decide who shall have access to your page (or collection if the page is part of one). See “Edit access” for more details.
-
Click the Return to pages and collections button to return to the pages and collections overview page.
Add content to a page
The static layout selector was replaced with a more flexible option. Now the layout can be created on the fly directly on the Edit screen of a page.
The new layout is based on the Gridstack plugin for jQuery. It is well-suited for responsive pages, adapts to the page width, and blocks can be resized directly in edit mode.
An extension to this plugin is the accessibility options needed to allow people working with a keyboard only or a screen reader to continue being able to create and modify pages as well.
When a page is created with an accessible layout (this page option is available if you set the Accessible page creation option in your account settings to “Yes”), the following will happen:
-
The page is set to one column. All blocks will be placed underneath each other.
-
The Add block button can be clicked or navigated to via the keyboard and will add a block at the top or bottom of the page. Drag-and-drop is disabled.
-
You can change the position of a block by navigating to it, holding the Enter key pressed, and using the Up and Down arrow on your keyboard to change its position.
Be careful when choosing 4 or more columns. Your portfolio page may look very good on your big 21” screen, but a user looking at it on a laptop or tablet may not have the same experience. In most cases, up to 3 columns is the best choice.
Drag a block onto a page and resize it
-
Drag the Drag to add a new block button onto the page.
If you use only a keyboard to navigate Folioz, you can place blocks using that when you enabled the accessible page creation in your account preferences and set you page to have an accessible layout in your page settings.
-
When you see a dotted line around a rectangle, you know where you can drop the block.
-
Once the block is on the page, the block configuration modal is displayed and you can select the block type that you want to use. You can also just change the block title and leave the placeholder block in place deciding on the type of artefact you want to add later. This is in particular interesting for the creation of templates as you can leave it up to your learners to decide what content they want to place under a heading.
Refer to the section “Blocks” for more information on the different block types.
A site administrator can change the order of the block types seen in the placeholder block configuration.
-
Resize the width and / or height of a block by dragging the Resize icon
 in the bottom right corner of a block to change its dimensions.
Content within the block will adjust automatically to the new size when no specific restricting dimensions are provided.
-
Click the Display page button to view your page and its content without the edit controls.
Remember:
-
You can align your blocks into columns and rows. If a block in a second row is as wide as the block right above it and there is no other block in between, the block will snap up to the first block. You can still arrange blocks into rows by resizing your blocks to the correct width.
-
Blocks that contain dynamic content, e.g. the journal blocks, they may get longer with time and push other blocks down.
-
You can re-arrange a block by clicking its heading and dragging and dropping it elsewhere.
-
You can change the settings of a block by clicking its Configure button .
-
Changes to the layout and arrangement of blocks are saved automatically. As soon as you made changes inside blocks or on the page itself, they are also visible to any visitor of your page.
Edit an existing page
You can edit an existing page in two ways:
- Click the Edit button when you are on the Pages overview page.
- Click the Edit this page button when you are on the actual page.
You find more information on how to edit artefacts on a portfolio page in the Edit content part.
If the site administrator activated clean URLs, your portfolio pages have human-readable URLs which you can change to a certain extend.
Change the URL for your portfolio page
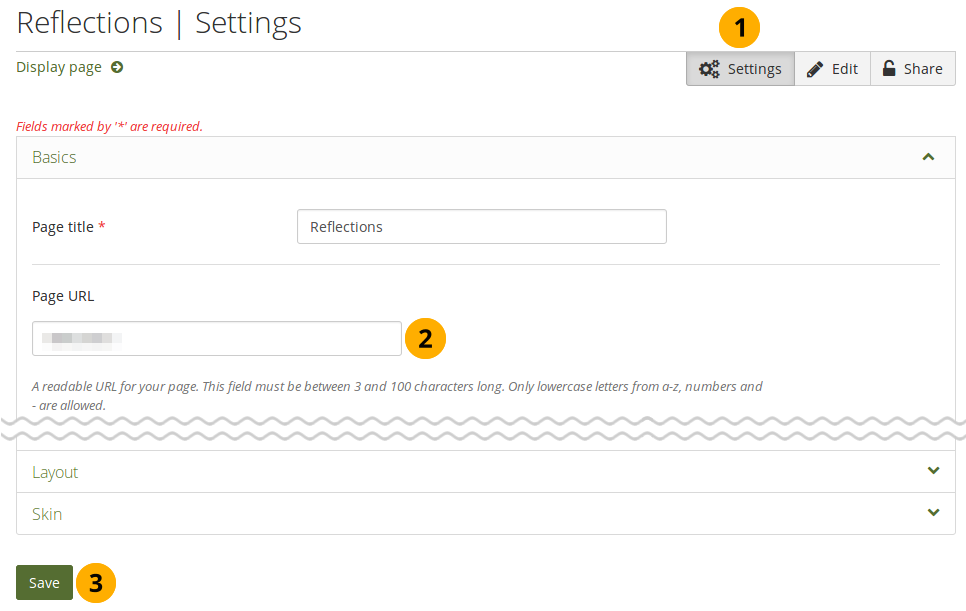
- When you are in the page edit mode, click the Settings button.
- Page URL: Choose the name for your page if you do not like the default one. It must be 3-30 characters long. You can only use lowercase letters from a-z, numbers and - (hyphen).
- Click the Save button at the bottom of the page.
Though you can change the URL to your page at any point, you shouldn’t do that because people who already know the URL to your page will not be able to access it anymore after you have changed it.
View a page
You can view a page to check what it looks like when somebody else sees it. Go to the Pages and collections overview page and click on the title of a page.
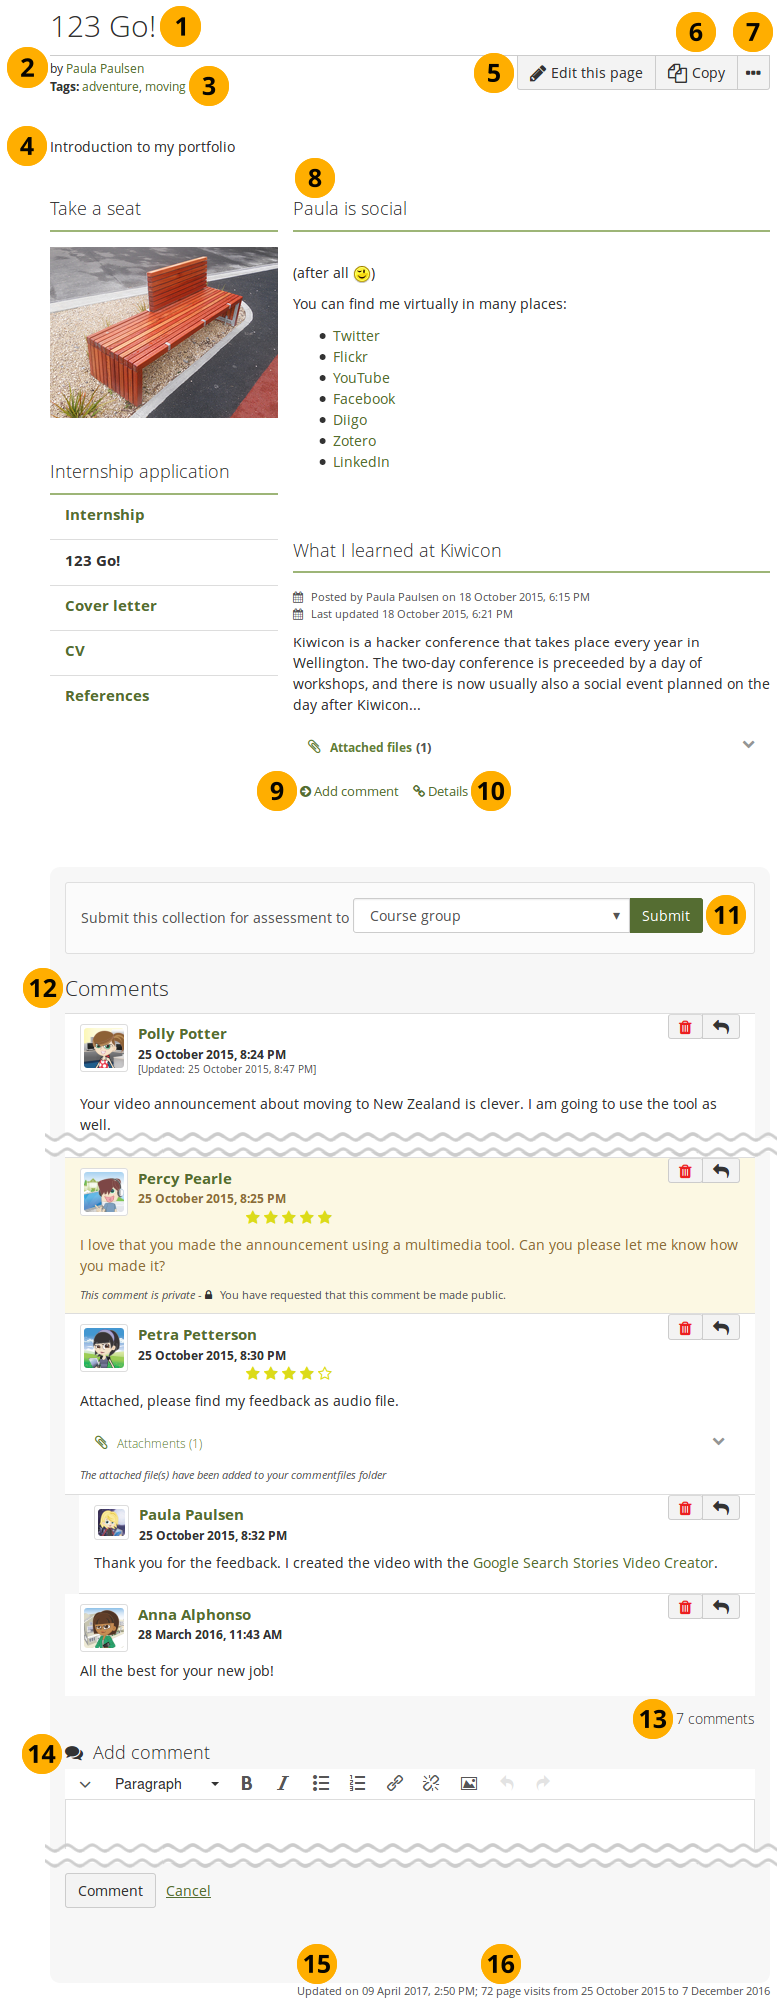
An example portfolio page.
-
Title of the portfolio page.
-
Author of the portfolio page.
-
Tags which you provided for your page.
-
Description of the page.
-
The Edit this page button is only visible if you are the page owner or belong to a group of users who can make changes to the page if it is in a group, institution or site level.
-
The Copy button is visible when you can copy the page or collection that you are viewing. You see it on your own pages as well as pages of others.
-
Click the More options button to reach lesser used functionality on a page.
On your own pages you can:

- Click the Print link to open the print dialogue. Using this print functionality, your portfolio pages are printed in the current layout, with collapsed blocks or artefacts uncollapsed so you can see their content easily. Note: Links are not yet active and linked files or embedded media are not accessible.
- Click the Delete link to delete your page.
As someone viewing another person’s portfolio, you can:
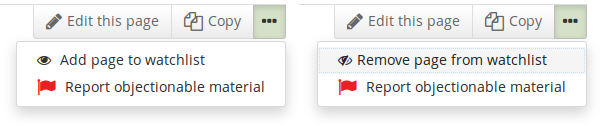
- Add or remove a page from your watchlist: Click the Add page to watchlist link if you want to be informed when changes are made to the page. When you make changes to the page or a block on the page, a notification is triggered and sent to anyone who is watching the page. This is also the case when you add a new journal entry to a journal that is displayed on your page even when you do not add the entry via the page. If you no longer wish to receive these notifications, remove the page from your watchlist by clicking the link Remove page from watchlist.
- Report objectionable content for this page: If a page contains offensive artefacts, you can report them to the administrator and provide an explanation why you think the content is offensive.
These functionalities are only available on other people’s pages as they are not needed on your own.
-
The artefacts that you placed in the page.
-
Click the Add a comment link Add comment to be taken to the Details page for this artefact to leave a comment.
-
Click the Details icon Details to be taken to the Details page for this artefact if there is one.
-
If you belong to a group which allows the submission of pages for feedback / assessment, you see the group displayed here or can choose it from the drop-down menu and can submit your page directly from here. For more information see the section on feedback for assessment.
-
Comments from users is displayed at the bottom of the page unless you display it with the comments block elsewhere on the page. Each comment includes:
- Profile picture and name of the commentator that are linked to the profile page.
- The comment itself.
- The creation date of the comment and potentially the last update date and time of the comment.
- Comment rating.
- Any attachments.
- A note if the comment is private only to the commentator and the portfolio page author.
For more information on giving and receiving comments, please see section Feedback.
-
The total number of comments is displayed.
-
You and others can use the Add comment section to leave comments on the page.
Please refer to the section on making comments to see how that can be done.
-
Display the last update date and time of the page.
-
View how many times your page was accessed.
Deleting a page
You can delete a portfolio at any time unless it has been submitted for feedback.
When you delete a page, text blocks and external content blocks are completely deleted. You cannot recover them. There is no revision history. All other artefacts are not deleted because they reside in your Content area.
If you are allowed to delete a page, you see the Delete this page option in the More options button when you view your page directly.
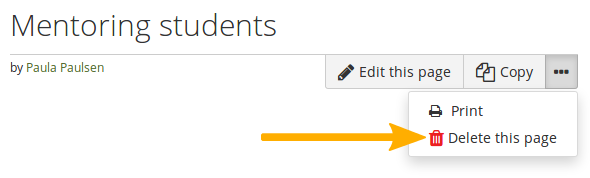
Click the “More options” button to find the “Delete” option
When you attempt to delete a page or collection, you get the chance to export the portfolio first so that you can make an archive. If your page is part of a collection, the warning message also contains the title and a link to the collection for you to check whether you really want to delete the page and thus make changes to your collection.
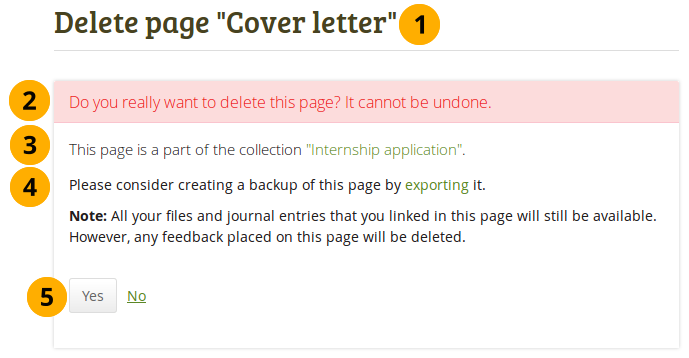
Warning when you attempt to delete a page that is in a collection
-
The title of the portfolio you are about to delete is displayed so you can double-check it is the correct one.
-
An explicit warning about the deleting of the portfolio is displayed. Deletion cannot be undone.
-
If you delete a page that is part of a collection, the collection is linked so you can view your collection and double-check deleting of the page is OK.
-
If you want to continue deleting your portfolio, you may want to export it first so you have a copy in case you do need it later again. Click the export link to be taken to the options for the export.
We recommend you export your portfolio in both HTML and Leap2A formats so that you can view them without the need of Folioz (HTML) or can import them back into the same or another Mahara instance or another portfolio software that supports the Leap2A format.
-
Click the Yes button if you want to continue with the portfolio deletion or the No button if you want to keep it.
Files
Managing Files
The Files area is a repository, i.e. a document storage for folders and files, that you can use within your portfolio. Both folders and files are considered artefacts and as such can be added to a page. You may create any number of folders or sub folders. To view which subfolders and files sit within a folder, click on the folder name. Use the Home link to return to the top level folder directory.
You can arrange files and folders by dragging and dropping the icon in front of the file / folder name onto another folder icon. A suitably named and organised filing structure will help you with the long-term organisation and retrieval of your artefacts. If you want to move a file or folder out of a subfolder, move it onto the parent folder icon .
You will find that some folders are automatically created by the system such as viewfiles or images. The viewfiles folder includes files from imported pages whereas the images folder includes your uploaded profile pictures. As with any other file, you can move them out of this folder and store them in a different folder.
You can move files and folders to your heart’s content without having to re-link them in the pages where you use them. Also renaming them will not have a negative impact on links.
File browser
In the Files area you have a file browser in which you can organise your files so you can find them more easily. You can sort your files into folders and also create subfolders.
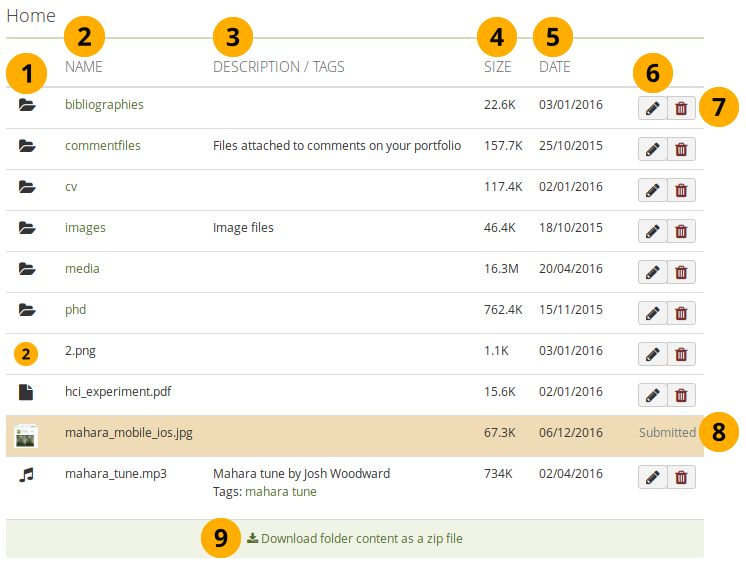
Your file browser
-
Click a file or folder icon and drag and drop it onto a folder to move the file or folder within that folder.
-
Name: You see all your folders and files that are not in folders listed to access them easily.
When you click on the name of an image, you see a preview of it. You are presented with a download option when you click on another file.
-
Description / Tags: View the description and tags of your folders or files to know quickly what the content of them is.
If you do not give an image a description, the file name is used as
alt tagto identify the image when you place it into an image block or display it embedded in text. -
Size: The size of your files and folders is displayed.
-
Date: The date you created a folder or uploaded a file is shown.
-
Click the Edit button to edit folder or file properties. Continue with editing a file.
-
Click the Delete button to delete a file or folder.
A pop-up window requires you to confirm the deletion because you will not be able to recover the file once it is deleted. If you use a file in a journal entry and / or on a page, the warning message tells you that this file is in use elsewhere so that you don’t delete it by accident.
-
If a folder or file is used in a portfolio that has been submitted, you are not able to edit or delete it.
-
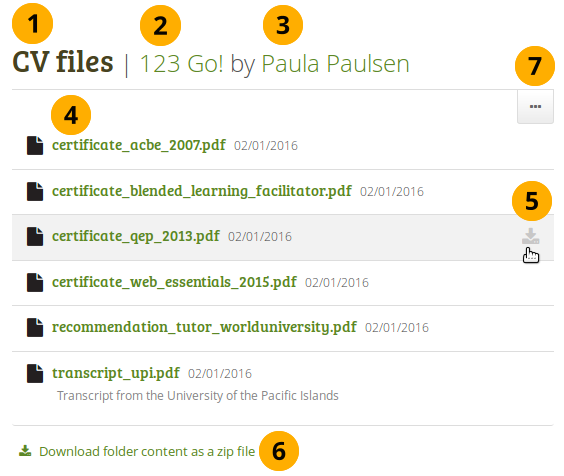
Click the Download folder content as a zip file link in order to get a zip file which contains all files and folders of the current folder.
Site administrators decide in the Artefact type: File settings for how long the zip file is kept on the server.
Upload a file
Before you upload a file, make sure that you are allowed to do so. For any artefacts that you publish in your portfolio, you must have the sufficient rights. That means:
-
the artefact is your own or
-
you are allowed to reproduce and distribute it, i.e. it does not violate any copyright legislation and
-
the artefact also adheres to the Terms and Conditions of the Folioz
It can be that you have to agree to an upload agreement before you can upload any files to your Files area. The site administrator decides about that in Administration menu → Extensions → Plugin administration → Plugin type: artefact: file.
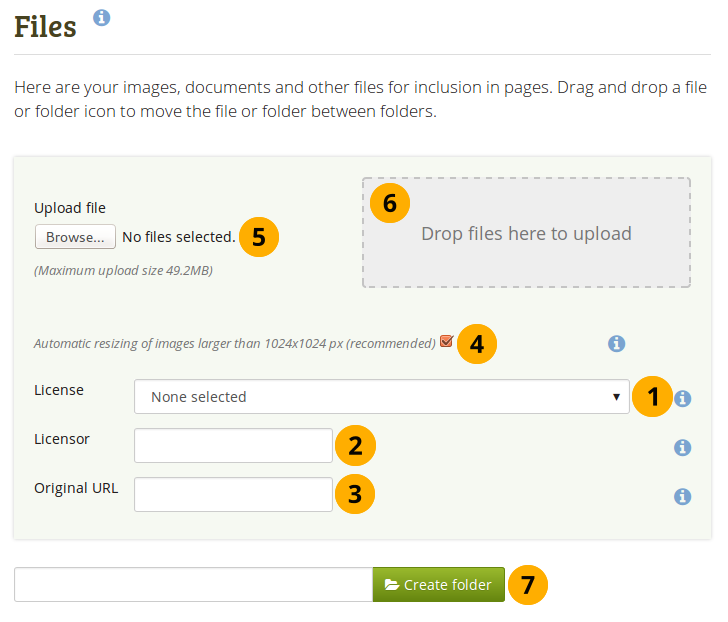
Upload a file
-
License: You see this field if the site administrator turned on license metadata. Choose the license for the artefact that you are about to upload. You can set your default license in your account settings.
-
Licensor: You see this field if the site administrator turned on license metadata. If you are uploading a file that somebody else created, you can attribute the work to them here and provide their name for example.
-
Original URL: You see this field if the site administrator turned on license metadata. If you are uploading somebody else’s file, provide a link to the original Internet address so that others can go there and view the original file.
-
If the site administrator turned on the image resizing option, you can decide whether you want to have your images resized if they are larger than the specified dimensions. This option is recommended to save space in your portfolio.
-
Upload file: Upload a file by clicking on the Browse button to search for the file on your computer. Make sure that it is not larger than the maximum upload size that is shown in the parentheses.
-
Instead of clicking the Browse button to upload files, you can drag and drop files from your computer directly onto the “drop zone”. You must still observe the maximum file size upload for each file and the maximum total file size cannot be exceeded either.
This functionality is not available in all browsers. Generally, users of Chrome 7+, Firefox 4+, Internet Explorer 10+, Opera 12+ (Windows only) and Safari 6+ can use drag and drop.
You can drag and drop an entire folder without zipping it into the Files area using Chrome. The files are uploaded, but not the folder itself. So if all files should be in a separate folder, create a folder in Folioz first. This feature does not exist in Firefox and Safari.
-
Type the folder name and click the Create folder button if you want to create a folder before uploading files. Click the folder to upload files directly into it.
Upload multiple files
You can upload multiple files at once in three different ways:
-
You can upload multiple files when you are browsing for them after having clicked the Browse button. Hold down the Ctrl key (or Command key on a Mac) and click on all the files that you wish to upload at once.
-
You can drag and drop multiple files into the drop zone.
-
You can also place all files into a compressed file, a .zip file, and upload that to Folioz. This method allows you to upload multiple files from different folders on your computer at once. You can create a zip file from any number of files that you have selected in your document management program by making a right mouse click and selecting Compress… (or something similar).
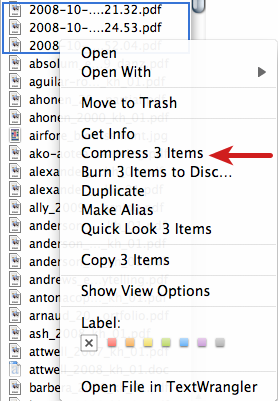
Zip files in the Finder under MacOSX
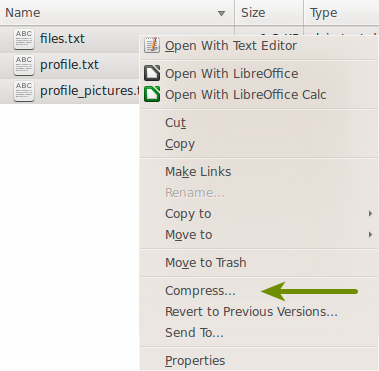
Zip files in Ubuntu’s Nautilus
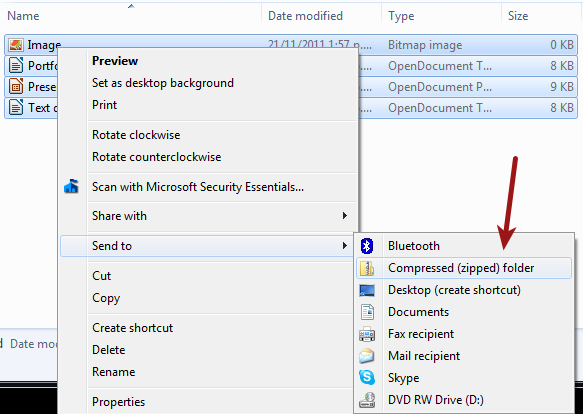
Zip files in Windows Explorer
Once you have uploaded your zip file to Folioz, you can unzip it there. Click on the Unzip button next to the Edit button . Please follow the on-screen instructions.
Edit a file or folder
You can edit the properties of a file or folder at any time. The file does not have to be re-linked in portfolio pages, but the properties you changed will be updated automatically.

Edit a file
-
Click the Edit button to edit folder or file properties.
-
Name: Change the name of the file (or folder). It is not necessary to keep the file extension as Folioz stores it internally. However, it can be good to leave it in case somebody has problems opening the file if no default programme is associated with the file after downloading it. This field is mandatory and each file (or folder) must have a name.
-
Description: Give the file (or folder) a description to find it again more easily.
If you do not give an image a description, the file name is used as
alt tagto identify the image when you place it into an image block or display it in text. -
Tags: Give the file (or folder) one or more tags. You can choose from your existing tags by starting to type a letter and then selecting the tag you want to use. You can also type a new tag, and it is added to your list of tags.
You can find more information on how to use the tag selector in the “Tags” section.
-
License: You see this field if the site administrator turned on license metadata. Choose the license for the artefact that you are editing.
-
Licensor: You see this field if the site administrator turned on license metadata. If you are editing a file that somebody else created, you can attribut the work to them here and provide their name for example.
-
Original URL: You see this field if the site administrator turned on license metadata. If you are editing somebody else’s file, provide a link to the original Internet address so that others can go there and view the original file.
-
Allow comments: Decide if users should be allowed to comment directly on the file artefact page when they view it.
-
Click the Save changes button to keep your changes or click Cancel to abort the action.
Rotate an image
When you upload images directly from a mobile device, the orientation may not be correct, and a landscape image might be displayed in portrait mode. By rotating the image in Folioz on the fly, you can correct its orientation.
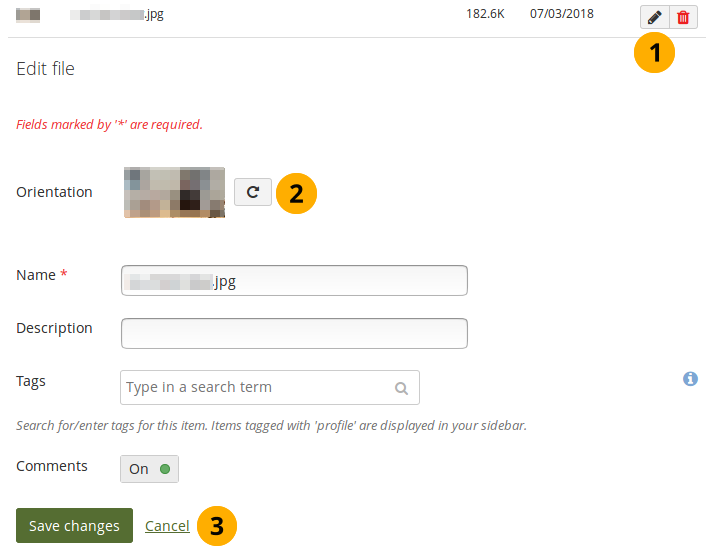
Rotate an image
-
Click the Edit button next to the image that you want to rotate.
-
Orientation: Click the Rotate button until you reach the desired orientation. The new orientation is applied wherever that image is used in blocks on a page.
-
Click the Save changes button to keep your changes or click Cancel to abort the action.
File quota
The default file storage quota size is 50 megabytes. If arrangements have been made with your institution it could be higher.

File quota
Blocks
Blocks for internal and external artefacts are used to compose portfolio pages and group pages. Content of blocks can be shown on a page immediately, or just the block’s heading can be displayed. The retractable blocks allow you to be more flexible in what you want to show immediately on a page. If you choose not to give a block a title, you cannot retract that block as there would be no place to unretract it. When you started editing information in a block and you navigate away from it accidentally without having saved your block, you are being asked whether you wish to stay on the page or leave the page.
Content chooser
All different types of content as well as blocks that pull in external content into a portfolio page are accessible via the content chooser.
The content chooser is available on the left-hand side of a page when you are in the edit mode. It does not scroll. Thus, it makes it easy to add content items also further down on the page.
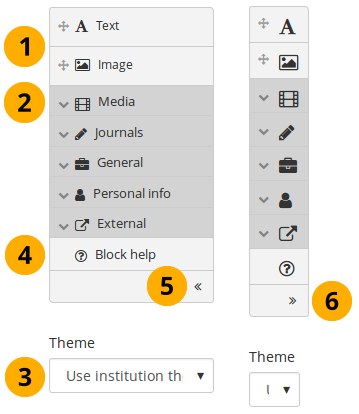
All content items are accessible in the content chooser
-
You can select the Text or the Image block directly as these are two of the more frequently used content items.
You may see additional or different blocks in this list of frequently used content items as it is up to the administrator of the site that you use which blocks to display here. There is an API available to make adding different items easier.
-
You can access all other content items via the individual panels:
- Media: holds blocks for files that can be displayed as links, in folders or in the case of images and videos directly in the page
- Journals: various content blocks which allow you to place journals / journal entries into a page
- General: content items that are of a general nature
- Personal info: choose profile information or your résumé to display in a block
- External: contains blocks to place RSS feeds, external media or GoogleApps documents etc. into a page
The functionality of each block that you can use in your portfolio pages and in group pages is outlined in the section on the individual artefact blocks.
-
Theme: You may be able to choose a theme for your portfolio page. If that is the case, you see the Theme drop-down menu. That allows you to select a theme in which that page is displayed to others who view your portfolio page.
The site administrator must allow page themes in the site’s user settings for this option to be available.
-
Click the Block help icon to be taken to the manual’s block section for the version of Mahara that you are using.
-
Click the arrow pointing to the left to reduce the size of the content chooser. Only the icons will be displayed giving you more space on a page.
-
Click the arrow pointing to the right to show the block descriptions in the content chooser.
The content chooser is displayed per default only with its icons shown on small devices to maximize the screen size that is available to edit a page.
Files, images and video
These artefacts are internal Folioz ones to display:
- links to files that you have uploaded
- folders that contain files
- show images
- embed audio and video files
If you are on a mobile device and select to upload a file, you can take a photo or make a video or audio recording (Android only for audio) directly.
Embedded media
Display an embedded video or audio file from your uploaded files. Mahara comes with the Video.js media player that allows for the display of a number of file formats without having another player installed on the device.
The site administrator must allow media formats. Some of them can be displayed directly within Mahara while others need additional software installed on a device. See the list of allowed media formats.
Videos placed onto a page in this block scale to the width of their column. They also scale automatically when your browser space gets smaller.
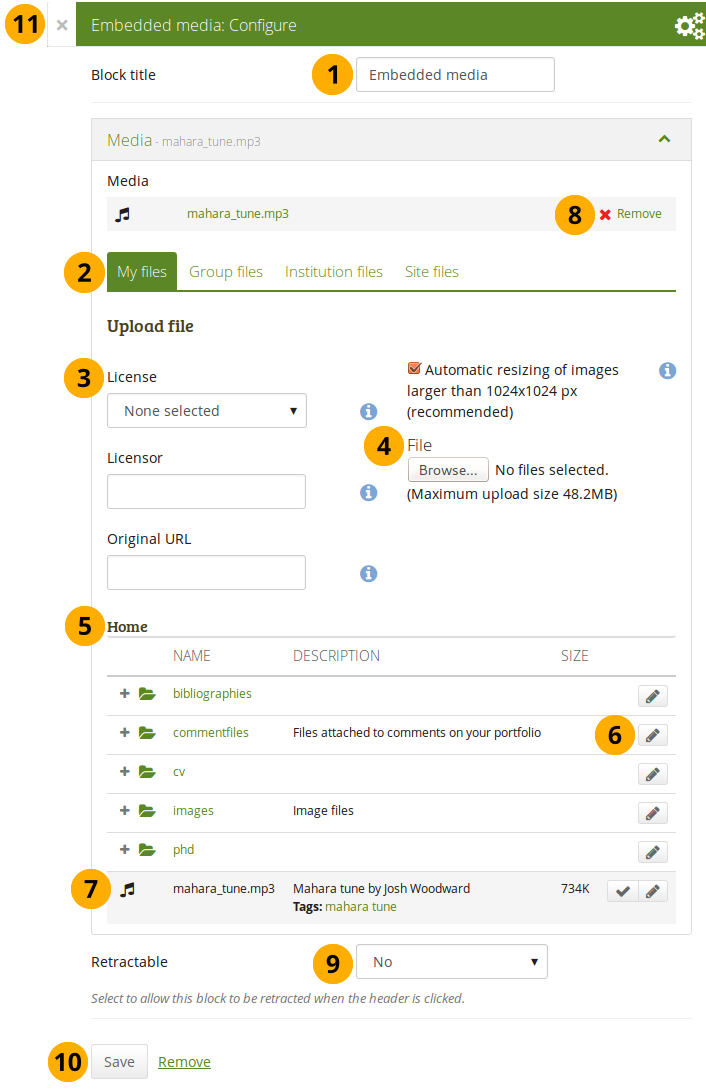
Configure the Embedded media block
-
Block title: Choose a title for your block.
-
Files area: Choose from which files area you would like to select a media file:
- My files: You see all the folders and files that you have created.
- Group files: You see all the folders and files that you are allowed to publish.
- Institution files: If you are an institution administrator, you will see institution folders and files.
- Site files: If you are a site administrator, you will see all site folders and files. Otherwise, you can only see the ones that are in the folder public in the Site files.
-
License information: You see these fields if the site administrator turned on license metadata. Additionally, if you are in an institution, your institution administrator may require you to provide a license.
- License: Your default license is displayed. You can set your default license in your account settings. You may choose a different license for each individual artefact.
- Licensor: If you are uploading a file that somebody else created, you can attribute the work to them here and provide their name for example.
- Original URL: If you are uploading somebody else’s file, provide a link to the original Internet address so that others can go there and view the original file.
-
File: You do not have to go back to your Files area in Create in order to upload a file. You can do so directly from this screen.
-
Folder path: The breadcrumbs show in which folder you are currently.
-
Click the Edit button to change any component of a folder or file, i.e. its name, description and tags. If you have a folder or file included in a page that you submitted for feedback, you will not be able to edit them.
You can still select files that have been submitted in another portfolio page.
-
Click into the row that contains the file you wish to display in the block to select it or click the Select button .
When you place group, institution or site files into a page, beware that these files may not be available at some point anymore when the person in charge deletes them.
-
Click Remove if you want to revert your selection.
-
Retractable: Choose whether you want to allow users to reduce the block to its heading on a page or see just the heading only automatically. The options are:
- No: The block and its content is displayed at all times.
- Yes: Allow users to reduce the block to just the heading by clicking the Retractable icon .
- Automatically retract: Only the heading of the block is visible, and the user can click the Retracted icon to view its content.
-
Click the Save button to accept your changes, or click Cancel to leave the block’s content as it is. Remove is shown only when you place the block into the page for the first time.
-
You can also click the Close button in the top left-hand corner of the modal window to either remove a newly created block before it is being saved or to cancel any changes and leave the block’s content as it is.
Only the files that you are allowed to embed are displayed. If you uploaded a mp4 file but it does not show here, you may have to check if it has the correct codec. Only H.264 mp4 files can be embedded.
iOS devices can even be trickier as these devices may only recognize the MPEG4 “Baseline” profile rather than the “High” profile. You can read the Apple specifications and convert a video if needed using Handbrake. Newer iOS devices (from the iPhone 5S on) should play “High” profile videos.
File(s) to download
Select files that viewers of your portfolio can download.
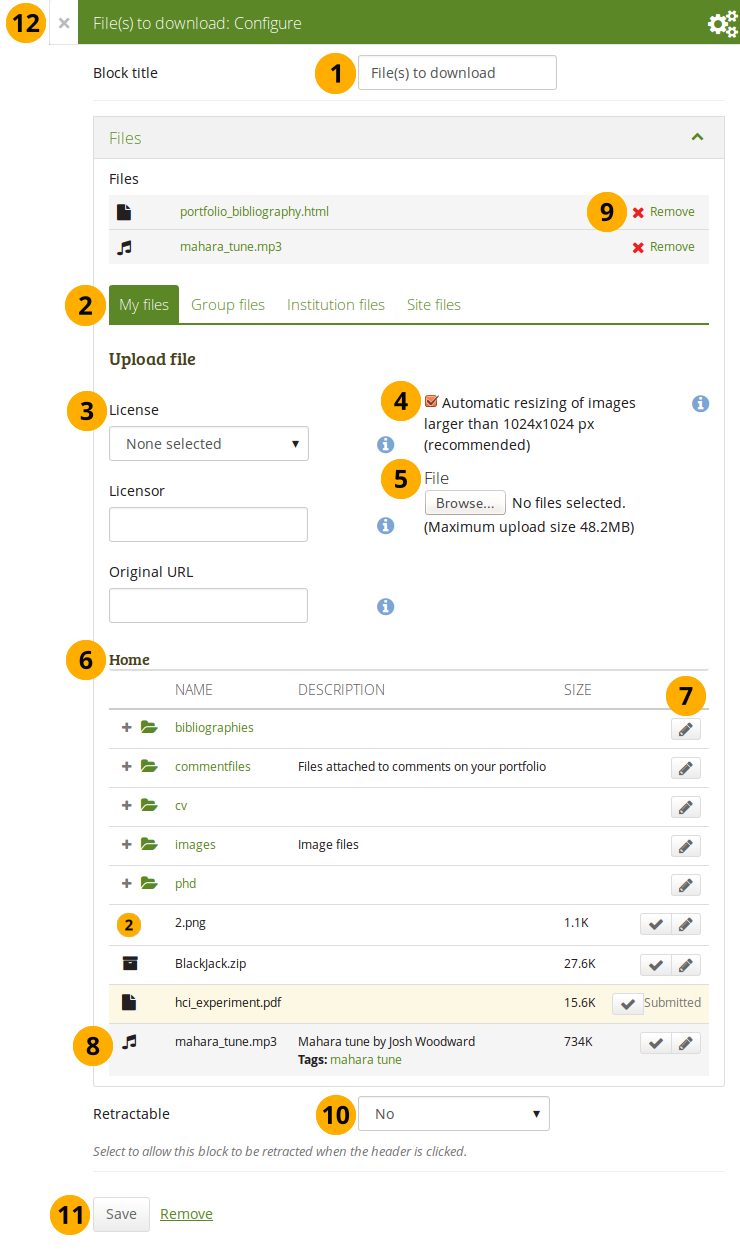
Configure the File(s) to download block
-
Block title: Choose a title for your files block.
-
Files area: Choose from which files area you would like to select a file:
- My files: You see all the folders and files that you have created.
- Group files: You see all the folders and files that you are allowed to publish.
- Institution files: If you are an institution administrator, you will see institution folders and files.
- Site files: If you are a site administrator, you will see all site folders and files. Otherwise, you can only see the ones that are in the folder public in the Site files.
-
License information: You see these fields if the site administrator turned on license metadata. Additionally, if you are in an institution, your institution administrator may require you to provide a license.
- License: Your default license is displayed. You can set your default license in your account settings. You may choose a different license for each individual artefact.
- Licensor: If you are uploading a file that somebody else created, you can attribute the work to them here and provide their name for example.
- Original URL: If you are uploading somebody else’s file, provide a link to the original Internet address so that others can go there and view the original file.
-
If the site administrator turned on the image resizing option, you can decide whether you want to have your images resized if they are larger than the specified dimensions. This option is recommended to save space in your portfolio.
-
File: You do not have to go back to your Files area in Create in order to upload a file. You can do so directly from this screen.
-
Folder path: The breadcrumbs show in which folder you are currently.
-
Click the Edit button to change any component of a folder or file, i.e. its name, description and tags. If you have a folder or file included in a page that you submitted for feedback, you will not be able to edit them.
You can still select files that have been submitted in another portfolio page.
-
Click into the row that contains the file you wish to display in the block to select it or click the Select button .
When you place group, institution or site files into a page, beware that these files may not be available at some point anymore when the person in charge deletes them.
-
Click Remove if you want to revert your selection.
-
Retractable: Choose whether you want to allow users to reduce the block to its heading on a page or see just the heading only automatically. The options are:
- No: The block and its content is displayed at all times.
- Yes: Allow users to reduce the block to just the heading by clicking the Retractable icon .
- Automatically retract: Only the heading of the block is visible, and the user can click the Retracted icon to view its content.
-
Click the Save button to accept your changes, or click Cancel to leave the block’s content as it is. Remove is shown only when you place the block into the page for the first time.
-
You can also click the Close button in the top left-hand corner of the modal window to either remove a newly created block before it is being saved or to cancel any changes and leave the block’s content as it is.
You cannot re-order files once you have selected them. You would need to remove them and select them again in the correct order.
When the block is placed on the portfolio page, you can view more information or download the files.
- file name
- file description
- size
- upload date
- a link to more details
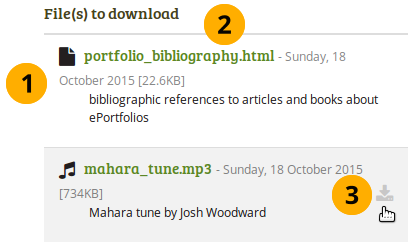
Details about files that can be downloaded.
- View information about the file:
- file name
- file description
- size
- upload date
- Click the file name to be taken to the details page for this file.
- Hover over a file and click anywhere into the row or on the download icon to download the file.
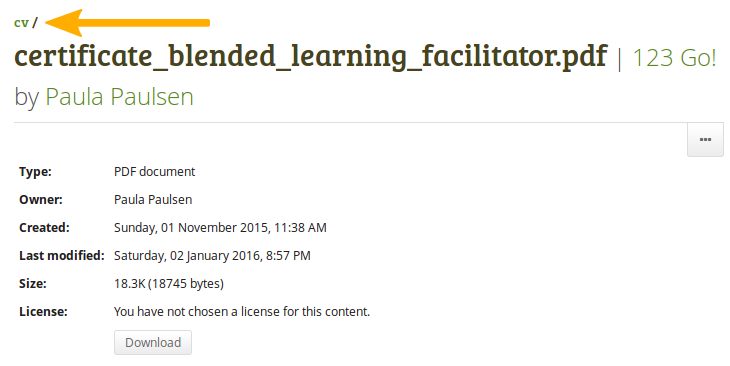
When you click the file name, you are taken to the details page for that particular file and see some more metadata.

More details about a file that can be downloaded.
- The name of the file is displayed.
- The title of the page in which the artefact appears is linked.
- The author of the page is displayed and a link to the profile page provided.
- Additional metadata is displayed for the file:
- file type
- description
- tags
- owner
- creation date
- last modified date
- size
- license (if license information is turned on by the site administrator)
- Click the Download button to download the file to your computer.
- If the owner of the file allowed comments, you can comment directly on the file.
- Click the More options button to reach lesser used functionality:
- Add the page that contains the file to your watchlist or remove it.
- Report the file as containing objectionable content.
Folder
Select a folder to display all files within it as links on your page.
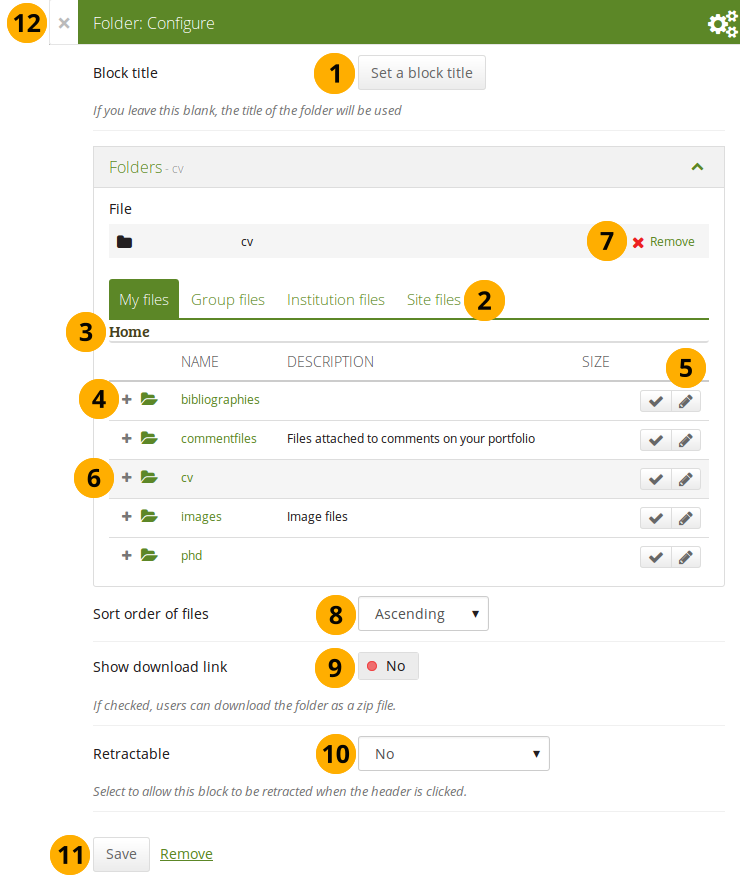
Configure the Folder block
-
Block title: If you do not set a title, the name of the folder that you choose to display will be used.
-
Files area: Choose from which files area you would like to select a folder:
- My files: You see all the folders and files that you have created.
- Group files: You see all the folders and files that you are allowed to publish.
- Institution files: If you are an institution administrator, you will see institution folders and files.
- Site files: If you are a site administrator, you will see all site folders and files. Otherwise, you can only see the ones that are in the folder public in the Site files.
-
Folder path: The breadcrumbs show in which folder you are currently.
-
Click the Expand icon if you want to reach a sub folder.
-
You can edit any component of the folder, i.e. its name, description and tags by clicking the Edit button .
-
Click into the row that contains the folder you wish to display in the block to select it or click the Select button .
You can also still select folders that have been submitted in another portfolio page.
-
Click Remove if you wish to revert your choice.
-
Sort order of files: Decide on the sort order of files in the block when they are displayed on the page. You can choose between:
- Ascending
- Descending
Site administrators decide on the default sort order of content within folder in the Blocktype: File / folder settings.
-
Show download link: Switch this option to “Yes” if you wish to allow the viewers of your page to download the folder contents as zip file.
Site administrators decide in the Blocktype: File / folder settings whether users are allowed to display the download link or not.
-
Retractable: Choose whether you want to allow users to reduce the block to its heading on a page or see just the heading only automatically. The options are:
- No: The block and its content is displayed at all times.
- Yes: Allow users to reduce the block to just the heading by clicking the Retractable icon .
- Automatically retract: Only the heading of the block is visible, and the user can click the Retracted icon to view its content.
-
Click the Save button to accept your changes, or click Cancel to leave the block’s content as it is. Remove is shown only when you place the block into the page for the first time.
-
You can also click the Close button in the top left-hand corner of the modal window to either remove a newly created block before it is being saved or to cancel any changes and leave the block’s content as it is.
When you place a folder with group, institution or site files into a page, beware that these files may not be available at some point anymore when the person in charge deletes them.
You can see information about the folder as well as the files contained within it when the block is placed on a page.
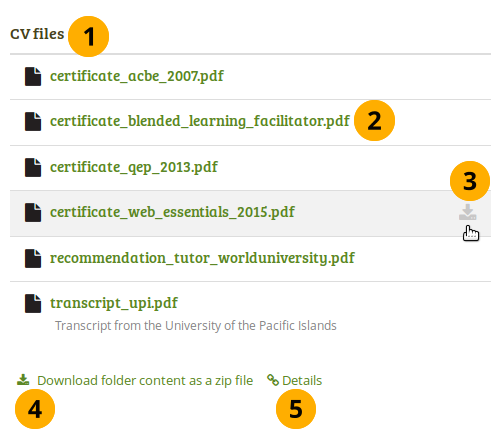
“Folder” block on a page
- Block title.
- Click the file name to be taken to the details page for this file.
- Hover over the file and click anywhere into the row or on the Download icon to download the file.
- Click the Download folder content as zip file to download all files in one go to your computer.
- Click the Details link Details to be taken to the details page for the block.
On the details page for the Folder block you see the following.
Details page of a “Folder” block
- Block title.
- The title of the page in which the block appears is linked.
- The author of the page is displayed and a link to the profile page provided.
- Click the file name to be taken to the details page for this file.
- Hover over the file and click anywhere into the row or on the Download icon to download the file.
- Click the Download folder content as zip file to download all files in one go to your computer.
- Click the button with the three dots to reach lesser used functionality:
- Add the page that contains the file to your watchlist or remove it.
- Report the file as containing objectionable content.
When you clicked on a file, you are taken to that file’s details page. You always see which folder contains the file.
Details page of a file within a “Folder” block
Image
Display a single image in a block.
In a default Mahara instance, this block is available in the content chooser at the top together with the simple Text block. It does not appear in the section Media as well.
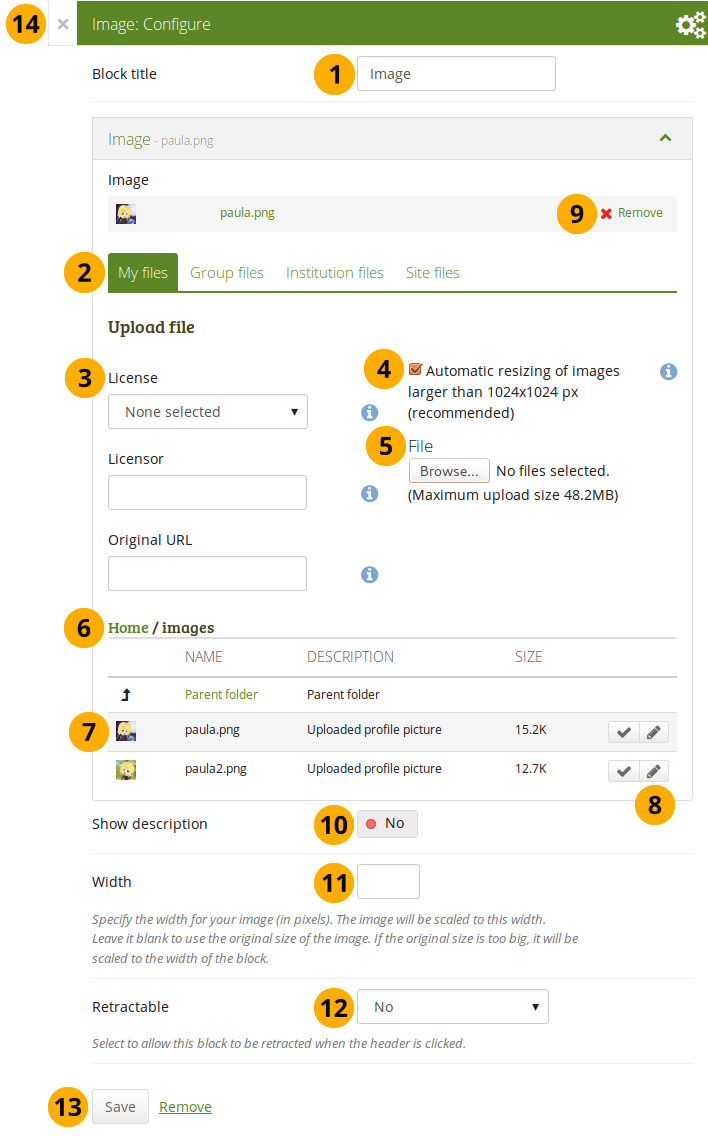
Configure the Image block
-
Block title: Choose a title for your block.
-
Files area: Choose from which files area you would like to select an image:
- My files: You see all the folders and files that you have created.
- Group files: You see all the folders and files that you are allowed to publish.
- Institution files: If you are an institution administrator, you will see institution folders and files.
- Site files: If you are a site administrator, you will see all site folders and files. Otherwise, you can only see the ones that are in the folder public in the Site files.
-
License information: You see these fields if the site administrator turned on license metadata. Additionally, if you are in an institution, your institution administrator may require you to provide a license.
- License: Your default license is displayed. You can set your default license in your account settings. You may choose a different license for each individual artefact.
- Licensor: If you are uploading a file that somebody else created, you can attribute the work to them here and provide their name for example.
- Original URL: If you are uploading somebody else’s file, provide a link to the original Internet address so that others can go there and view the original file.
-
If the site administrator turned on the image resizing option, you can decide whether you want to have your images resized if they are larger than the specified dimensions. This option is recommended to save space in your portfolio.
-
File: You do not have to go back to your Files area in Create in order to upload a file. You can do so directly from this screen.
-
Folder path: The breadcrumbs show in which folder you are currently.
-
Click into the row that contains the file you wish to display in the block to select it or click the Select button . You only see image files that you are allowed to use in the block.
When you place group, institution or site files into a page, beware that these files may not be available at some point anymore when the person in charge deletes them.
-
Click the Edit button to change any component of a folder or file, i.e. its name, description, rotation, and tags. If you have a folder or file included in a page that you submitted for feedback, you will not be able to edit them.
You can still select files that have been submitted in another portfolio page.
If you rotate an image via this dialogue, it will be rotated in all other places where it is used as well.
-
Click Remove if you want to revert your selection.
-
Show description: Set the switch to “Yes” if you wish to display the description of your photo. It could contain the source of it for example.
-
Width: Choose the width (in pixels) for your image. If you do not provide a number, the image will be scaled to the width of the block.
-
Retractable: Choose whether you want to allow users to reduce the block to its heading on a page or see just the heading only automatically. The options are:
- No: The block and its content is displayed at all times.
- Yes: Allow users to reduce the block to just the heading by clicking the Retractable icon .
- Automatically retract: Only the heading of the block is visible, and the user can click the Retracted icon to view its content.
-
Click the Save button to accept your changes, or click Cancel to leave the block’s content as it is. Remove is shown only when you place the block into the page for the first time.
-
You can also click the Close button in the top left-hand corner of the modal window to either remove a newly created block before it is being saved or to cancel any changes and leave the block’s content as it is.
Image gallery
Select a folder with images or individual images to show in a gallery or embed an external image gallery.
Image gallery with uploaded images
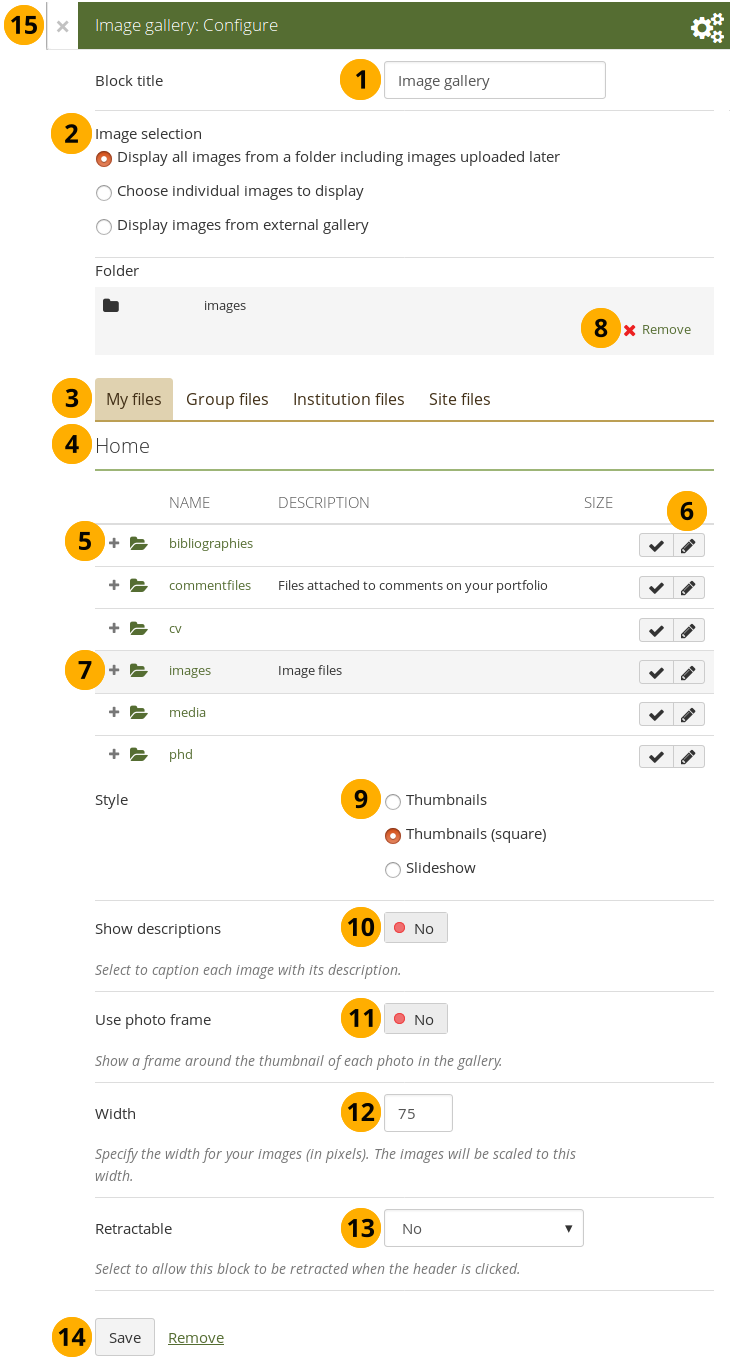
Configure the Image gallery block with internal images
-
Block title: Choose a title for your image gallery block.
-
Image selection: You can choose to display all images from a specific folder or you can select the images individually. See embedding images from an external gallery for that option.
If you choose to display an image gallery based on a folder and you rename images within that folder, they will be reordered accordingly.
-
Files area: Choose from which files area you would like to select an image:
- My files: You see all the folders and files that you have created.
- Group files: You see all the folders and files that you are allowed to publish.
- Institution files: If you are an institution administrator, you will see institution folders and files.
- Site files: If you are a site administrator, you will see all site folders and files. Otherwise, you can only see the ones that are in the folder public in the Site files.
-
Folder path: The breadcrumbs show in which folder you are currently.
-
Click the Expand icon if you want to reach a sub folder.
-
Click the Edit button to change any component of the folder, i.e. its name, description and tags. If you have a folder or file included in a page that you submitted for feedback, you will not be able to edit the file.
-
Click into the row that contains the folder or image you wish to display in the block to select it or click the Select button . You only see image files that are allowed to be used in the block. You can also still select folders or files that have been submitted in another portfolio page.
If you selected to display an entire folder in your image gallery, new images that you upload to that folder are added to your gallery automatically.
-
Click Remove if you want to revert your selection.
-
Style: Decide to show all selected images as thumbnails or as slideshow where you only see one image at a time. If you select the option “Thumbnails (square)”, all your images will be displayed in the same size as thumbnails.
If you select to display your images in a slideshow, you can navigate all images with the help of the icons Next and Previous . Use the icons First and Last to start or end your slideshow.
-
Show descriptions: Turn this option on if you want to display the image descriptions in the gallery.
-
Use photo frame: Using this option will put a frame around each photo.
-
Width: Specify the width (in pixels) for your images. The images are scaled to this width.
-
Retractable: Choose whether you want to allow users to reduce the block to its heading on a page or see just the heading only automatically. The options are:
- No: The block and its content is displayed at all times.
- Yes: Allow users to reduce the block to just the heading by clicking the Retractable icon .
- Automatically retract: Only the heading of the block is visible, and the user can click the Retracted icon to view its content.
-
Click the Save button to accept your changes, or click Cancel to leave the block’s content as it is. Remove is shown only when you place the block into the page for the first time.
-
You can also click the Close button in the top left-hand corner of the modal window to either remove a newly created block before it is being saved or to cancel any changes and leave the block’s content as it is.
When you place group, institution or site files into a page, beware that these files may not be available at some point anymore when the person in charge deletes them.
Image gallery from external images
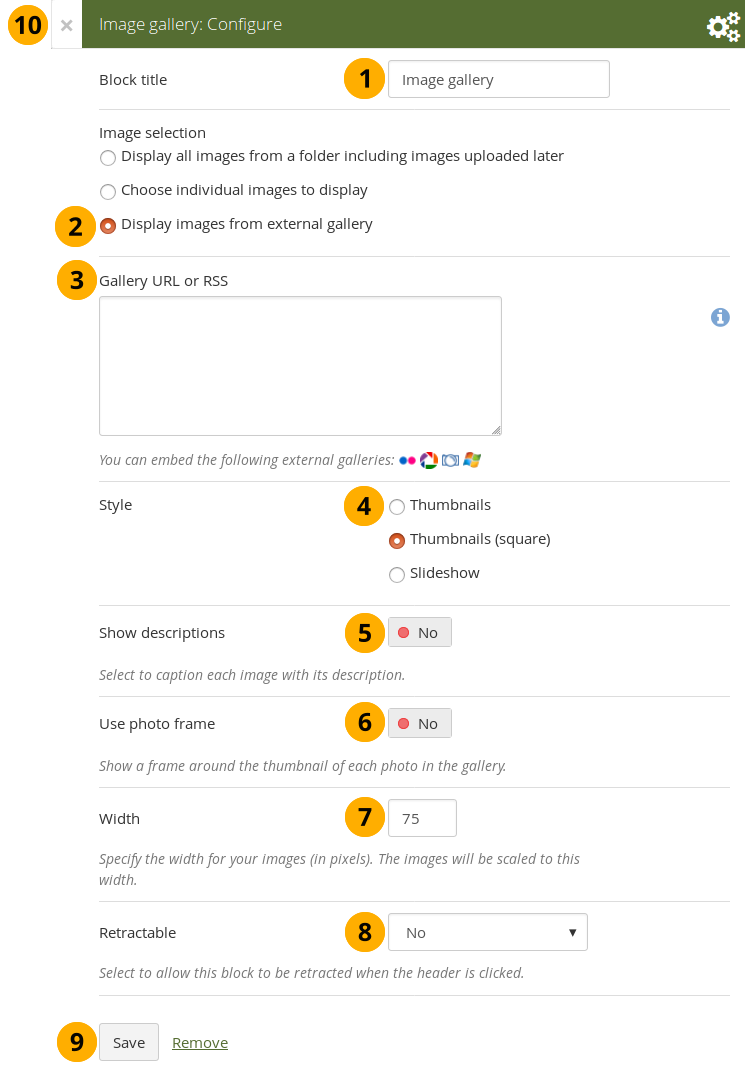
Configure the Image gallery block with external images
-
Block title: Choose a title for your image gallery block.
-
Image selection: Select the option “Display images from external gallery”.
-
Gallery URL or RSS: Copy the link to the external gallery and past it into the text box. You can embed the following external galleries:
- Flickr, e.g. https://www.flickr.com/photos/12345678@N01/sets/98765432123456789/
- Photobucket, e.g. http://s1234.photobucket.com/albums/ee123/username/ or http://s1234.photobucket.com/albums/ee123/username/AlbumName/
- Picasa, e.g. http://picasaweb.google.com/user.name/AlbumName#
- Windows Live Photo Gallery, e.g. http://cid-123456ab7890cd12.photos.live.com/self.aspx/AlbumName/photo.jpg
- To use Flickr, the site administrator has to provide a valid API key.
- To use Photobucket, the site administrator has to provide a valid API key and a secret API key.
- For Windows Live Photo Gallery to work properly, the link to one of the photos inside the album must be copied and pasted into the text box in order to show the entire album.
-
Style: Decide to show all selected images as thumbnails or as slideshow where you only see one image at a time. If you select the option “Thumbnails (square)”, all your images will be displayed in the same size as thumbnails.
-
Show descriptions: Turn this option on if you want to display the image descriptions in the gallery.
-
Use photo frame: Using this option will put a frame around each photo.
-
Width: Specify the width (in pixels) for your images. The images are scaled to this width.
-
Retractable: Choose whether you want to allow users to reduce the block to its heading on a page or see just the heading only automatically. The options are:
- No: The block and its content is displayed at all times.
- Yes: Allow users to reduce the block to just the heading by clicking the Retractable icon .
- Automatically retract: Only the heading of the block is visible, and the user can click the Retracted icon to view its content.
-
Click the Save button to accept your changes, or click Cancel to leave the block’s content as it is. Remove is shown only when you place the block into the page for the first time.
-
You can also click the Close button in the top left-hand corner of the modal window to either remove a newly created block before it is being saved or to cancel any changes and leave the block’s content as it is.
Embed PDFs into a page.
Configure the PDF block
-
Block title: Choose a title for your PDF block.
-
Files area: Choose from which files area you would like to select a file:
- My files: You see all the folders and files that you have created.
- Group files: You see all the folders and files that you are allowed to publish.
- Institution files: If you are an institution administrator, you will see institution folders and files.
- Site files: If you are a site administrator, you will see all site folders and files. Otherwise, you can only see the ones that are in the folder public in the Site files.
-
License information: You see these fields if the site administrator turned on license metadata. Additionally, if you are in an institution, your institution administrator may require you to provide a license.
- License: Your default license is displayed. You can set your default license in your account settings. You may choose a different license for each individual artefact.
- Licensor: If you are uploading a file that somebody else created, you can attribute the work to them here and provide their name for example.
- Original URL: If you are uploading somebody else’s file, provide a link to the original Internet address so that others can go there and view the original file.
-
File: You do not have to go back to your Files area in Create in order to upload a file. You can do so directly from this screen.
-
Folder path: The breadcrumbs show in which folder you are currently.
-
Click the Expand icon if you want to reach a sub folder.
-
Click the Edit button to change any component of a folder or file, i.e. its name, description and tags. If you have a folder or file included in a page that you submitted for feedback, you will not be able to edit them.
You can still select files that have been submitted in another portfolio page.
-
Click into the row that contains the file you wish to display in the block to select it. You only see PDF files.
When you place group, institution or site files into a page, beware that these files may not be available at some point anymore when the person in charge deletes them.
-
Click Remove if you want to revert your selection.
-
Retractable: Choose whether you want to allow users to reduce the block to its heading on a page or see just the heading only automatically. The options are:
- No: The block and its content is displayed at all times.
- Yes: Allow users to reduce the block to just the heading by clicking the Retractable icon .
- Automatically retract: Only the heading of the block is visible, and the user can click the Retracted icon to view its content.
-
Click the Save button to accept your changes, or click Cancel to leave the block’s content as it is. Remove is shown only when you place the block into the page for the first time.
-
You can also click the Close button in the top left-hand corner of the modal window to either remove a newly created block before it is being saved or to cancel any changes and leave the block’s content as it is.
Once the PDF is embedded on a page, you can scroll through it and also download it for example. The PDF is displayed in its best possible fit to show one page completely.
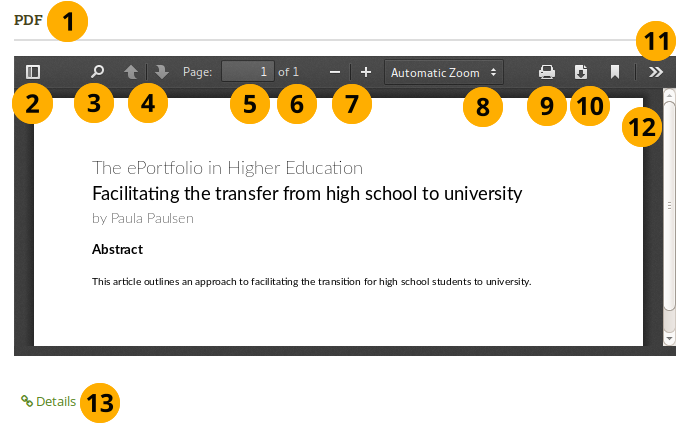
Embedded PDF on a page
- Title of the block.
- Toggle to the sidebar where you can jump from one page to another either in the thumbnail or document outline view.
- Click the Search icon to search within the document.
- You can move to the previous or next page using the Arrow icons.
- The number of the current page is displayed. You can put a different number in and hit the Enter or Tab key and jump to that directly.
- The total number of pages is shown.
- Decrease the page size by clicking the Minus, or increase the page size by clicking the Plus. The block size does not increase.
- Use the Automatic zoom drop-down menu to choose a different zoom size instead of using the Plus and Minus buttons.
- Click the Print icon
 to print the PDF.
 - Click the Download icon
 to download the PDF to your computer. The suggested file name is the one the file has on the site.
 - Click the Tools icon
 to see more options available for this PDF.
 - Use the scrollbar to move through the document.
- Click the Details link Details to be taken to the details page for the block.
If you have trouble embedding a PDF file, you might have come across an issue that others have also experienced. The mimetype of the PDF may not be recognized correctly. The correct “mimetype” is “pdf”, but programmes can circumvent using this mimetype for PDFs to ensure that their file is downloaded instead of viewed in the browser for example. There is not an easy fix to this issue, and the discussion of possible solutions has started.
In the meantime, you can delete the incorrect mimetypes from your browser and ensure that only “PDF” is left.
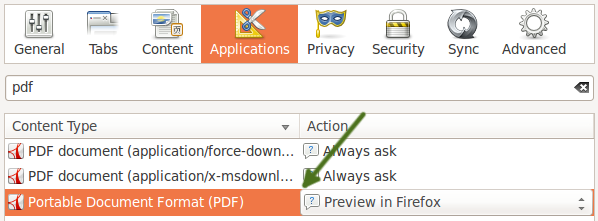
Follow these steps to delete the incorrect mimetypes:
- Close Firefox.
- Locate your profile folder.
- Open the mimeTypes.rdf file in a text editor.
- Search for pdf.
- Leave only the entry that is application/pdf.
- Delete all other PDF references by deleting everything for that entry from
<RDF:Description ...> to </RDF:Description>. - Open Firefox and go to Preferences → Applications.
- Search for pdf. You should now only see one entry that reads “Portable Document Format (PDF)”.
Some HTML
Display the content of an HTML file in a page.
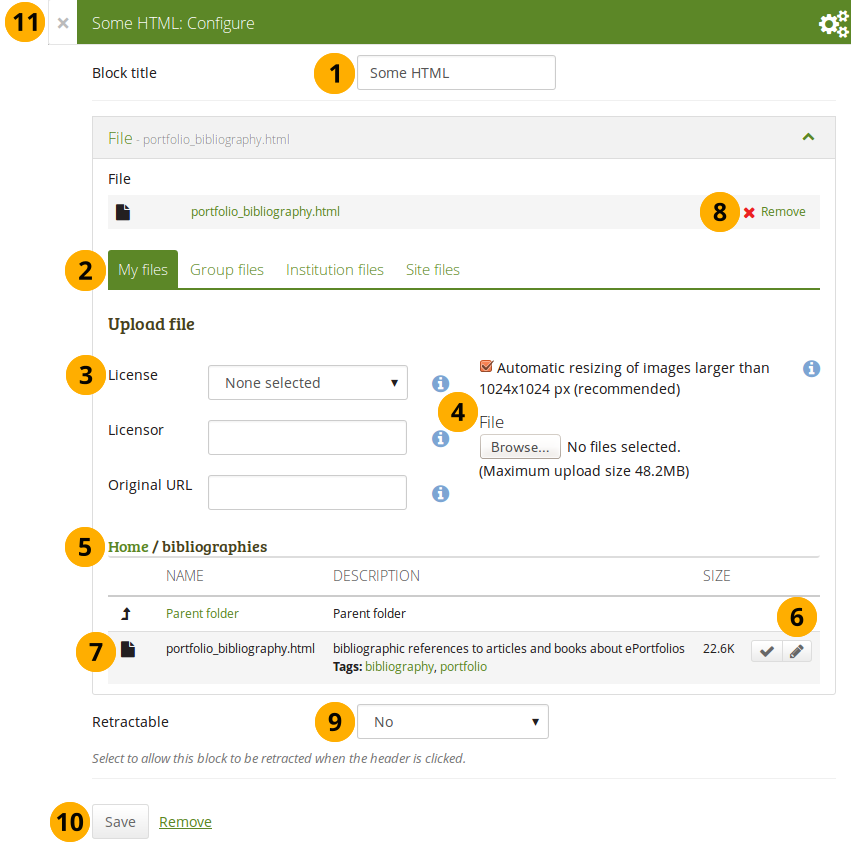
Configure the HTML block
-
Block title: Choose a title for your block.
-
Files area: Choose from which files area you would like to select an HTML file:
- My files: You see all the folders and files that you have created.
- Group files: You see all the folders and files that you are allowed to publish.
- Institution files: If you are an institution administrator, you will see institution folders and files.
- Site files: If you are a site administrator, you will see all site folders and files. Otherwise, you can only see the ones that are in the folder public in the Site files.
-
License information: You see these fields if the site administrator turned on license metadata. Additionally, if you are in an institution, your institution administrator may require you to provide a license.
- License: Your default license is displayed. You can set your default license in your account settings. You may choose a different license for each individual artefact.
- Licensor: If you are uploading a file that somebody else created, you can attribute the work to them here and provide their name for example.
- Original URL: If you are uploading somebody else’s file, provide a link to the original Internet address so that others can go there and view the original file.
-
Upload file: You do not have to go back to your Files area in Create in order to upload a file. You can do so directly from this screen.
-
Folder path: The breadcrumbs show in which folder you are currently.
-
Click the Edit button to change any component of a folder or file, i.e. its name, description and tags. If you have a folder or file included in a page that you submitted for feedback, you will not be able to edit them.
You can still select files that have been submitted in another portfolio page.
-
Click into the row that contains the file you wish to display in the block to select it or click the Select button . You only see HTML files.
When you place group, institution or site files into a page, beware that these files may not be available at some point anymore when the person in charge deletes them.
-
Click Remove if you want to revert your selection.
-
Retractable: Choose whether you want to allow users to reduce the block to its heading on a page or see just the heading only automatically. The options are:
- No: The block and its content is displayed at all times.
- Yes: Allow users to reduce the block to just the heading by clicking the Retractable icon .
- Automatically retract: Only the heading of the block is visible, and the user can click the Retracted icon to view its content.
-
Click the Save button to accept your changes, or click Cancel to leave the block’s content as it is. Remove is shown only when you place the block into the page for the first time.
-
You can also click the Close button in the top left-hand corner of the modal window to either remove a newly created block before it is being saved or to cancel any changes and leave the block’s content as it is.
You can only display a self-contained HTML file in a page, but not an entire site because the links to the files are not retained correctly when you upload files.
Journals
You can embed content from your journals in various ways in a page:
- display an entire journal
- display only one journal entry
- show the latest journal entries
- display journal entries with a specific tag
You must create at least one journal in order to see anything in this block.
You can allow the copying of your journal (entries). Choose this option wisely because once a user copied your journal content into their portfolio, it looks as if they had written the journal entries. This could lead to plagiarism. However, it can be used very nicely to create templates and to scaffold learning.
Journals exist in all areas of Mahara:
- Personal portfolio
- Groups
- Institution level
- Site level
You can display journals or journal entries in these different contexts the following way:
- Personal journals: You can include personal journals and journal entries in your own portfolios and in group portfolios. If somebody else changes the block configuration in a group portfolio, they will not be able to choose your journals or journal entries though. Only you can place them there.
- Group journals: You can display group journals and entries only in the group in which they were created.
- Institution journals: An institution’s journals are only available for inclusion in pages for that institution.
- Site journals: You can add site journals only to site portfolios.
Journal
Display an entire journal on your portfolio page.
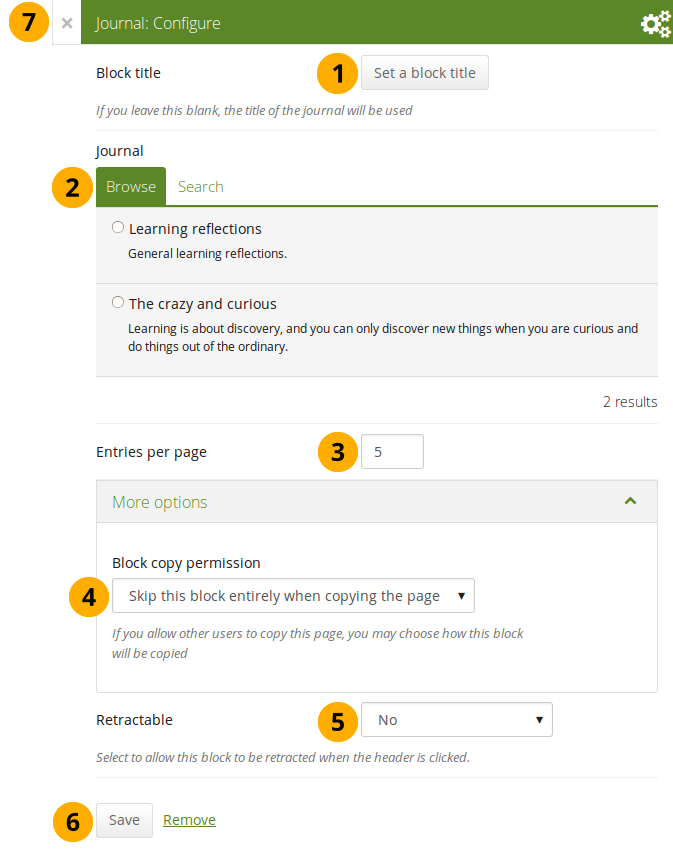
Configure the Journal block
-
Block title: The title for the block is chosen automatically from the title of the journal unless you provide a different one.
-
Journal: Select the journal you wish to display. If you have many journals, you can also search for the one you want to use.
The search is performed in the title, description, and tags.
-
Entries per page: Decide how many entries you want to display. Entries beyond this number are accessible via a navigation bar.
-
Block copy permissions: You decide what shall happen with this block when you allow other users to copy your page. The options are:
- Skip this block entirely when copying the page
- Others may display your journal in their page
- Others will get their own copy of your journal
-
Retractable: Choose whether you want to allow users to reduce the block to its heading on a page or see just the heading only automatically. The options are:
- No: The block and its content is displayed at all times.
- Yes: Allow users to reduce the block to just the heading by clicking the Retractable icon .
- Automatically retract: Only the heading of the block is visible, and the user can click the Retracted icon to view its content.
-
Click the Save button to accept your changes, or click Cancel to leave the block’s content as it is. Remove is shown only when you place the block into the page for the first time.
-
You can also click the Close button in the top left-hand corner of the modal window to either remove a newly created block before it is being saved or to cancel any changes and leave the block’s content as it is.
Once you have included the Journal block into a page, you can create a new journal entry directly from that block when you are in the Edit mode for the page. When you click the New entry button, you will be taken to your journal and a new entry is started for you. It is then added to the journal automatically.
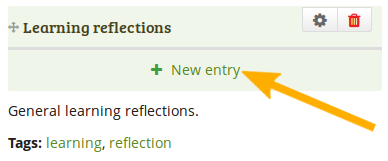
Create a new journal entry directly from the Entire journal block
Journal entry
Display one journal entry on your portfolio page.
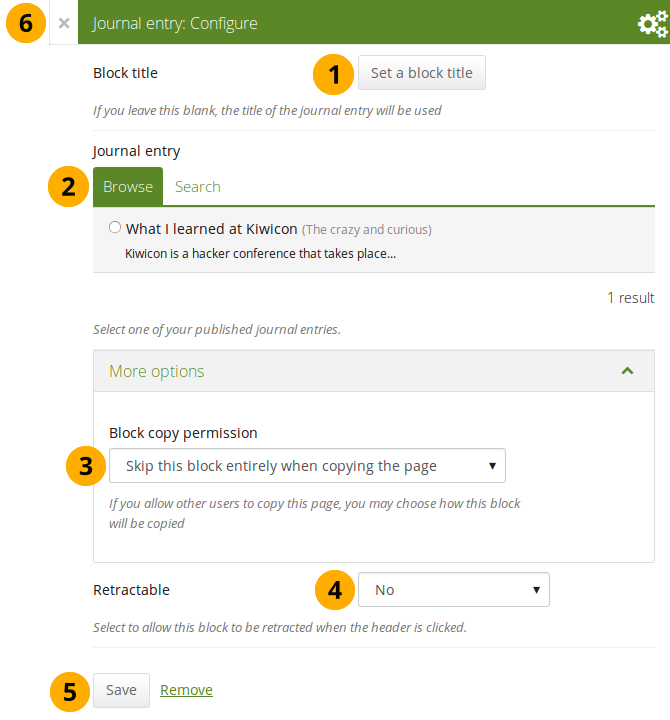
Configure the Journal entry block
-
Block title: The title of the journal entry is chosen automatically unless you provide a different one.
-
Journal entry: Select the journal entry you wish to display. If you have many, you can also search for the one you want to use. You always also see the title of the journal in which the entry appears.
The search is performed in the title, description, and tags.
-
Block copy permissions: You decide what shall happen with this block when you allow other users to copy your page. Options are:
- Skip this block entirely when copying the page
- Others may display your journal entry in their page
- Others will get their own copy of your journal entry
-
Retractable: Choose whether you want to allow users to reduce the block to its heading on a page or see just the heading only automatically. The options are:
- No: The block and its content is displayed at all times.
- Yes: Allow users to reduce the block to just the heading by clicking the Retractable icon .
- Automatically retract: Only the heading of the block is visible, and the user can click the Retracted icon to view its content.
-
Click the Save button to accept your changes, or click Cancel to leave the block’s content as it is. Remove is shown only when you place the block into the page for the first time.
-
You can also click the Close button in the top left-hand corner of the modal window to either remove a newly created block before it is being saved or to cancel any changes and leave the block’s content as it is.
Recent journal entries
Display recent journal entries across all your journals on your portfolio page. You can use this block also in group, institution and site pages.
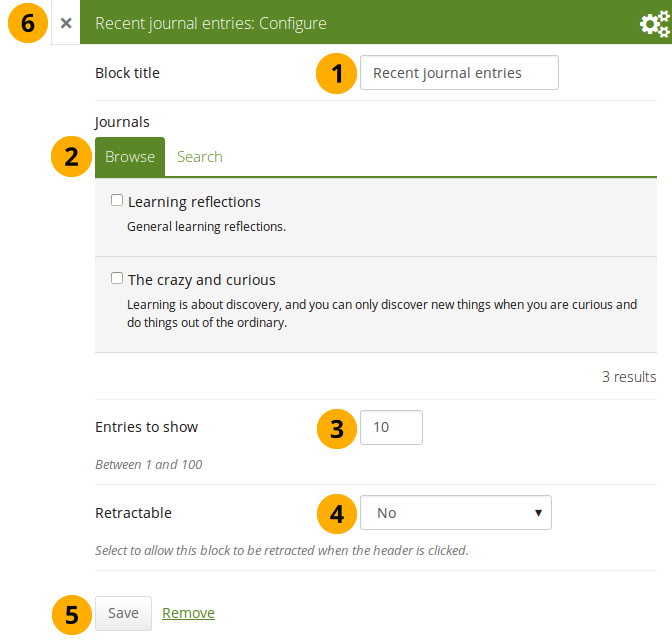
Configure the Recent journal entries block
-
Block title: Choose a title for your block.
-
Journals: Select the journal(s) from which you wish to display the latest entries. If you have many journals, you can also search for the one(s) you want to use.
The search is performed in the title, description, and tags.
-
Entries to show: Decide how many entries you want to display.
-
Retractable: Choose whether you want to allow users to reduce the block to its heading on a page or see just the heading only automatically. The options are:
- No: The block and its content is displayed at all times.
- Yes: Allow users to reduce the block to just the heading by clicking the Retractable icon .
- Automatically retract: Only the heading of the block is visible, and the user can click the Retracted icon to view its content.
-
Click the Save button to accept your changes, or click Cancel to leave the block’s content as it is. Remove is shown only when you place the block into the page for the first time.
-
You can also click the Close button in the top left-hand corner of the modal window to either remove a newly created block before it is being saved or to cancel any changes and leave the block’s content as it is.
If you have multiple journals, you can display recent entries from all of them.
Once you included the Recent journal entries block into a page, you can create a new journal entry directly from that block when you are in Edit mode for the page. When you click the New entry button, you will be taken to your journal, and a new entry is started for you. It is then added to the journal automatically.
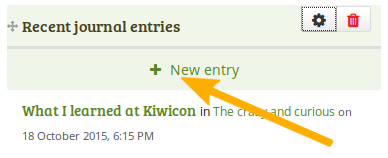
Create a new journal entry directly from the Recent journal entries block - one journal only
If you enabled multiple journals and selected more than one for which to display recent journal entries, you will see a slightly different display.
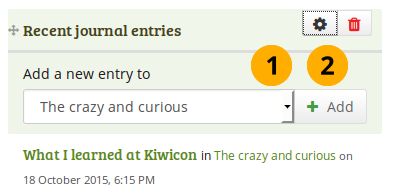
Create a new journal entry directly from the Recent journal entries block - multiple journals available
- Choose the journal to which to add your entry from the drop-down menu.
- Click the Add button to create your new entry.
Tagged journal entries
Display tagged journal entries across all your journals on your portfolio page.
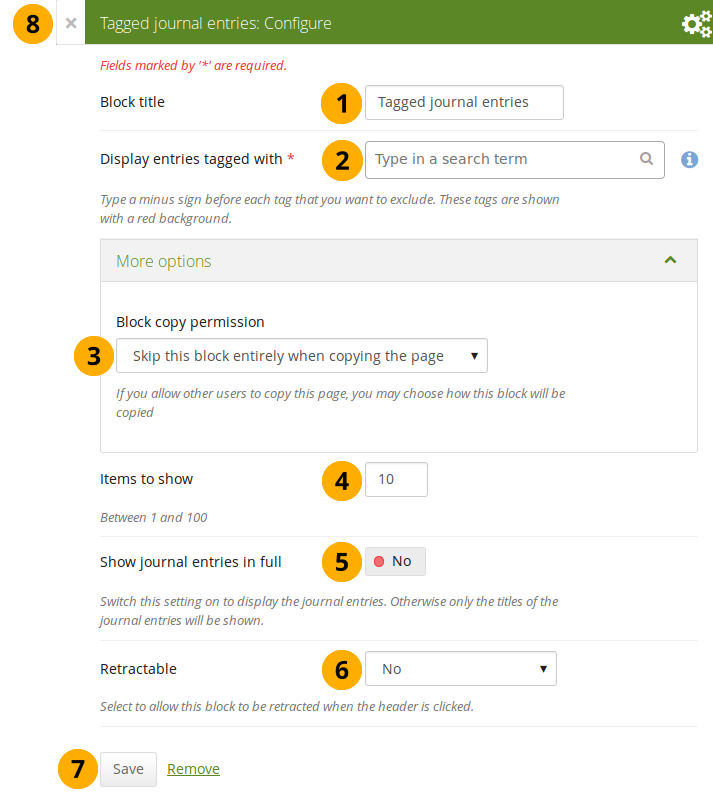
Configure the Tagged journal entries block
- Block title: Choose a title for your block.
- Display entries tagged with: Choose the tags that you want to use to filter all your journal entries for display. Only tags you used on journal entries are available. You can include or exclude tags. See below for more information.
-
Block copy permissions: You decide what shall happen with this block when you allow other users to copy your page. Options are:
- Skip this block entirely when copying the page
- Others will get a copy of the block configuration: The block is copied, but not the journal entries. When the user creates journal entries with the tag(s) used in the block, they will be displayed.
- Items to show: Decide how many entries you want to display.
- Show journal entries in full: If you switch this option to “Yes”, your journal entries will be displayed. Otherwise, only their titles are shown and people need to click on them to read your entries.
-
Retractable: Choose whether you want to allow users to reduce the block to its heading on a page or see just the heading only automatically. The options are:
- No: The block and its content is displayed at all times.
- Yes: Allow users to reduce the block to just the heading by clicking the Retractable icon .
- Automatically retract: Only the heading of the block is visible, and the user can click the Retracted icon to view its content.
- Click the Save button to accept your changes, or click Cancel to leave the block’s content as it is. Remove is shown only when you place the block into the page for the first time.
- You can also click the Close button in the top left-hand corner of the modal window to either remove a newly created block before it is being saved or to cancel any changes and leave the block’s content as it is.
Add new tagged journal entries directly from a page
Once you have included the Tagged journal entries block into a page, you can create a new journal entry directly from that block when you are in Edit mode for the page. When you click the New entry button, you will be taken to your journal and a new entry is started for you. It is then added to the journal automatically with the tag(s) whose journal entries are displayed on the page.
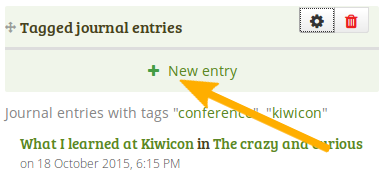
Create a new journal entry directly from the Tagged journal entries block - one journal only
If you enabled multiple journals and have a minimum of two journals, you will see a slightly different display.
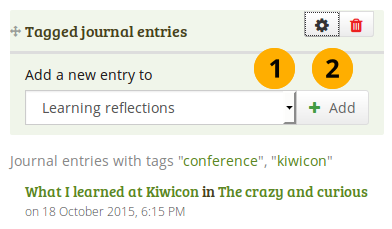
Create a new journal entry directly from the Tagged journal entries block - multiple journals available
- Choose the journal to which to add your entry from the drop-down menu.
- Click the Go button to create your new entry.
Select tags to include or exclude
When you want to choose which tags to use in your block, you can select multiple tags to include or exclude. That way you can be very flexible in which entries to display in your block and which ones to leave out. You must have tagged your journal entries beforehand. If you haven’t done that, please go to your journal entries and tag them. You can find them under Main menu → Create → Journals.

Display all the tags that you used on journal entries
- Click in the text field for the tag entries. You can start typing the tag that you are looking for if you know it. The result list that you see underneath gets shorter based on what you type. If you want to exclude a tag, type the minus sign and then the tag.
- In the tag result list, click the tag that you want to include. If you want to exclude a tag, type the minus sign and then select the tag.

A selection of tags for the tagged journal entries
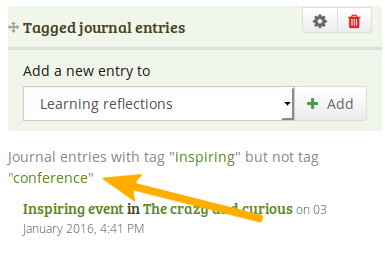
When you display your page that has a tagged journal entries block, you see which tags are used to filter your journal entries. For example: Journal entries with tag “learning” but not tag “conference”.
Know which tags to include and exclude
You can add multiple tags to limit the results as well as indicate which tags you want to ignore. If you select multiple tags, a journal entry must match all selected tags in order to be listed.
Let’s assume, you tagged your journal entries with the following tags:
- learning, formal, education
- learning, formal, education, music
- learning, formal, education, language
- learning, nonformal, education
- learning, nonformal, education, music
- learning, nonformal, education, language
- teaching, nonformal, education
- teaching, nonformal, education, music
- teaching, nonformal, education, language
When you select:
- the tag “education”, all journal entries would be displayed in the block.
- the tags “learning” and “language”, journal entries 3 and 6 would be displayed, i.e. the entries that are tagged “learning” and “language”.
- the tags “education” and “language”, journal entries 3, 6, and 9 would be shown, i.e. the entries that are tagged “education” and “language”.
You can also exclude tags from the results by putting a minus sign before the tag you want to select.
If you select:
- the tag “learning” and exclude “formal” (exclude the tag by typing “-formal” without the quotation marks), journal entries 4, 5, and 6 would be displayed. You search for journal entries tagged “learning” and not “formal”.
- the tag “nonformal” and “education” and exclude “music” and “language” (exclude the tags by typing “-music -language” without the quotation marks), journal entries 4 and 7 would be shown. You search for journal entries tagged “nonformal” and “education” and not “music” and not “language”.
The operators and and not are two of the so-called “Boolean operators”.
General
The artefacts in this tab are of a general nature or do not fit into any other category and can be used around the site.
When you create a page in a group, you do not have the plans block available as you cannot create plans in groups. Additionally, you can choose the following blocks when you edit the group homepage:
- Group info
- Group members
- Group pages
Annotation
Add a block to your page which lets you add an annotation for your page.
This feature is used in conjunction with SmartEvidence.
Write an annotation

Configure the Annotation block
-
Block title: The block title is set automatically based on the standard selected. It takes the form of “Annotation: Shortname of the standard” and cannot be changed.
-
Annotation: Write your annotation for your portfolio page. The annotation helps connect the evidence on the page to the standard or competency you selected to associate it with in the competency framework.
You can change the text as long as no feedback has been placed on the block. In order to change the text, you go into Edit mode of the page and then choose the Configure icon of the Annotation block that you want to change. You cannot change the annotation from the SmartEvidence map.
-
Allow feedback: When you allow feedback on your annotation, others can leave feedback as usual. However, as soon as the first feedback has been added, you will not be able to make changes to your annotation text anymore. That is to ensure that the feedback still relates back to the annotation.
-
Tags: Enter tags to find your annotation more easily at a later stage. Separate your tags with commas. If you already have tags, you can click on the link Show my tags and select the ones that you think will fit for this collection as well. They will be entered into the text field for you.
-
Standard: When you place the Annotation block on the page, you can select the standard with which the page shall be associated based on the SmartEvidence framework selected for the collection. You can change the standard until somebody leaves feedback or makes an assessment. If you select the page from the SmartEvidence overview page, the standard is pre-selected and cannot be changed.
You can use the Annotation block without SmartEvidence, but then you can’t choose a competency standard.
-
The description of the selected standard is displayed so you can easily reference it.
-
Retractable: Choose whether you want to allow users to reduce the block to its heading on a page or see just the heading only automatically. The options are:
- No: The block and its content is displayed at all times.
- Yes: Allow users to reduce the block to just the heading by clicking the Retractable icon .
- Automatically retract: Only the heading of the block is visible, and the user can click the Retracted icon to view its content.
-
Click the Save button to accept your changes, or click Cancel to leave the block’s content as it is. Remove is shown only when you place the block into the page for the first time.
-
You can also click the Close button in the top left-hand corner of the modal window to either remove a newly created block before it is being saved or to cancel any changes and leave the block’s content as it is.
Respond to an annotation on the SmartEvidence map
When you have access to a collection that contains a SmartEvidence map, you can leave feedback on an annotation. You may be able to assess it if you have staff or institution administrator permissions in the same institution as the portfolio author unless it is a self-assessment framework.

Respond to an annotation
-
Click the annotation on the SmartEvidence map that you wish to take a closer look at. A modal window opens with the annotation.
-
Read the annotation.
-
Place feedback: You can leave feedback on the annotation.
-
Make public: Decide whether everybody who has access to the page can view your feedback or just the portfolio author.
-
Click the Place feedback button to add your feedback to the annotation.
-
You can view the feedback of others.
-
If an assessment was already made, you can see it here. This also serves as log of the assessment changes throughout the lifetime of the annotation.
-
Assessment: If you have the permission to assess the standard, you see a drop-down menu here with the possible statuses that you can use. Select one of them.
The assessment statuses are defined in the SmartEvidence framework file.
-
Click the Save button to keep your selection or click Cancel to abort the assessment.
-
You can also click the Close button in the top left-hand corner of the modal window to either remove a newly created block before it is being saved or to cancel any changes and leave the block’s content as it is.
Respond to an annotation on a page
You can provide feedback to an annotation, and assess it if you have the appropriate permission, also from the portfolio page on which the annotation is placed.

Respond to an annotation on a page
-
Click the Place feedback link at the bottom of the Annotation block.
-
Write your feedback.
-
Assessment: If you have the permission to assess the standard, you see a drop-down menu with the possible statuses that you can use. Select one of them.
The assessment statuses are defined in the SmartEvidence framework file.
-
Make public: Decide whether everybody who has access to the page can view your feedback or just the portfolio author.
-
Click the Place feedback button to add your feedback to the annotation or click Cancel to abort the assessment.
-
You can also click the Close button in the top left-hand corner of the modal window to either remove a newly created block before it is being saved or to cancel any changes and leave the block’s content as it is.
Delete an annotation
When you delete an annotation, all its feedback is deleted as well. You cannot retrieve it again easily.
Comments
You can move the comments section from the bottom of a page elsewhere onto your page to integrate it better with your page content. Please note the following:
- There is no configuration possible for this block.
- You only see comments when you display a page, but not in edit mode.
- You can only place 1 comment block onto a page.
- Comments for individual artefacts is still placed at the bottom of the artefact details pages because you cannot put a block onto these pages.
- You can move the block like any other block on your page. If you delete the block, the comments are displayed at the bottom of the page again.
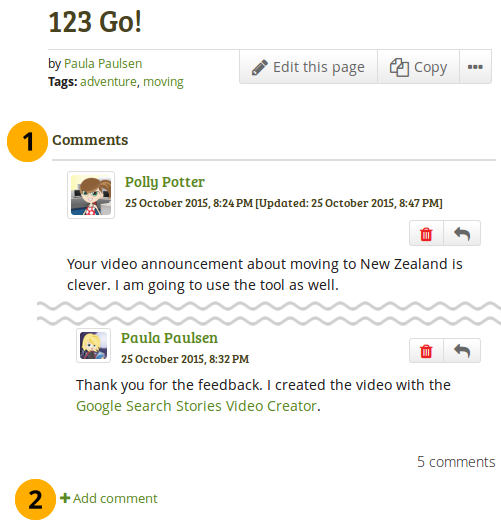
What the feedback block looks like on a page
- The block has the heading “Comments” unless your Mahara installation uses a different word.
- When you click the Add comment link, a modal window is displayed in which you can enter your comments with all the usual functionality.
Creative Commons license
Add a block to your page which lets users know under which Creative Commons license your page is published.
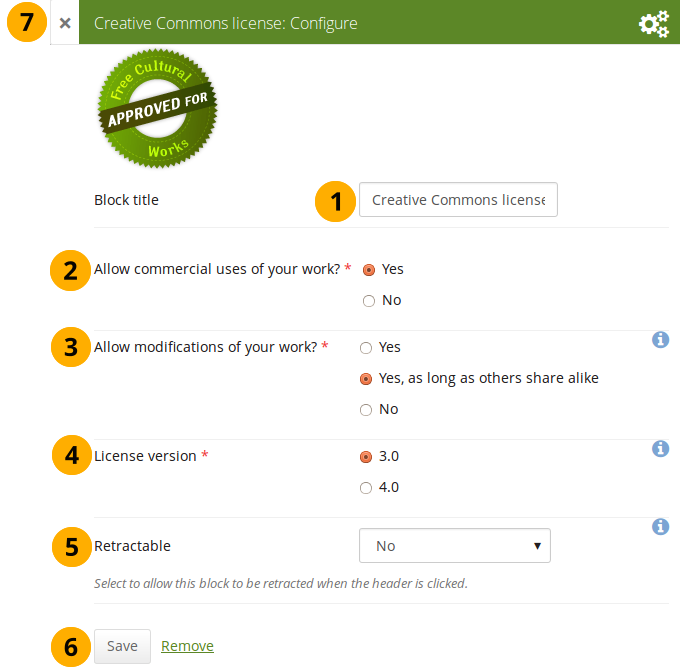
Configure the Creative Commons license block
-
Block title: Choose a title for your block.
-
Allow commercial uses of your work? Decide whether users can re-use your work for commercial purposes.
-
Allow modifications of your work? Decide whether others can remix your work and create something new and if so under which conditions.
-
License version: Select under which Creative Commons license you wish to publish your work. You can choose between
- Creative Commons 3.0
- Creative Commons 4.0
Check out what is new in Creative Commons 4.0, and why you may want to choose that license.
-
Retractable: Choose whether you want to allow users to reduce the block to its heading on a page or see just the heading only automatically. The options are:
- No: The block and its content is displayed at all times.
- Yes: Allow users to reduce the block to just the heading by clicking the Retractable icon .
- Automatically retract: Only the heading of the block is visible, and the user can click the Retracted icon to view its content.
-
Click the Save button to accept your changes, or click Cancel to leave the block’s content as it is. Remove is shown only when you place the block into the page for the first time.
-
You can also click the Close button in the top left-hand corner of the modal window to either remove a newly created block before it is being saved or to cancel any changes and leave the block’s content as it is.
Group info
This block is a default block on the group homepage. There is no configuration possible.
This block can only be used on a group homepage.
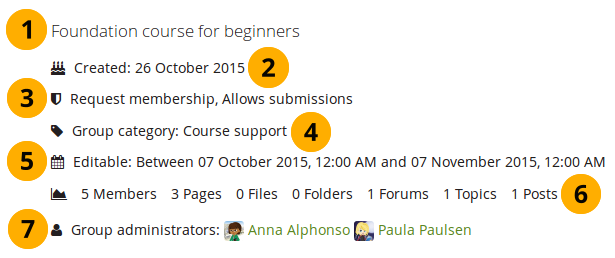
Items in the group info block
The block contains information about:
- Description of the group
- Group creation date
- Type of group
- Group category if any was chosen
- Dates between which regular group members can participate in group activities. This information is only visible if any dates were entered in the group settings.
- Group statistics
- number of group members
- number of pages created in the group
- number of files uploaded to the group
- number of folders created in the group
- number of forums created in the group
- number of forum topics created in the group
- number of posts in forum topics in the group
- Group administrators
Group members
This block is a default block on the group homepage. You can display member profile pictures and their names.
This block can only be used on a group homepage.

Configure the Group members block
- Block title: The automatic title for this block is “Members”. You can set another one if you wish.
- Shown members: Choose how many members (between 1 and 100) are shown on the group homepage. All others are accessible via the Members tab in the group. The default number of members displayed is 12.
- Order: Choose the order in which members are displayed. Options are
- Latest: Display members according to their group joining date in reverse chronological order.
- Random: Let Mahara decide which members to display.
- Retractable: Choose whether you want to allow users to reduce the block to its heading on a page or see just the heading only automatically. The options are:
- No: The block and its content is displayed at all times.
- Yes: Allow users to reduce the block to just the heading by clicking the Retractable icon .
- Automatically retract: Only the heading of the block is visible, and the user can click the Retracted icon to view its content.
- Click the Save button to accept your changes, or click Cancel to leave the block’s content as it is. Remove is shown only when you place the block into the page for the first time.
- You can also click the Close button in the top left-hand corner of the modal window to either remove a newly created block before it is being saved or to cancel any changes and leave the block’s content as it is.
Group portfolios
This block is a default block on the group homepage. You can display pages and collections created in and / or shared with the group in this block.
This block can only be used on a group homepage.
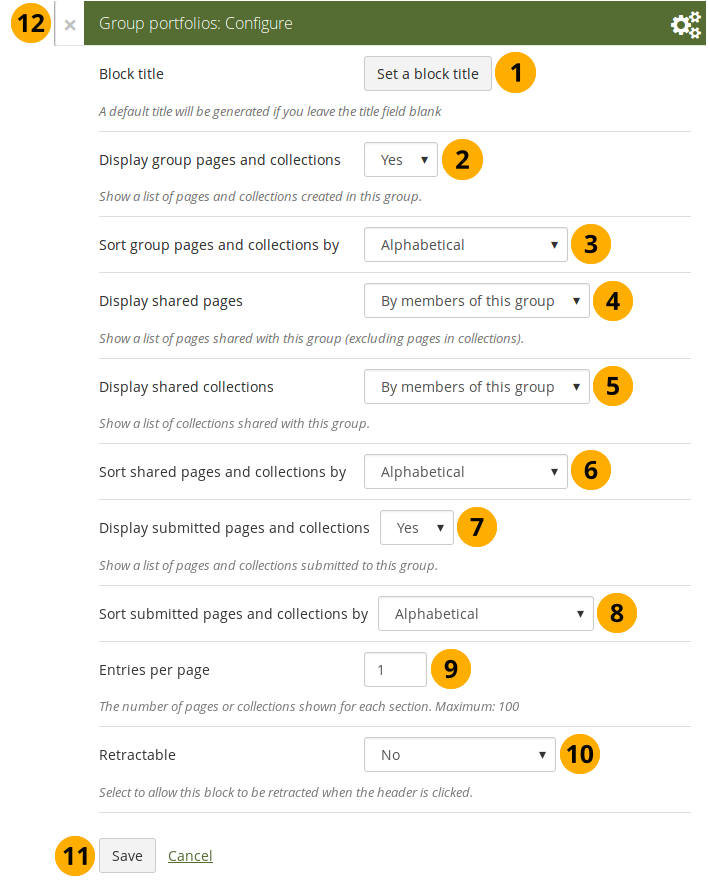
Configure the Group portfolios block
-
Block title: The automatic title for this block is “Group portfolios”. You can set another one if you wish.
-
Display group pages and collections: Decide whether to display pages and collections that were created in the group. “Yes” is the default option.
-
Sort group pages and collections by: Choose in which order to display portfolios created in the group. “Alphabetical” is the default option, but you can also display them based on when they were last updated.
-
Display shared pages: Decide whether to display pages that users shared with the group. Pages that are in collections are not displayed. The options are:
-
None: No shared pages are displayed.
-
By members of this group: Display only pages that have been shared by members of the group.
This option is particularly well-suited for groups that are used for class purposes. That way, students can share their pages or collections with the group for a long time, but the administrator can choose to display only pages of group members but not those that are not members anymore. The pages of non-group members are still accessible via the Shared with me functionality.
-
By anybody: Display all pages that have been shared with the group.
-
-
Display shared collections: Decide whether to display collections that users shared with the group. The options are:
- None: No shared collections are displayed.
- By members of this group: Display only collections that have been shared by members of the group.
- By anybody: Display all collections that have been shared with the group.
Submitted pages are not displayed in the section of “Shared pages” and “Shared collections” to avoid confusion whether they have been shared with the group or not.
-
Sort shared pages and collections by: Choose in which order to display pages and collections shared with the group. “Alphabetical” is the default option, but you can also display them based on when they were last updated.
-
Display submitted pages and collections: Decide whether to display pages and collections that group members submitted to the group. There is no distinction made between pages and collections. “Yes” is the default option.
When you choose this option, you also see which members have not yet submitted a portfolio to the group. This is helpful in particular in large groups with lots of portfolio submissions.
-
Sort submitted pages and collections by: Choose in which order to display pages and collections submitted to the group. “Alphabetical” is the default option, but you can also display them based on when they were last updated.
-
Entries per page: Choose the maximum number of pages or collections you wish to see on the group homepage for the above before a paginator is displayed. You can display a maximum of 100 items per category.
-
Retractable: Choose whether you want to allow users to reduce the block to its heading on a page or see just the heading only automatically. The options are:
- No: The block and its content is displayed at all times.
- Yes: Allow users to reduce the block to just the heading by clicking the Retractable icon .
- Automatically retract: Only the heading of the block is visible, and the user can click the Retracted icon to view its content.
-
Click the Save button to accept your changes, or click Cancel to leave the block’s content as it is. Remove is shown only when you place the block into the page for the first time.
-
You can also click the Close button in the top left-hand corner of the modal window to either remove a newly created block before it is being saved or to cancel any changes and leave the block’s content as it is.
A page is considered as modified when the content of at least one block is updated, including the adding of a new Mahara journal entry into the journal block.
Inbox
The Inbox block displays the latest messages that you have received.
This block can only be used on your dashboard.

Configure the Inbox block
- Block title: The automatic title for this block is “Inbox”. You can set another one if you wish.
- Message types to display: Change the switch to “Yes” for each message type that you want to display in this block.
- Administration messages: If you are an institution or site administrator, you see this option. All administration messages such as for objectionable content, virus upload, contact, etc. are grouped in “Administration messages”.
- Maximum number of items to display: Decide how many messages shall be shown on your dashboard. You can choose between 1 and 100.
- Retractable: Choose whether you want to allow users to reduce the block to its heading on a page or see just the heading only automatically. The options are:
- No: The block and its content is displayed at all times.
- Yes: Allow users to reduce the block to just the heading by clicking the Retractable icon .
- Automatically retract: Only the heading of the block is visible, and the user can click the Retracted icon to view its content.
- Click the Save button to accept your changes, or click Cancel to leave the block’s content as it is. Remove is shown only when you place the block into the page for the first time.
- You can also click the Close button in the top left-hand corner of the modal window to either remove a newly created block before it is being saved or to cancel any changes and leave the block’s content as it is.
When you display messages from other users on your dashboard through the Inbox block, you can see quickly which messages you have not read. They are marked in bold.
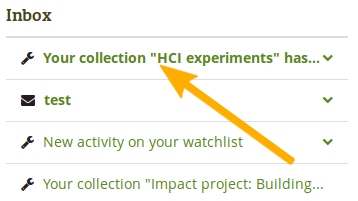
Unread messages are displayed in bold
Latest changes I can view
The Latest changes I can view block displays the latest portfolios to which you have access across Mahara by other people. This includes pages and collections. Prior to Mahara 15.10 this block was called Latest pages.
This block can only be used on your dashboard.
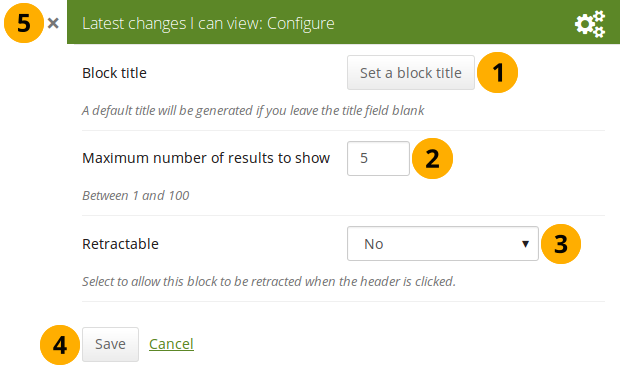
Configure the Latest changes I can view block
- Block title: The automatic title for this block is “Latest changes I can view”. You can set another one if you wish.
- Maximum number of results to show: Decide how many pages and collections shall be shown on your dashboard. You can choose between 1 and 100.
- Retractable: Choose whether you want to allow users to reduce the block to its heading on a page or see just the heading without the block content automatically. The options are:
- No: The block and its content is displayed at all times.
- Yes: Allow users to reduce the block to just the heading by clicking on the heading of a block where the Retractable icon is shown.
- Automatically retract: Only the heading of the block is visible, and the user can click on the heading of a block where the Retracted icon is shown to view its content.
- Click the Save button to accept your changes, or click the Cancel button to leave the block’s content as it is. The Remove button is shown only when you place the block into the page for the first time.
- You can also click the Close icon in the top left-hand corner to either remove a newly created block before it is being saved or to cancel any changes and leave the block’s content as it is.
The block on your dashboard page looks like the following.
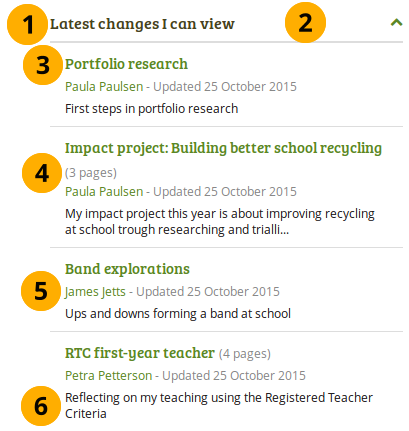
Example of the Latest changes I can view block
- Title of the block.
- If you chose a retractable option, you can click on the title or anywhere in the title space to change the block’s behaviour.
- Title of the page or collection to which you have access.
- If it is a collection, you see the number of pages contained within.
- Name of the portfolio author, and when the portfolio was last updated.
- Page or collection description.
Navigation
You must create at least one collection in order to use this block.
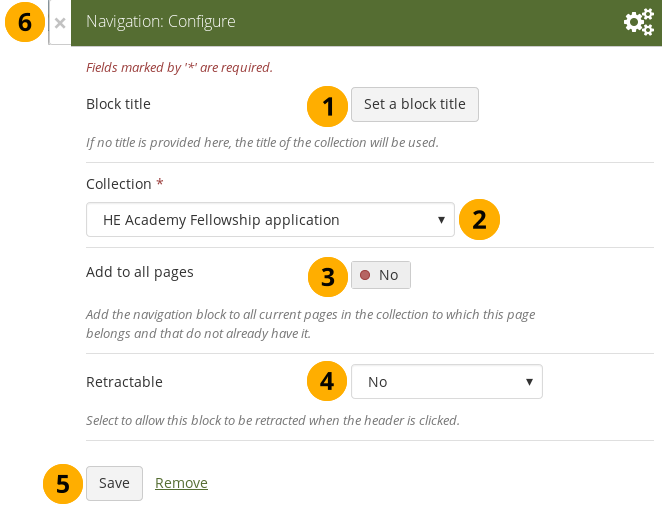
-
Block title: The title of the collection is chosen automatically unless you provide a different one.
-
Collection: Choose the collection from the drop-down menu for which you wish to display links in the block.
-
Add to all pages: Automatically add the block to all pages in the current collection with links to the selected collection.
If you add another page to the collection, it does not automatically receive the navigation block. You need to add it manually.
-
Retractable: Choose whether you want to allow users to reduce the block to its heading on a page or see just the heading only automatically. The options are:
- No: The block and its content is displayed at all times.
- Yes: Allow users to reduce the block to just the heading by clicking the Retractable icon .
- Automatically retract: Only the heading of the block is visible, and the user can click the Retracted icon to view its content.
-
Click the Save button to accept your changes, or click Cancel to leave the block’s content as it is. Remove is shown only when you place the block into the page for the first time.
-
You can also click the Close button in the top left-hand corner of the modal window to either remove a newly created block before it is being saved or to cancel any changes and leave the block’s content as it is.
Note
Add a note to your page. This feature is used when you do not want to keep the text in a journal, but still want to be able to re-use the text on other pages.
Add a new note
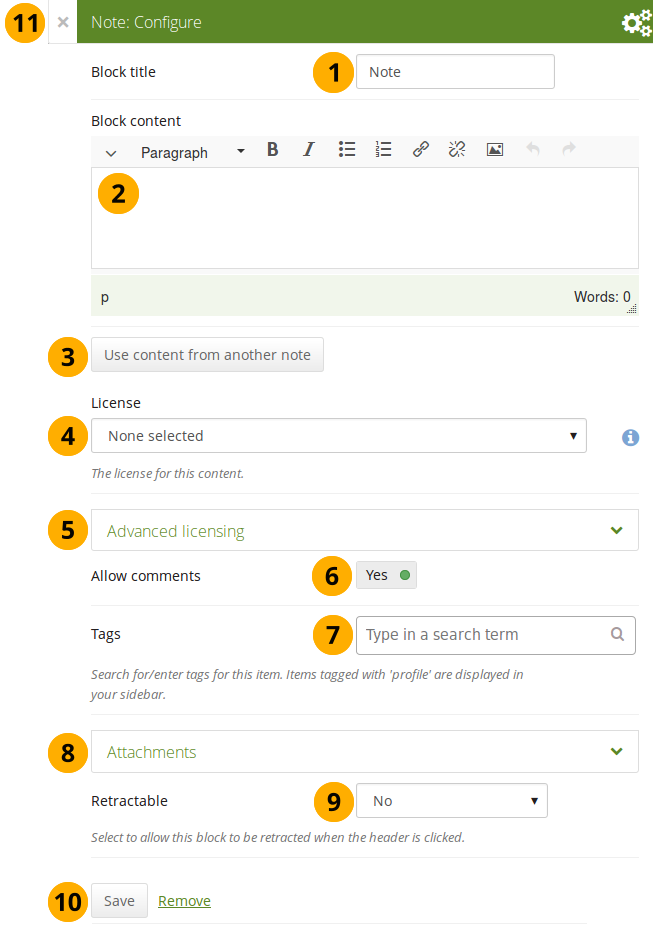
Configure the Note block
-
Block title: Provide a title for your note.
-
Block content: Write your text. You can include formatting, external images etc.
-
Alternatively, you can also use text from another note that you have already written. Click the Use content from another note button to do so.
-
License: You see this drop-down menu if the site administrator turned on license metadata. Additionally, if you are in an institution, your institution administrator may require you to provide a license. Your default license is displayed. You can set your default license in your account settings. You may choose a different license for each individual artefact.
-
Advanced licensing: If you can / must enter license information, you can also provide information about the original licensor and a URL where the original can be found.
-
Allow comments: Switch this setting to “No” if you do not want others to comment on your note. This option is set to “Yes” by default.
-
Tags: Enter tags to find your note more easily at a later stage. You can choose from your existing tags by starting to type a letter and then selecting the tag you want to use. You can also type a new tag, and it is added to your list of tags.
You can find more information on how to use the tag selector in the “Tags” section.
-
Attachments: Attach a file to a note as additional evidence for the text you are writing.
-
Retractable: Choose whether you want to allow users to reduce the block to its heading on a page or see just the heading only automatically. The options are:
- No: The block and its content is displayed at all times.
- Yes: Allow users to reduce the block to just the heading by clicking the Retractable icon .
- Automatically retract: Only the heading of the block is visible, and the user can click the Retracted icon to view its content.
-
Click the Save button to accept your changes, or click Cancel to leave the block’s content as it is. Remove is shown only when you place the block into the page for the first time.
-
You can also click the Close button in the top left-hand corner of the modal window to either remove a newly created block before it is being saved or to cancel any changes and leave the block’s content as it is.
Add an image into a note
Please refer to the section “Insert an image into text” for more information.
Attach a file to a note
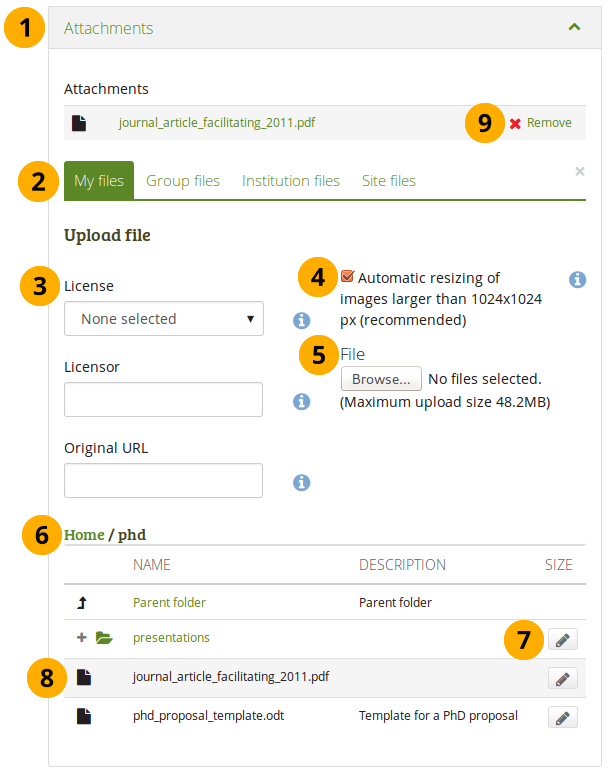
Attach a file to a Note block
-
Click the Attachments panel if you wish to add one or more files to a note.
-
Files area: Choose from which files area you would like to select a file:
- My files: You see all the folders and files that you have created.
- Group files: You see all the folders and files that you are allowed to publish.
- Institution files: If you are an institution administrator, you will see institution folders and files.
- Site files: If you are a site administrator, you will see all site folders and files. Otherwise, you can only see the ones that are in the folder public in the Site files.
-
License information: You see these fields if the site administrator turned on license metadata. Additionally, if you are in an institution, your institution administrator may require you to provide a license.
- License: Your default license is displayed. You can set your default license in your account settings. You may choose a different license for each individual artefact.
- Licensor: If you are uploading a file that somebody else created, you can attribute the work to them here and provide their name for example.
- Original URL: If you are uploading somebody else’s file, provide a link to the original Internet address so that others can go there and view the original file.
-
If the site administrator turned on the image resizing option, you can decide whether you want to have your images resized if they are larger than the specified dimensions. This option is recommended to save space in your portfolio.
-
File: You do not have to go back to your Files area in Create in order to upload a file. You can do so directly from this screen.
-
Folder path: The breadcrumbs show in which folder you are currently.
-
Click the Edit button to change any component of a folder or file, i.e. its name, description and tags. If you have a folder or file included in a page that you submitted for feedback, you will not be able to edit them.
You can also still select files that have been submitted in another portfolio page.
-
Click into the row that contains the file you wish to display in the block to select it.
When you place group, institution or site files into a page, beware that these files may not be available at some point anymore when the person in charge deletes them.
-
Click Remove if you want to revert your selection.
-
Continue editing your note and save it.
Re-use text from an existing note
You can re-use text from other note from one page in another without having to copy the page first.
If you do not make a copy of the note content in the block configuration and change it, the text is changed in all other instances where this note is used.
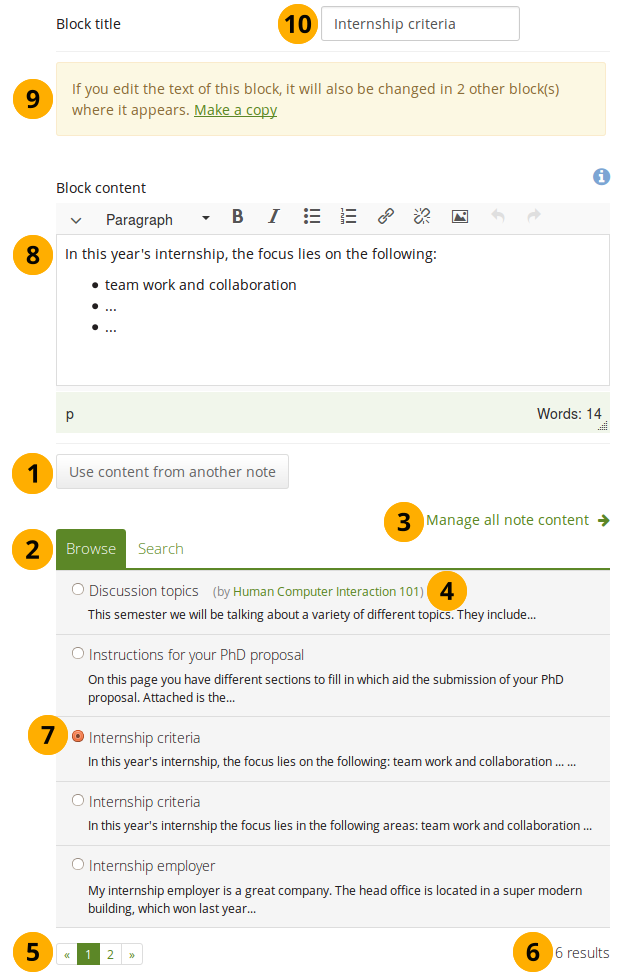
Configure the Note block by copying text
-
Click the button Use content from another note to view all notes to which you have access. These can be:
- your own notes
- notes from group pages that you can copy
- notes from institution or site pages to which you have access
-
Click Browse or Search to find the note that you want to re-use.
The search is performed in the title, description, and tags.
-
Click the Manage all note content link to be taken to your personal Notes if you can’t find what you are looking for.
-
All notes are listed with their title and the first line. If a note does not belong to you but for example to a group, you see the author next to the note’s title.
-
Use the paginator to move between your notes if more than 5 are displayed.
-
You see the number of notes that you have access to.
-
Click the radio button in front of a note that you want to use in this page.
-
The content of the note that you have selected is displayed in the Block content box. Now you can make changes.
The text will be changed in all other instances where this note appears.
-
If you wish to make changes to the note, but do not want to change it everywhere else, click the Make a copy link above the Block content. The text is then retained, but it is treated like a new note and the original note is not changed.
-
Block title: Review the block title and make changes if necessary. Once you copied a note, the original block title is entered here.
You can change the block title no matter whether you change the content of the note or not.
-
All other functionality that you see on the screen is the same as for adding a new note.
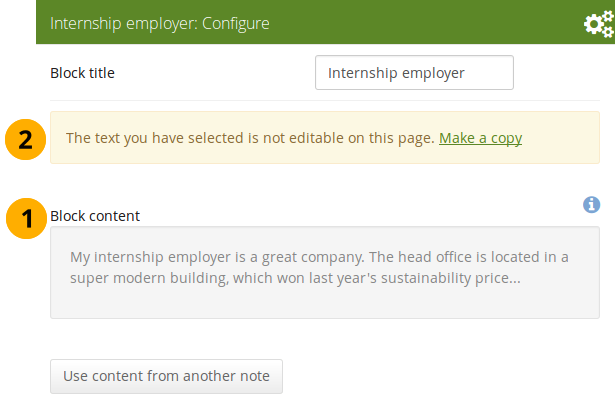
Open a note that is submitted for assessment in another portfolio
- Block content: When you open a note that is used on a page that is currently submitted, you cannot make changes to the note.
- Click the Make a copy link in order to make changes to this note on this page only. It is not changed on the other page that is submitted or on any other page where the text appears.
Peer assessment
Allow peer reviewers to give blind feedback.
Add the peer assessment block to a page
This block allows somebody else to provide blind feedback on the portfolio author, e.g. in a formal assessment context where skills and competencies need to be assessed by the peer independently of what the portfolio author has stated.
The peer reviewer can see block headings, but not the content in the blocks themselves. If the portfolio consists of multiple pages, and one of them does not contain a peer block, the peer reviewer does not see the page content at all.
You must give a person the “Peer” role when sharing the portfolio page for them to be able to add their assessment.
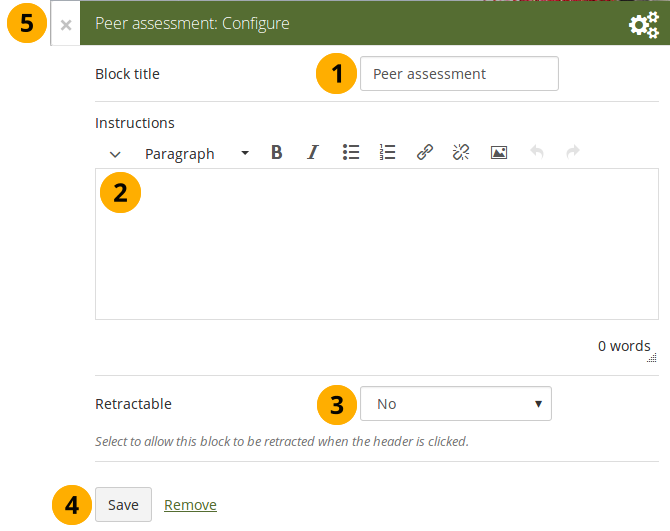
Configure the Peer assessment block
- Block title: The title that you want to give this particular block.
- Instructions: Provide instructions for the peer reviewer to help them with their assessment.
- Retractable: Choose whether you want to allow users to reduce the block to its heading on a page or see just the heading only automatically. The options are:
- No: The block and its content is displayed at all times.
- Yes: Allow users to reduce the block to just the heading by clicking the Retractable icon .
- Automatically retract: Only the heading of the block is visible, and the user can click the Retracted icon to view its content.
- Click the Save button to accept your changes, or click Cancel to leave the block’s content as it is. Remove is shown only when you place the block into the page for the first time.
- You can also click the Close button in the top left-hand corner of the modal window to either remove a newly created block before it is being saved or to cancel any changes and leave the block’s content as it is.
Set up a peer assessor
You can give someone the peer assessment permissions on the Edit access screen of your portfolio page.
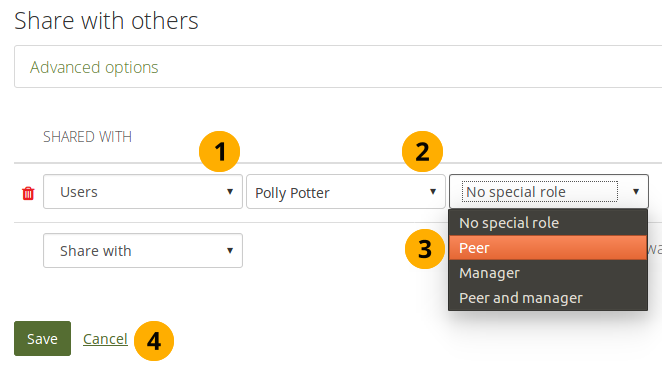
Give someone peer assessment permissions
If the page is in a collection that contains pages that don’t have the peer assessment block, the peer assessor doesn’t see any content on those pages but the notice “You cannot see the content on this page because it does not require a peer assessment.”
Add a peer assessment
Peer assessments are blind assessments at the moment allowing the peer assessor to give their feedback independently of the portfolio author.
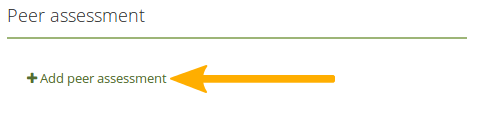
Add a peer assessment
When you are the peer assessor on someone’s portfolio, and a page contains a peer assessment block, you can add your assessment by clicking the Add peer assessment link.
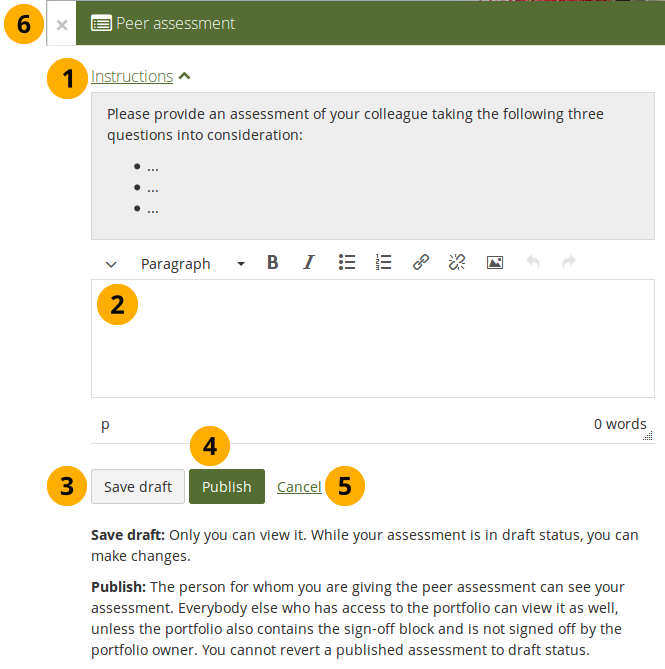
Write a peer assessment
-
Click the Instructions link to view the instructions for the peer assessment.
-
Write your peer assessment.
-
Click the Save draft button if you are not yet ready for the portfolio author to view your assessment, and you want to save a draft status.
-
Click the Publish button when you finished your assessment, and the portfolio author can view it. A notification is also sent to the portfolio author.
If the peer assessment block is used in conjunction with the sign-off block, the portfolio author must sign off the page before anybody other than themselves and the peer assessor can see published peer assessments.
View a peer assessment
If a peer assessment is in draft mode, only the peer assessor can see it. Once it’s published, others can view it as well.
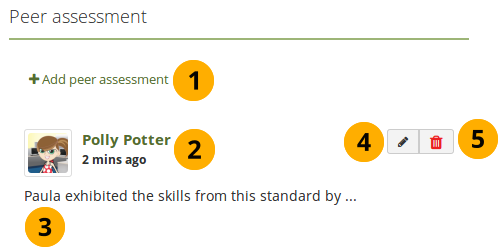
View a peer assessment
- Click the Add peer assessment link if you want to add (another) peer assessment when you cannot edit an earlier one in the same block anymore.
- The profile picture and name of the peer assessor are displayed along with the date and time when the peer assessment was made.
- The peer assessment is displayed.
- The Edit button is only displayed to the peer assessor for 10 minutes after publishing the assessment in case there are last minute changes they want to make.
- The Delete button is only shown to the peer assessor, and they can delete their assessment at any point. If they do, the portfolio author receives an email about that with the text of the assessment included.
Plans
Display your plans in a block.
You must create at least one plan in order to use this block.
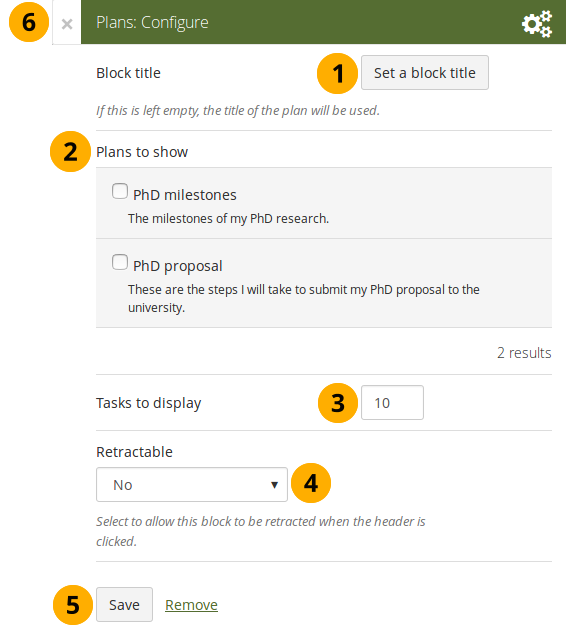
Configure the Plans block
- Block title: The title of the plan is chosen automatically unless you provide a different one.
- Plans to show: Choose the plan or plans which you want to display in your page.
- Tasks to display: Decide how many tasks you want to display for each plan before a paginator is displayed.
- Retractable: Choose whether you want to allow users to reduce the block to its heading on a page or see just the heading only automatically. The options are:
- No: The block and its content is displayed at all times.
- Yes: Allow users to reduce the block to just the heading by clicking the Retractable icon .
- Automatically retract: Only the heading of the block is visible, and the user can click the Retracted icon to view its content.
- Click the Save button to accept your changes, or click Cancel to leave the block’s content as it is. Remove is shown only when you place the block into the page for the first time.
- You can also click the Close button in the top left-hand corner of the modal window to either remove a newly created block before it is being saved or to cancel any changes and leave the block’s content as it is.
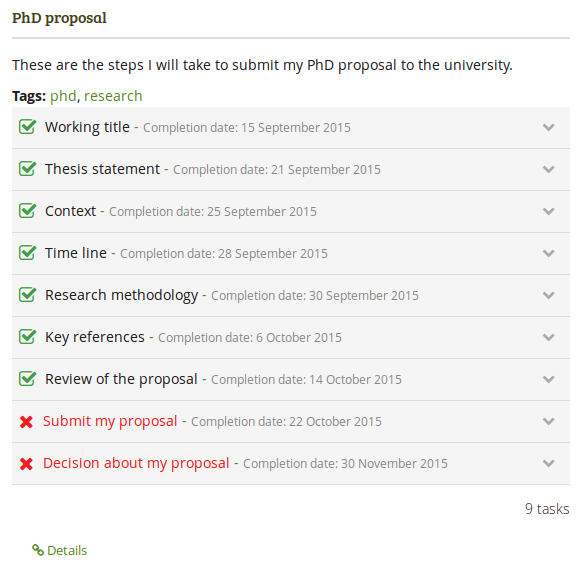
Result of an embedded plan in a portfolio page. By clicking on the linked titles, you can show the descriptions of the individual tasks.
Recent forum posts
Display a specified number of recent forum posts from one group on a page.
You must be a member of at least one group in order to use this block.
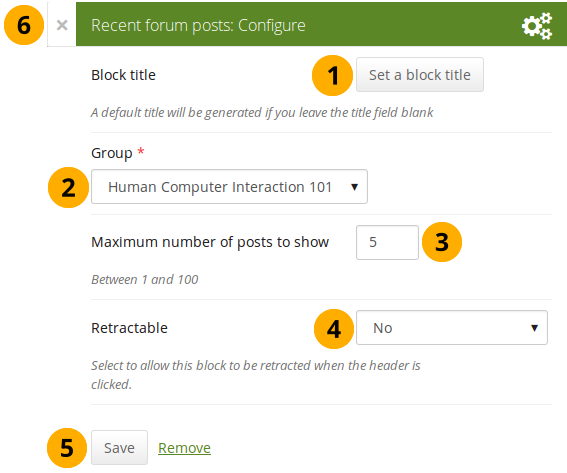
Configure the Recent forum posts block
- Block title: The title of the block is generated automatically unless you provide a different one. The default title is “Recent forum posts”.
- Group: Choose the group whose forum posts you wish to display.
- Maximum number of posts to show: Decide how many of the latest forum posts you wish to show. The default value is 5. You can show up to 100 posts.
- Retractable: Choose whether you want to allow users to reduce the block to its heading on a page or see just the heading only automatically. The options are:
- No: The block and its content is displayed at all times.
- Yes: Allow users to reduce the block to just the heading by clicking the Retractable icon .
- Automatically retract: Only the heading of the block is visible, and the user can click the Retracted icon to view its content.
- Click the Save button to accept your changes, or click Cancel to leave the block’s content as it is. Remove is shown only when you place the block into the page for the first time.
- You can also click the Close button in the top left-hand corner of the modal window to either remove a newly created block before it is being saved or to cancel any changes and leave the block’s content as it is.
Sign-off
The sign-off and verification process allows for a visual indicator on a portfolio page showing whether the page has been finished and whether a manager has verified it before it can go for the final assessment. The verification by a manager is optional.
Set up a page for sign-off and verification
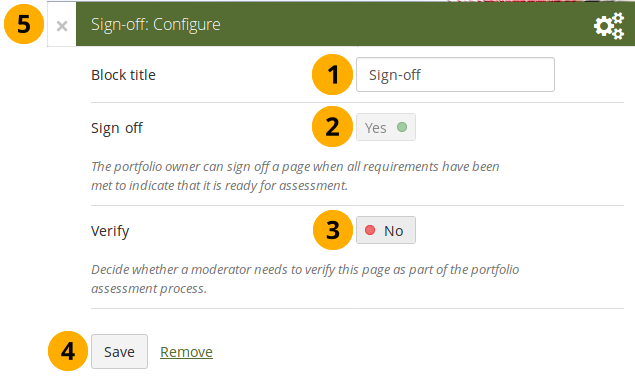
Configure the Sign-off block
-
Block title: Give the block a title. This is not required as the options will sit right below the page heading rather than in a block on the page itself when in view mode.
-
Sign off: A sign-off by the portfolo author is always required.
-
Verify: Give a person with the “Manager” permission the opportunity to verify a page and state that fact to carry it one step further in the assessment. Page content will not be locked when the verification has been made.
The manager cannot revoke the verification. This can only be done by the portfolio author in form of revoking the sign-off for the page.
Set up a manager for verification
You can give someone the manager permissions on the Edit access screen of your portfolio page to allow them to verify your portfolio.
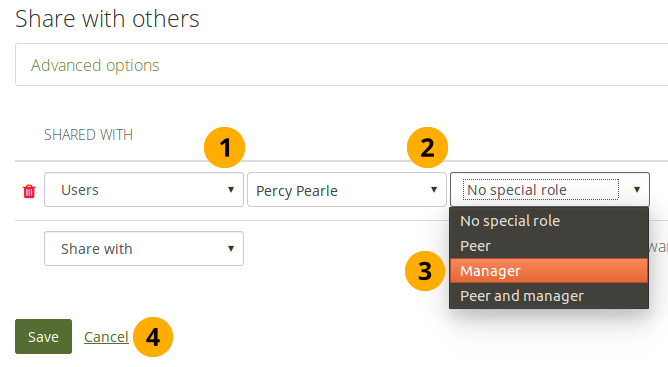
Give someone manager permissions
Sign off a page
When you have a sign-off block on your page and you view it, you can see the sign-off and verification options below the page heading to the right.
View the sign-off as portfolio autor
When you are ready to sign off your page, you can click the red dot icon , and it will turn into a green tick icon to indicate that the page has been signed off.
If the page also needs a verification, your manager can now perform it.
Verify a page
As manager, you can see the sign-off and verification options below the page heading to the right. You can only tick the verification option.
Verify a page as manager
When you are ready to verify a page that allows for verification, you can click the red dot icon , and it will turn into a green tick icon to indicate that the page has been verified.
You cannot revoke the verification. Only the portfolio author can do so by revoking the sign-off.
Text
Add text to your page. This feature is used when you want to put a snippet of text onto a page that does not have to be re-used.
In a default Mahara instance, this block is available in the content chooser at the top together with the Image block. It does not appear in the section General as well.
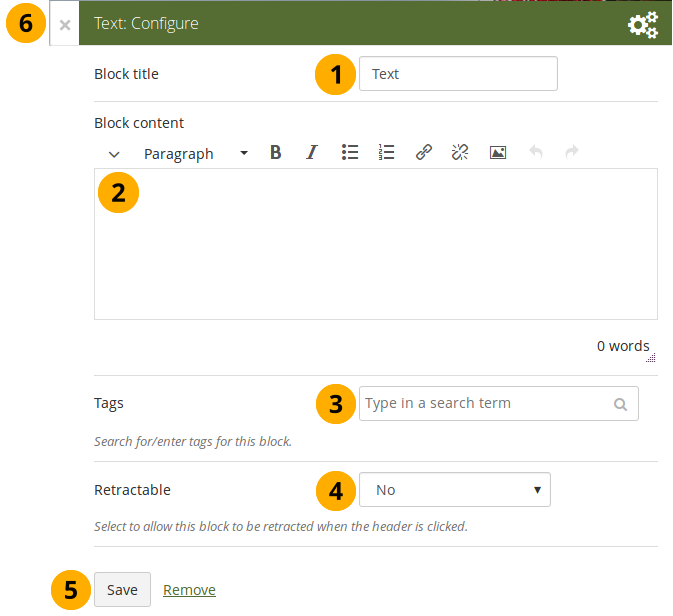
Configure the Text block
- Block title: Provide a title for your text.
- Block content: Write your text. You can include formatting, external images etc.
- Tags: Enter tags for this block to find this content more easily. The tags are displayed as part of the page tags.
- Retractable: Choose whether you want to allow users to reduce the block to its heading on a page or see just the heading only automatically. The options are:
- No: The block and its content is displayed at all times.
- Yes: Allow users to reduce the block to just the heading by clicking the Retractable icon .
- Automatically retract: Only the heading of the block is visible, and the user can click the Retracted icon to view its content.
- Click the Save button to accept your changes, or click Cancel to leave the block’s content as it is. Remove is shown only when you place the block into the page for the first time.
- You can also click the Close button in the top left-hand corner of the modal window to either remove a newly created block before it is being saved or to cancel any changes and leave the block’s content as it is.
Please refer to the section “Insert an image into text” for more information on adding an image to the text block.
Watched pages
The Watched pages block displays the pages that are either on your watchlist or belong to your friends and you have access to them.
You can only use this block on your dashboard.
Pages on my watchlist
If you want pages to be displayed, you need to add them to it first by clicking the More options button on a page and then add the page to your watchlist.
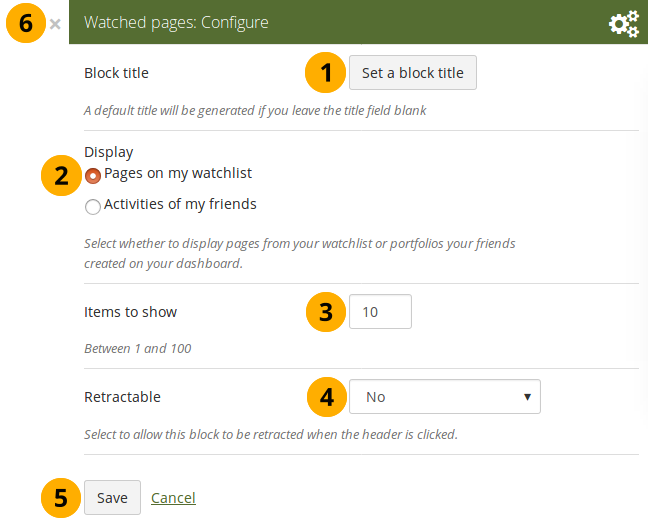
Configure the Watched pages block for your watchlist
- Block title: The automatic title for this block is “Watched pages”. You can set another one if you wish.
- Select to display Pages on my watchlist.
- Items to show: Decide how many pages shall be shown on your dashboard. You can choose between 1 and 100.
- Retractable: Choose whether you want to allow users to reduce the block to its heading on a page or see just the heading without the block content automatically. The options are:
- No: The block and its content is displayed at all times.
- Yes: Allow users to reduce the block to just the heading by clicking the Retractable icon .
- Automatically retract: Only the heading of the block is visible, and the user can click the Retracted icon to view its content.
- Click the Save button to accept your changes, or click the Cancel button to leave the block’s content as it is. The Remove button is shown only when you place the block into the page for the first time.
- You can also click the Close button in the top right-hand corner to either remove a newly created block before it is being saved or to cancel any changes and leave the block’s content as it is.
View your watchlist on your dashboard.
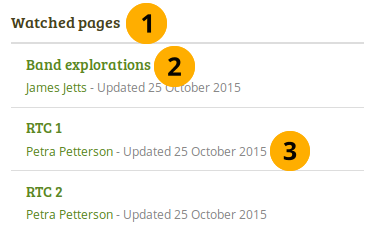
View the Watched pages block
-
Title of the block.
If you chose a retractable option, you can click on the title or anywhere in the title space to change the block’s behaviour.
-
Title of the watched page. You can click the link to be taken to her.
-
View the page owner and the date when the page was last updated. This is in particular important information when all your watched pages have the same or a similar title.
Activities of my friends
If you have friends on Mahara, then you can use this block to display their portfolios when they have shared them with you:
- personally
- as a member of a group
- as an institution member
- as a registered user
- publicly
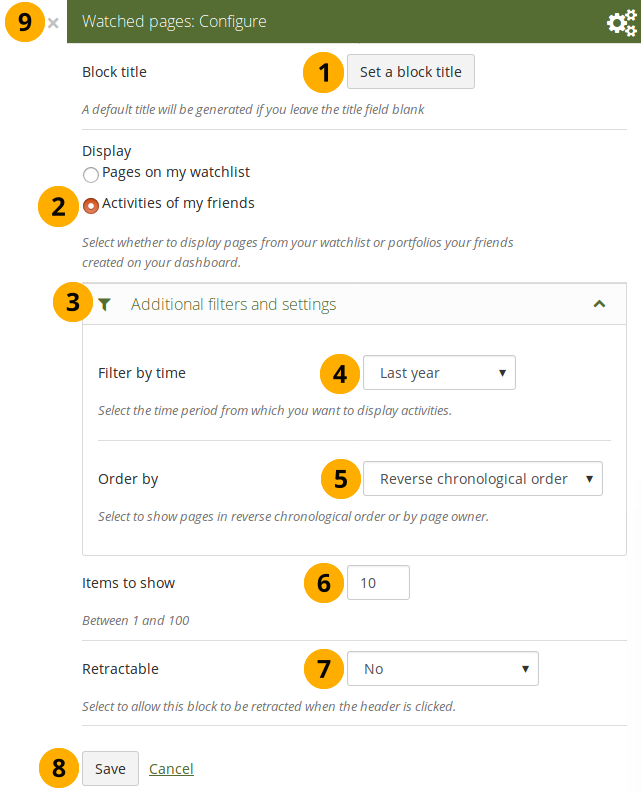
Configure the Watched pages block for your friend activity
- Block title: The automatic title for this block is “Watched pages”. You can set another one if you wish.
- Select to display Activities of my friends.
- Click Additional filters and settings to make additional changes.
- Filter by time: You can select the time period over which you want to see changes. Your options are:
- Last week
- Last month
- Last 2 months
- Last 3 months
- Last 6 months
- Last year
- Since last login
- Order by: Decide how the portfolios are to be ordered. Your choices are:
- Reverse chronological order: Display the latest changes first
- Page owner: Display all pages by their owner with the one having made changes last first.
- Items to show: Decide how many pages shall be shown on your dashboard. You can choose between 1 and 100.
- Retractable: Choose whether you want to allow users to reduce the block to its heading on a page or see just the heading without the block content automatically. The options are:
- No: The block and its content is displayed at all times.
- Yes: Allow users to reduce the block to just the heading by clicking the Retractable icon .
- Automatically retract: Only the heading of the block is visible, and the user can click the Retracted icon to view its content.
- Click the Save button to accept your changes, or click the Cancel button to leave the block’s content as it is. The Remove button is shown only when you place the block into the page for the first time.
- You can also click the Close button in the top right-hand corner to either remove a newly created block before it is being saved or to cancel any changes and leave the block’s content as it is.
Personal info
The artefact blocks in this tab allow you to include information that you provided in the profile into your portfolio. If you want to make changes to the text or the images, go to User menu → Profile.
Furthermore, you can also put certain blocks on your profile page that only exist for that particular page:
- My friends
- My groups
- My pages
- Wall
My friends
Add a block that displays your friends’ profile pictures and their names to your profile page. This is a default block on your profile page.
You only need to place the block on your profile page. There is no further configuration possible.
My groups
Add a block that displays your groups on your profile page. It is a standard profile page block. You can decide on the sort order of the groups and also limit the number of groups to be shown before a paginator is displayed.
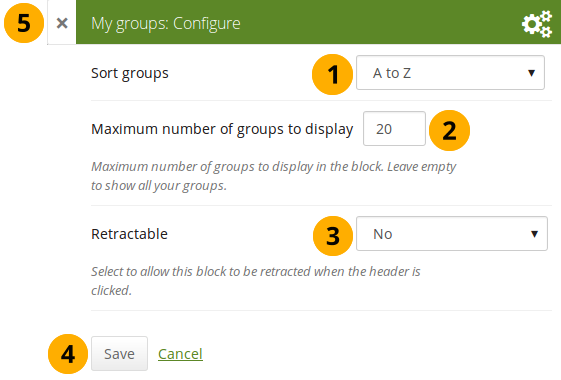
Configure the My groups block
-
Sort groups: Decide in which sort order your groups should be displayed:
- Most recently joined: Groups are displayed in chronologically reverse order to show the groups that you joined recently first.
- Earliest joined: This option displays your groups in the order in which you joined them.
- A to Z: Alphabetically from A to Z. This is the default option.
- Maximum number of groups to display: Decide how many groups you wish to display in the block before the paginator is shown and the remaining pages can be seen on the next page within the block. Leave this field empty if you wish to display all your groups.
-
Retractable: Choose whether you want to allow users to reduce the block to its heading on a page or see just the heading only automatically. The options are:
- No: The block and its content is displayed at all times.
- Yes: Allow users to reduce the block to just the heading by clicking the Retractable icon .
- Automatically retract: Only the heading of the block is visible, and the user can click the Retracted icon to view its content.
- Click the Save button to accept your changes, or click Cancel to leave the block’s content as it is. Remove is shown only when you place the block into the page for the first time.
- You can also click the Close button in the top left-hand corner of the modal window to either remove a newly created block before it is being saved or to cancel any changes and leave the block’s content as it is.
My portfolios
Add a block that displays your pages and collections on your profile or dashboard page. It is a standard profile page block. This block should stay on your profile page because other users can see all your pages and collections to which they have acceess.
You only need to place the block on your profile page. There is no further configuration possible.
When other users view your profile page, they only see the pages and collections to which they have access. That also means that you see all your pages and collections while others may see none or just a few.
You see the following when you use the block.
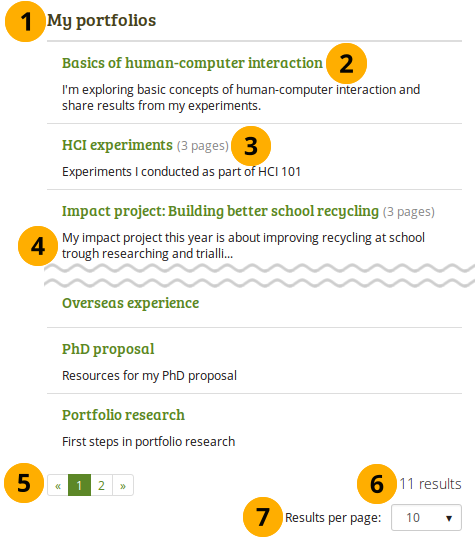
The My portfolios block displayed in a page
- Block title
- Title of the page or collection to which you have access.
- If it is a collection, you see the number of pages contained within.
- Page or collection description.
- Paginator to view more portfolios.
- Number of portfolios that you can view.
- If you would like to see fewer or more portfolios, you can change that here. Per default, 10 portfolios are displayed.
Profile information
Add a block with profile fields to your page.
Only display as much information as you wish anybody to see. Especially when you make your pages available to the public, i.e. everybody on the Internet, or all logged-in users, decide carefully whether you want to display your street address and / or phone number.
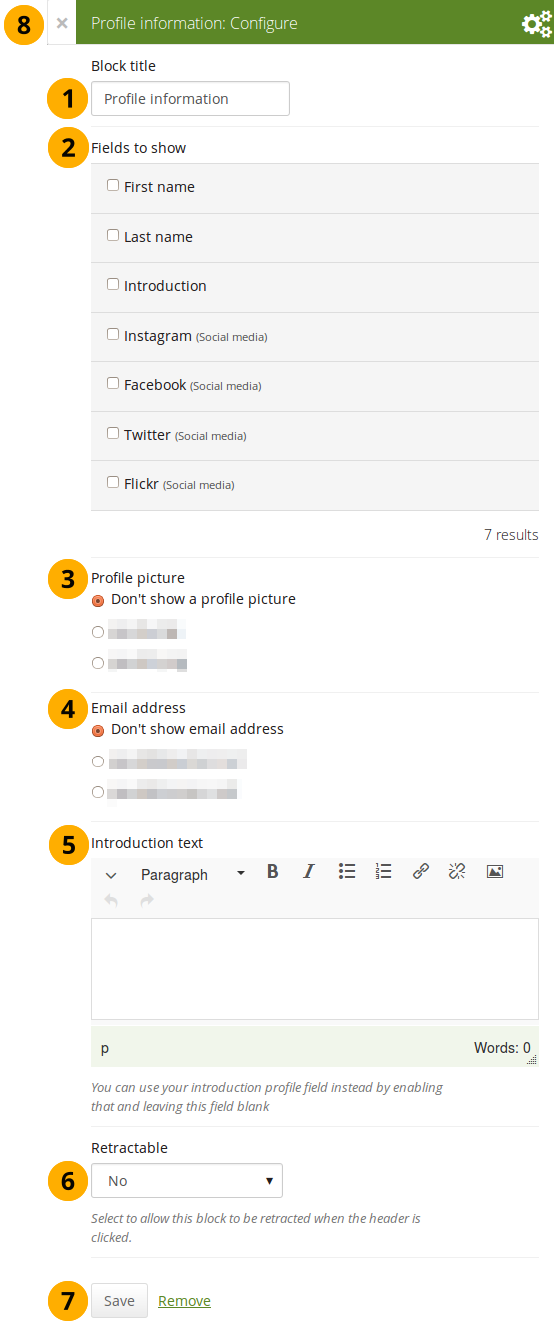
Configure the Profile information block
- Block title: Choose a title for your block.
- Fields to show: Decide which fields shall appear on the page. Put a check mark in front of each one that you want to show. Displayed are only the ones for which you provided content.
- Profile picture: Choose to display one of your profile pictures or “Don’t show a profile picture”.
- Email address Decide whether to display one of your email addresses that you have entered in your profile under User menu → Profile.
- Introduction text: If you do not want to display the introduction text from your profile, you can write another one just for this page here. However, it will be lost when you delete this block.
-
Retractable: Choose whether you want to allow users to reduce the block to its heading on a page or see just the heading only automatically. The options are:
- No: The block and its content is displayed at all times.
- Yes: Allow users to reduce the block to just the heading by clicking the Retractable icon .
- Automatically retract: Only the heading of the block is visible, and the user can click the Retracted icon to view its content.
- Click the Save button to accept your changes, or click Cancel to leave the block’s content as it is. Remove is shown only when you place the block into the page for the first time.
- You can also click the Close button in the top left-hand corner of the modal window to either remove a newly created block before it is being saved or to cancel any changes and leave the block’s content as it is.
Social media
Add a block with links to your social networks to your page.
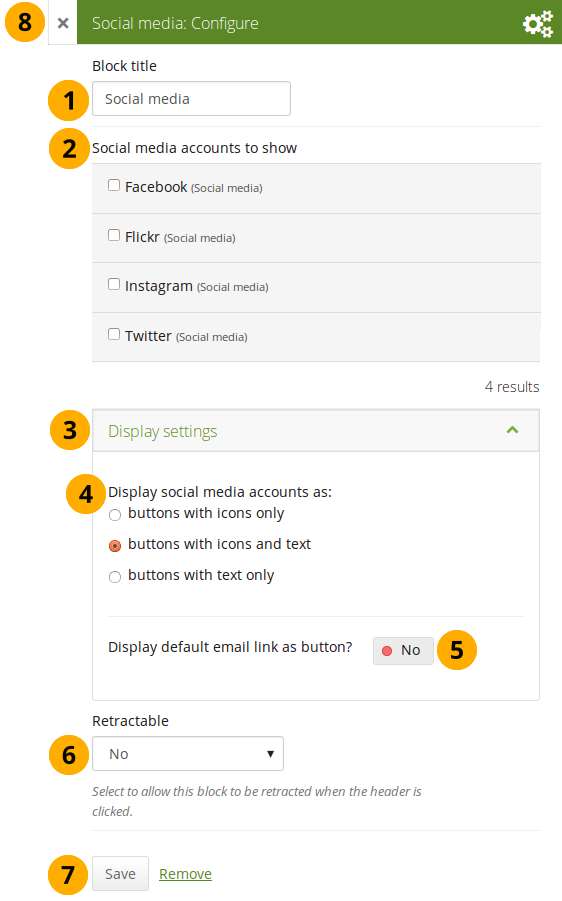
Configure the Social media block
-
Block title: Choose a title for your block.
-
Social media accounts to show: Decide which accounts shall appear on the page. Put a check mark in front of each one that you want to show. Displayed are only the ones for which you provided content.
-
Display settings: Click this panel heading to show the possible display settings.
-
Display social media accounts as: Decide which way you want to display the links to your social media accounts:
- Buttons with icons only: Show only the logos of the social media accounts. This option is a good one if you have lots of accounts and want to save space on your page. However, it might be trickier for people to know instantly which accounts are displayed if they are not familiar with the logos.
If you added a lot of social media accounts through the option “Other”, this option here would not be a good one as the logo for all the services is just a generic icon.
- Buttons with icons and text: This is the default option. The logo of the social network is displayed along with its name.
- Buttons with text only: This option only displays the name of the social network.
-
Display default email link as button? Switch this option to “Yes” if you want to provide a button for your primary email address.
-
Retractable: Choose whether you want to allow users to reduce the block to its heading on a page or see just the heading only automatically. The options are:
- No: The block and its content is displayed at all times.
- Yes: Allow users to reduce the block to just the heading by clicking the Retractable icon .
- Automatically retract: Only the heading of the block is visible, and the user can click the Retracted icon to view its content.
-
Click the Save button to accept your changes, or click Cancel to leave the block’s content as it is. Remove is shown only when you place the block into the page for the first time.
-
You can also click the Close button in the top left-hand corner of the modal window to either remove a newly created block before it is being saved or to cancel any changes and leave the block’s content as it is.
This is how the individual options are displayed on your page.
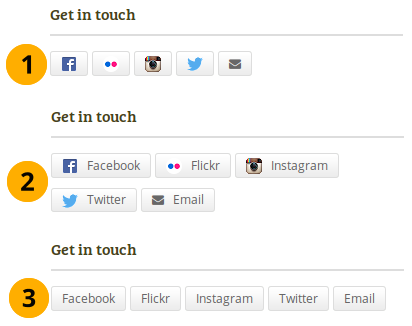
The 3 options for displaying your social media accounts
Wall
Add a block that displays your wall on your profile page. It is a standard profile page block. Other users can leave messages for you, i.e. write on your wall, and they can decide whether everyone looking at your profile page can see them or only they and you.
You only need to place the block on your profile page. There is no further configuration possible.
When you view your wall (or someone else’s wall) on your profile page, you see the following.
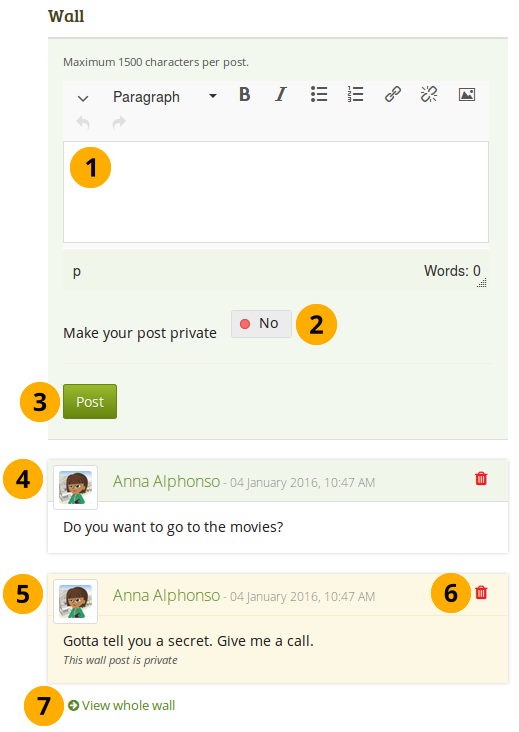
A wall on a profile page
- Enter your message in the text box. You can use the visual editor to format your message.
- Make your post private: Decide who shall see your wall post. If you make it private, only you and the person to whose wall you are posting will see the post.
- Click the Post button to add your message to the wall.
- A wall post always contains the name of the person who made the post, the date and the actual message. A public wall post can be viewed by anyone who has access to the profile page.
- Wall posts that are private are highlighted.
- Click the Delete icon if you do not want to have a specific post on your wall. The post authors and you as owner of your wall can delete posts.
- Click the View whole wall link to see all wall posts.
When somebody else leaves a message on your wall, you receive a notification and have that sent to your inbox. Other people are not notified about new messages on your wall.
Résumé
You can display either your entire résumé or parts of it in any portfolio page. If you choose to display only parts of your résumé, you have more control over the arrangement of the information.
My entire résumé
Add a block with your entire résumé to your page.
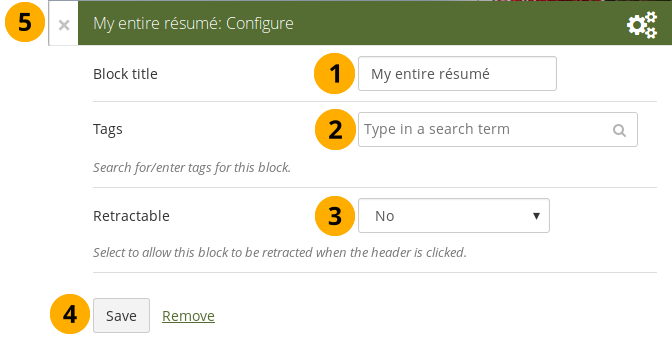
Configure the My entire résumé block
- Block title: Choose a title for your block.
- Tags: Enter tags for this block to find this content more easily. The tags are displayed as part of the page tags.
-
Retractable: Choose whether you want to allow users to reduce the block to its heading on a page or see just the heading only automatically. The options are:
- No: The block and its content is displayed at all times.
- Yes: Allow users to reduce the block to just the heading by clicking the Retractable icon .
- Automatically retract: Only the heading of the block is visible, and the user can click the Retracted icon to view its content.
- Click the Save button to accept your changes, or click Cancel to leave the block’s content as it is. Remove is shown only when you place the block into the page for the first time.
- You can also click the Close button in the top left-hand corner of the modal window to either remove a newly created block before it is being saved or to cancel any changes and leave the block’s content as it is.
When you use this block, you do not have control over the order in which the information is displayed, but Mahara decides that. In order to be more flexible, you can choose to display one résumé field at a time with the One résumé field block.
One résumé field
Add a block with one résumé field to your page.
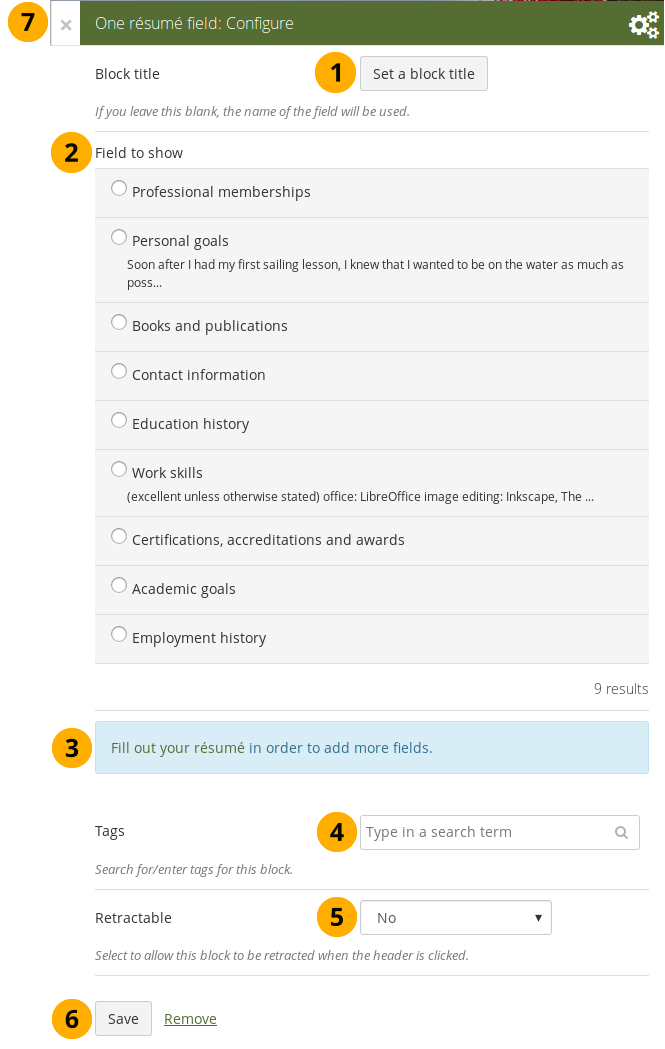
Configure the One résumé field block
- Block title: The title of the résumé field you want to display is chosen automatically unless you provide a different one.
- Field to show: Choose the résumé information that you want to display. You can select one area at a time.
- You can jump to the résumé section directly from this modal window in order to fill in more content.
- Tags: Enter tags for this block to find this content more easily. The tags are displayed as part of the page tags.
-
Retractable: Choose whether you want to allow users to reduce the block to its heading on a page or see just the heading only automatically. The options are:
- No: The block and its content is displayed at all times.
- Yes: Allow users to reduce the block to just the heading by clicking the Retractable icon .
- Automatically retract: Only the heading of the block is visible, and the user can click the Retracted icon to view its content.
- Click the Save button to accept your changes, or click Cancel to leave the block’s content as it is. Remove is shown only when you place the block into the page for the first time.
- You can also click the Close button in the top left-hand corner of the modal window to either remove a newly created block before it is being saved or to cancel any changes and leave the block’s content as it is.
External content
With the help of the external content blocks, you can include RSS feeds, external media or GoogleApps documents etc. into a page.
External feed
Embed an external RSS or ATOM feed, e.g. to display an external blog.
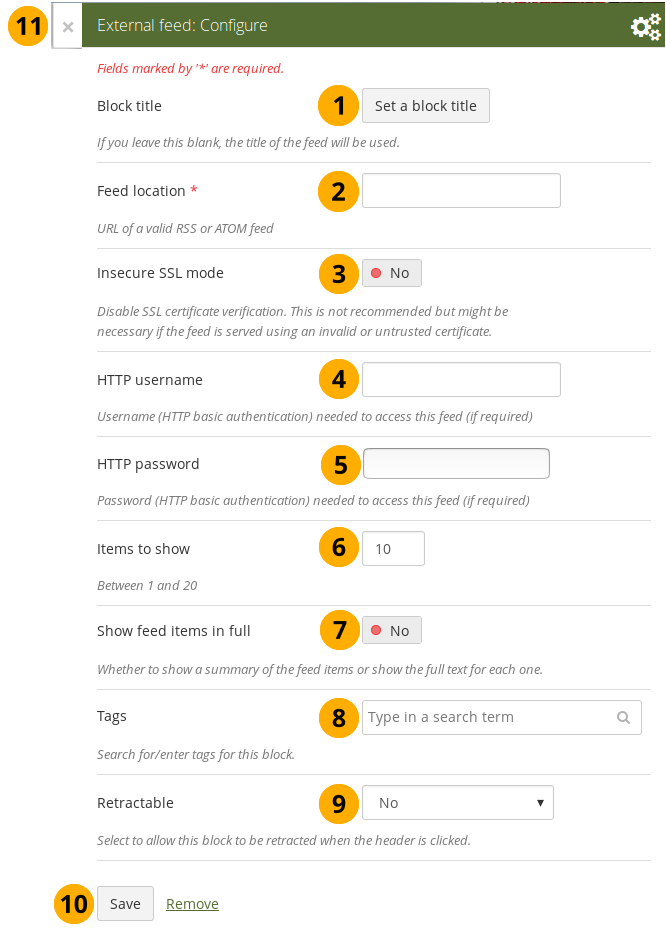
Configure the external feed block
-
Block title: If you leave the title blank, the title of the feed will be used.
-
Feed location: Put the entire feed URL from a valid RSS or ATOM feed in here. If the feed is not displayed, try to view it in a regular feed reader to make sure that the URL is correct. You must provide a feed URL here.
Unfortunately, Firefox and Chrome do not display the RSS feed icon for a page immediately near the address bar anymore. In Firefox you will have to go to View → Toolbars → Customize and then drag the RSS icon to your toolbar. It lights up orange / white when a feed is available.
If you use Chrome, you will have to install the RSS Subscription Extension.
-
Insecure SSL mode: Switch this option to “Yes” if you wish to enable the insecure SSL mode. This mode allows you to override certificate errors generated by a feed.
-
HTTP username: Provide a username if you wish to access a feed that requires authentication. This is the username to access the feed and not your portfolio system.
-
HTTP password: Provide a password to access a feed that requires authentication. This is the password to access the feed and not your portfolio system.
-
Items to show: Decide how many of the latest items in the feed you wish to display. You can choose up to 20.
-
Show feed items in full: Switch this option to “Yes” if you want to see the entire feed content and not only the heading of a blog post.
-
Tags: Enter tags for this block to find this content more easily. The tags are displayed as part of the page tags.
-
Retractable: Choose whether you want to allow users to reduce the block to its heading on a page or see just the heading only automatically. The options are:
- No: The block and its content is displayed at all times.
- Yes: Allow users to reduce the block to just the heading by clicking the Retractable icon .
- Automatically retract: Only the heading of the block is visible, and the user can click the Retracted icon to view its content.
-
Click the Save button to accept your changes, or click Cancel to leave the block’s content as it is. Remove is shown only when you place the block into the page for the first time.
-
You can also click the Close button in the top left-hand corner of the modal window to either remove a newly created block before it is being saved or to cancel any changes and leave the block’s content as it is.
If your feed is not updated automatically, please ask your site administrator to check the cron settings.
If you click an entry in the RSS feed, it will open in a new window.
External media
With this block you can embed content from a wide variety of third-party sites. The sites that are allowed are listed below the text area in the configuration screen. You see only their favicons, but when you hover over an icon with your mouse, you see the site’s name as well.
Mahara comes with a number of sites that are allowed per default. These are listed on the page. Your site administrator can add additional iframe sources.

Configure the external media block
-
Block title: Choose a title for your embedded content.
-
URL or embed code: Paste the URL or the embed code of a page where the content is located.
-
Embed code: Content from the sites listed in this section can be embedded using the <iframe> embed code. Any new site that the site administrator allows will be added in alphabetical order. The default sites are:
-
URLs: Content from the sites listed in this section can be embedded by simply grabbing the page URLs where the content can be found. The default sites are:
-
You can also paste an Embedly embed code and display your content that way.
-
Width: Choose the width (in pixels) that the content should take up on the page. This only goes for the content for which you provided the URL.
If you use the embed code, you need to provide the correct width and height directly in the embed code and can ignore this setting here.
-
Height: Choose the height (in pixels) that the content should take up on the page. This only goes for the content for which you provided the URL.
If you use the embed code, you need to provide the correct width and height directly in the embed code and can ignore this setting here.
-
Tags: Enter tags for this block to find this content more easily. The tags are displayed as part of the page tags.
-
Retractable: Choose whether you want to allow users to reduce the block to its heading on a page or see just the heading only automatically. The options are:
- No: The block and its content is displayed at all times.
- Yes: Allow users to reduce the block to just the heading by clicking the Retractable icon .
- Automatically retract: Only the heading of the block is visible, and the user can click the Retracted icon to view its content.
-
Click the Save button to accept your changes, or click Cancel to leave the block’s content as it is. Remove is shown only when you place the block into the page for the first time.
-
You can also click the Close button in the top left-hand corner of the modal window to either remove a newly created block before it is being saved or to cancel any changes and leave the block’s content as it is.
You can use the same iframe embed code around Mahara in notes, text and journal entries as well.
Watch the video Saving a video from iPad to MyPortfolio if you want to see how you can embed a YouTube video into your Mahara portfolio using an iPad. You can use a similar work flow for adding YouTube videos also via Android or on your computer. “MyPortfolio” is the name of a Mahara instance in New Zealand for schools.
Google Apps
Embed any of the following content available via Google (Apps):
- books
- calendars
- documents, spreadsheets, presentations
- maps
You can only display the content, but not immediately edit documents, spreadsheets or presentations. You will have to be logged in to your Google (Apps) account to do so. You can use this block with a regular, personal Google account or if you have a Google Apps account via an institution, e.g. your school or university.
If certain documents are restricted to a Google Apps domain or to specific people, a login screen is displayed.

Configure the Google Apps block
- Block title: Choose a title for your embedded content.
- Embed code or URL: Depending on what kind of content you wish to display, you either provide the embed code or the URL. Click the Help button for more information on how to embed each Google component.
- Height: Choose the height for the embedded content. The width is adjusted to the column width of the block automatically.
- Tags: Enter tags for this block to find this content more easily. The tags are displayed as part of the page tags.
-
Retractable: Choose whether you want to allow users to reduce the block to its heading on a page or see just the heading only automatically. The options are:
- No: The block and its content is displayed at all times.
- Yes: Allow users to reduce the block to just the heading by clicking the Retractable icon .
- Automatically retract: Only the heading of the block is visible, and the user can click the Retracted icon to view its content.
- Click the Save button to accept your changes, or click Cancel to leave the block’s content as it is. Remove is shown only when you place the block into the page for the first time.
- You can also click the Close button in the top left-hand corner of the modal window to either remove a newly created block before it is being saved or to cancel any changes and leave the block’s content as it is.
Google document
- Open the document.
- Click File in the menu bar and then Publish to the Web.
- Click the Start publishing button.
- Copy the document link or embed code.
- Paste the link or embed code into the Embed code or URL box in the Google Apps block.
Google spreadsheet
- Open the spreadsheet.
- Click File in the menu bar and then Publish to the Web.
- Click the Start publishing button.
- Read through the other options and decide on them.
- Copy the link for the option Web page or the embed code for the option HTML to embed in a page.
- Paste the link or embed code into the Embed code or URL box in the Google Apps block.
Google presentation
- Open the presentation.
- Click File in the menu bar and then Publish to the Web.
- Click the Start publishing button.
- Copy the link or embed code.
- Paste the link or embed code into the Embed code or URL box in the Google Apps block.
Google Drive folder
- Select the folder that you want to share.
- Click the Link icon. A shareable link is created.
- Copy the link.
- Paste the link into the Embed code or URL box in the Google Apps block.
Google Calendar
- Open Google Calendar.
- Click on the little triangle next to the calendar that you wish to embed.
- Click on Calendar settings.
- On the Calendar details tab scroll down to Embed This Calendar.
- Customize the calendar appearance and then copy the embed code.
- Paste the embed code into the Embed code or URL box in the Google Apps block.
Google Maps
- Open Google Maps.
- Click the My Places button.
- Click on the name of the map that you wish to embed.
- Click on the Link icon to the left of the map.
- Customize the appearance of the map and copy the embed code.
- Paste the embed code into the Embed code or URL box in the Google Apps block.
Use steps 2 and 3 only if you wish to embed one of your Google maps. If you wish to embed any Google map, you can skip these steps.
Google Books
- Open Google Books.
- Find the book that you wish to embed.
- Click on the book title.
- Click on the Link icon above the book.
- Copy the embed code of the book.
- Paste the embed code into the Embed code or URL box in the Google Apps block.
The link icon only appears if you are allowed to embed this book.
Badges
Open Badges are an answer for showing recognition of skills and competencies online with the help of an open framework.
Configure the block
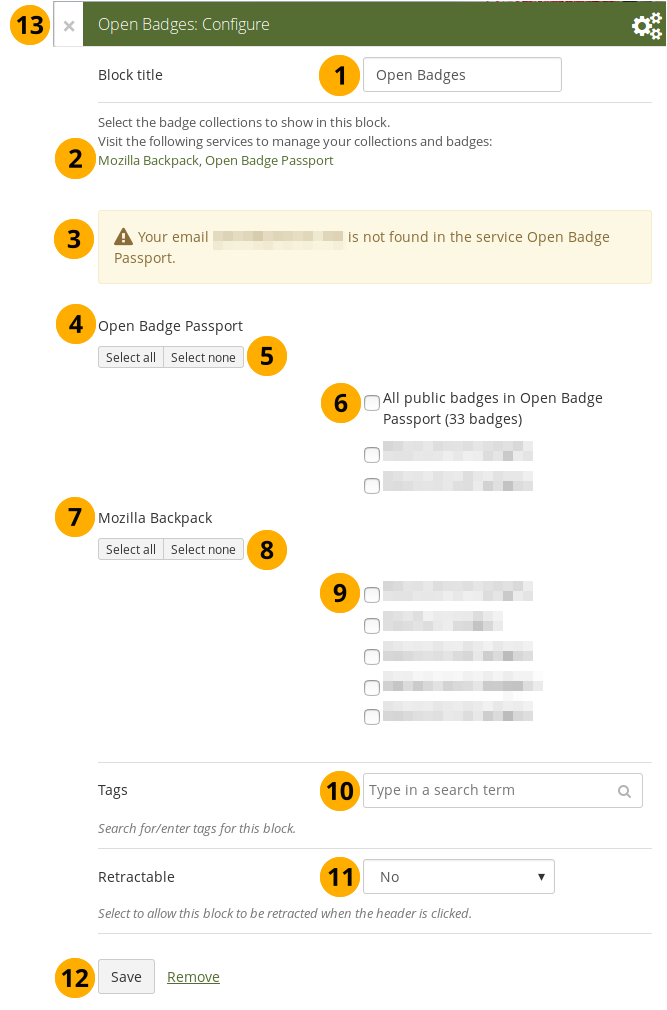
Configure the Open Badges block
-
Block title: Choose a title for your block.
-
If you do not see all your public badge collections, click the links to verify that you have made all badges publicly available that you want to see.
-
Mahara checks the backpacks for all email addresses that are associated with your account. If it can’t find any badges to display for a particular address, it’ll show a notice.
-
Open Badge Passport: All public badge collections from your Open Badge Passport are displayed.
If you have other “backpacks” that contain badges, the site administrator would need to allow them in the config.php.
-
Use the Select all or Select none buttons to select all badge collections or to revert your selection.
-
You can also select individual badge collections if you prefer by ticking their checkboxes.
-
Mozilla Backpack: All public badge collections from your backpack are displayed.
-
Use the Select all or Select none buttons to select all badge collections or to revert your selection.
-
You can also select individual badge collections if you prefer by ticking their checkboxes.
-
Tags: Enter tags for this block to find this content more easily. The tags are displayed as part of the page tags.
-
Retractable: Choose whether you want to allow users to reduce the block to its heading on a page or see just the heading only automatically. The options are:
- No: The block and its content is displayed at all times.
- Yes: Allow users to reduce the block to just the heading by clicking the Retractable icon .
- Automatically retract: Only the heading of the block is visible, and the user can click the Retracted icon to view its content.
-
Click the Save button to accept your changes, or click Cancel to leave the block’s content as it is. Remove is shown only when you place the block into the page for the first time.
-
You can also click the Close button in the top left-hand corner of the modal window to either remove a newly created block before it is being saved or to cancel any changes and leave the block’s content as it is.
Since your badges need to be fetched from an external service, it may take a little bit until they are displayed on the page.
Create a collection of badges in the Mozilla Backpack
Drag a badge onto a new collection space
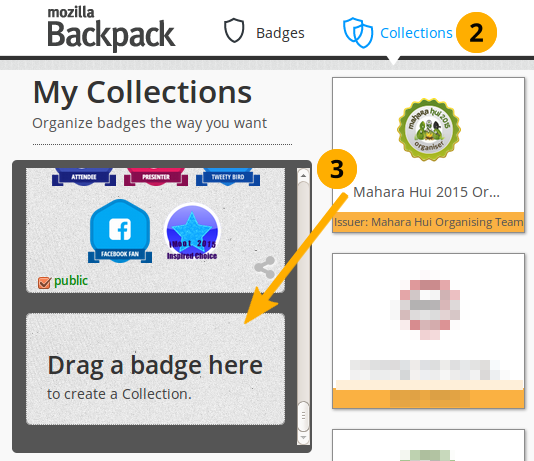
-
Go to your Mozilla Backpack. You must have already pushed at least one badge to it to complete the following steps.
-
Click the Collection navigation item to enter your badge collection area.
-
Drag one of your badges onto a (new) collection space.

Create a new collection
-
Give your new collection a title by clicking onto “New collection” and typing your title.
-
Tick the checkbox public so others can see your badges.
-
Click the Share icon. You will be taken to a page where you can see all the badges in the collection that you created.
Blocks in various pages
Certain blocks can only exist in certain page contexts. For example, the wall can only be placed on the profile page whereas a note can be used on any page. There are a number of page contexts which can have different blocks:
- portfolio page
- group page
- institution page
- site page
- profile page
- dashboard page
The following list shows in which contexts a specific block and therefore a specific artefact can be used. It also shows which blocks can be copied.
Note
Blocks in a page that are copied from one user to another need to be checked for content accuracy and whether they can be retained as they are or need to be updated.
Blocks that display a * next to their check mark can be added to a group, institution, or site page and configured where possible to help with setting up templates. No content is displayed though when the page is viewed because user-specific content is required.
4.3.6.1. Files, images and video
| Block | User | Group | Institution | Site | Dashboard | Profile | Group homepage | Copyable |
|---|---|---|---|---|---|---|---|---|
|
|
||||||||
|
|
||||||||
|
|
||||||||
|
|
||||||||
|
|
||||||||
|
|
||||||||
|
|
4.3.6.2. Journals
| Block | User | Group | Institution | Site | Dashboard | Profile | Group homepage | Copyable |
|---|---|---|---|---|---|---|---|---|
|
|
||||||||
|
|
||||||||
|
|
||||||||
|
|
4.3.6.3. General
| Block | User | Group | Institution | Site | Dashboard | Profile | Group homepage | Copyable |
|---|---|---|---|---|---|---|---|---|
|
|
||||||||
|
|
||||||||
|
|
||||||||
|
|
||||||||
|
|
||||||||
|
|
||||||||
|
|
||||||||
|
|
||||||||
|
|
||||||||
|
|
||||||||
|
|
||||||||
|
|
* | * | * | * | ||||
|
|
||||||||
|
|
* | * | * | * | ||||
|
|
||||||||
|
|
4.3.6.4. Personal info
| Block | User | Group | Institution | Site | Dashboard | Profile | Group homepage | Copyable |
|---|---|---|---|---|---|---|---|---|
|
|
||||||||
|
|
||||||||
|
|
||||||||
|
|
* | * | * | * | ||||
|
|
* | * | * | * | ||||
|
|
* | * | * | |||||
|
|
* | * | * | |||||
|
|
4.3.6.5. External content
| Block | User | Group | Institution | Site | Dashboard | Profile | Group homepage | Copyable |
|---|---|---|---|---|---|---|---|---|
|
|
||||||||
|
|
||||||||
|
|
Collections
Collections allow you to organize your portfolio into multiple pages so as to find individual sections more easily, you can create a multiple collections that reuse pages for different contexts of use..
Add a collection
If you want to organize your portfolio into multiple pages so as to find individual sections more easily, you can create a collection that holds multiple pages.
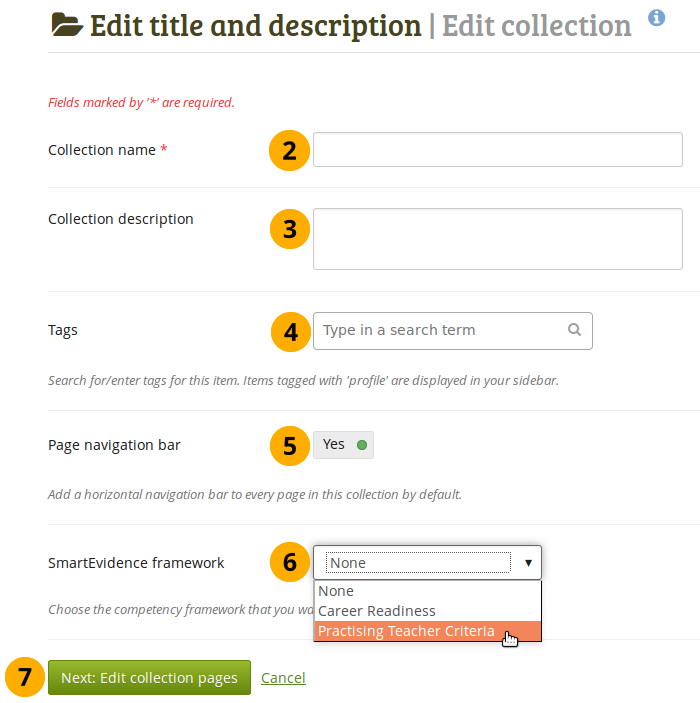
Create a collection
-
On the Pages and collections page, click the Add button. In the modal that comes up, click the Collection button. On the next screen…
-
Collection name: Provide a title for your collection.
-
Collection description: Optionally, you can write a short description about your collection. You do not have a visual editor, but just a plain text box.
-
Tags: Enter tags to find your collection more easily at a later stage. You can choose from your existing tags by starting to type a letter and then selecting the tag you want to use. You can also type a new tag, and it is added to your list of tags.
-
Page navigation bar: Choose whether you wish to display a tabbed navigation or not. If you choose not to, you will have to include the navigation block for you to go from one page to the next on the individual pages that belong to this collection.
-
SmartEvidence framework: Select the framework that you want to associate with your collection. You can change the collection as long as you have not put an annotation onto a page within the collection.
This functionality is available if your institution administrator allowed the use of SmartEvidence.
-
Click the Next: Edit collection pages button or click Cancel if you want to abort adding your collection.
Add pages to a collection
In the next step after you have created your collection, you choose which portfolio pages you wish to include in this collection. You see all the potential pages that you can use. If you had already placed a page into another collection, it is not shown here.
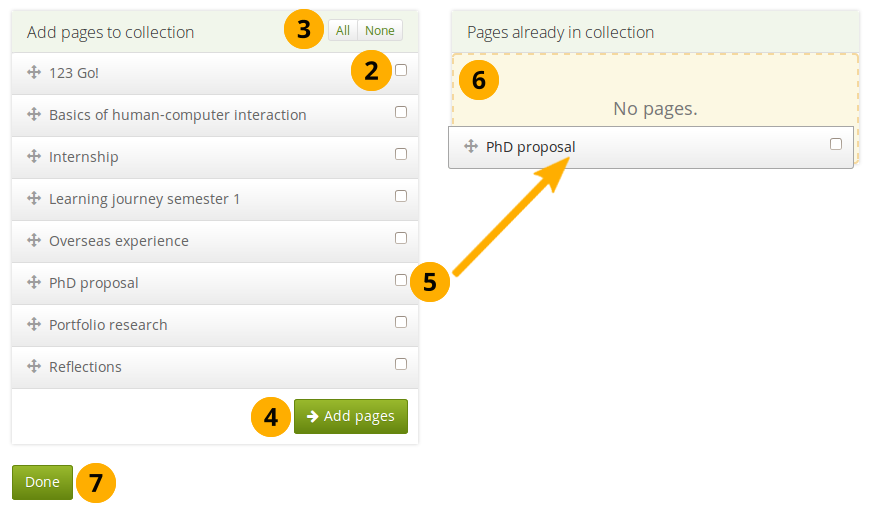
Add pages to a collection
- On Portfolio → Pages and collections, click the More options icon for the collection and then the Manage icon . On the next screen…
- Put a check mark next to each page that you wish to include in your collection.
- Alternatively, you can click the All link to add all pages available to the collection or the None link to revert your selection.
- Click the Add pages button to add the pages to your collection.
- If you do not wish to click all pages, you can also drag and drop them into the collection by clicking their title and dragging them to the area Pages already in collection.
- A dotted line shows you where you can drag your page so you can already drag the pages into the collection in the order that you prefer.
- Click the Done button to finish this step.
Manage pages in a collection
Once you have added your pages to your collection. You can move them around or remove them.
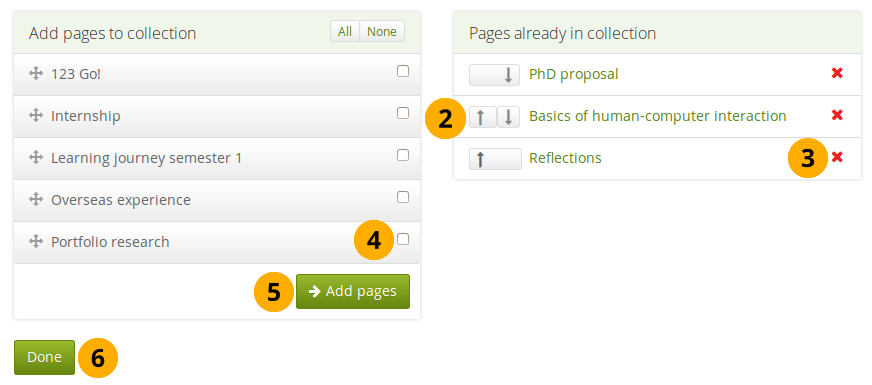
Manage the pages that are displayed within your collection
- If you are not already in the page management, click the More options icon for the collection and then the Manage icon . On the next screen…
- Use the Move up and Move down buttons to arrange your pages in a different order. Alternatively, you can drag and drop the pages within the list.
- Click the Remove icon to take a page out of a collection. The page itself is not deleted.
- Put a check mark next to each page that you wish to include in your collection in addition to the ones already in it.
- Click the Add pages button to add the pages to your collection and then move them around with the Move up and Move down buttons. Alternatively, you can drag and drop the pages to the position where you would like to have them in the list.
- Click the Done button.
When you add pages to your collection that have different access permissions than the collection has, the page’s access permissions get added to the collection and the page is available under the same access permissions as the entire collection because it is part of the collection.
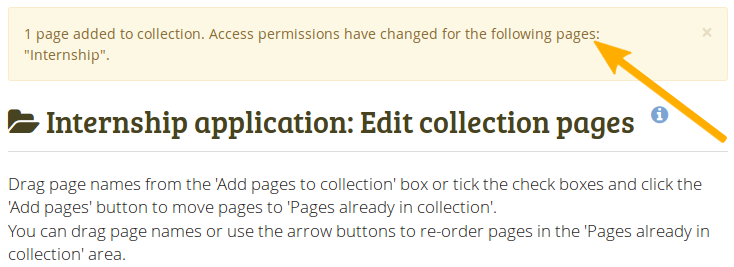
Notice about changes in permissions
If there is a change in access permissions, a warning will be displayed so that you are informed that changes have taken place.
View your collection by clicking on the collection title or any page that is part of your collection.
On a mobile device, you can swipe left and right to navigate through a collection when it has the page navigation bar.
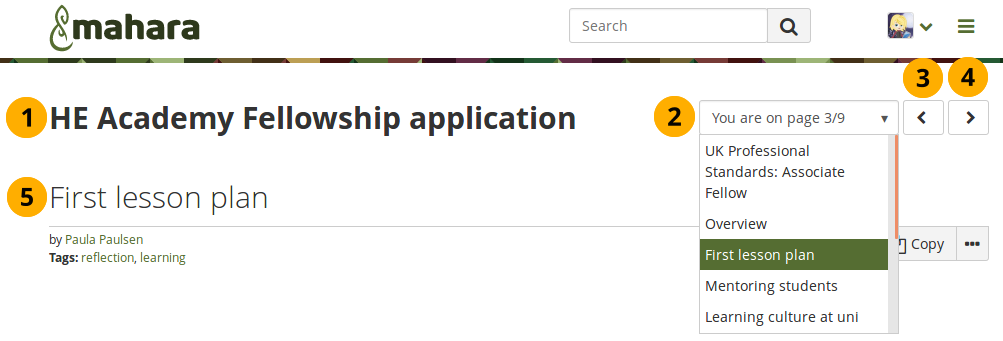
A collection with the page navigation bar
- Title of the collection.
- Drop-down menu: Select the page to which you want to jump within the collection.
- Previous page button to navigate to the previous page.
- Next page button to navigate to the next page.
- Title of the page you are currently viewing.
Deleting a collection
When you delete a collection, the pages and artefacts within it are not deleted.
If you want to delete an entire collection, you can do so on Portfolio → Pages and collections by clicking the More options icon and then the Delete icon .
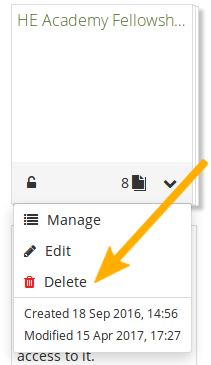
Delete a collection
Sharing your ePortfolio
When you have created portfolio pages (and collections), you may wish to share them with others, e.g. to receive feedback.
Share Overview
You can set the access permissions on the Edit access page. It is accessible via Portfolio → Shared by me or directly from the page editor when you edit a portfolio page.
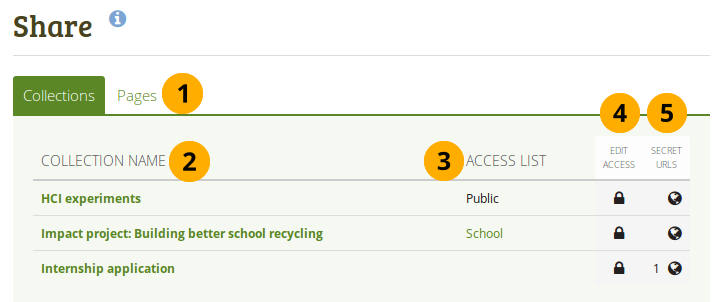
- Decide whether you want to change sharing permissions for a collection or a page.
- Collection name (or Page title): Your collections / pages are sorted alphabetically.
- Access list: The list of users, groups or institutions who have access to a particular collection or page.
- Edit access: The Edit access icon next to each collection or page allows you to change the permission of who can view a page or collection.
- Secret URLs: The Secret URL edit icon next to each collection or page allows you to set up one or more secret URLs for a page or collection. The number of secret URLs that you have generated is displayed next to the icon.
Edit access to your profile page
Your profile page is restricted to only members of your institution by default.
Other users who have an account can only see basic information, e.g. your name, your institution membership and messaging information.
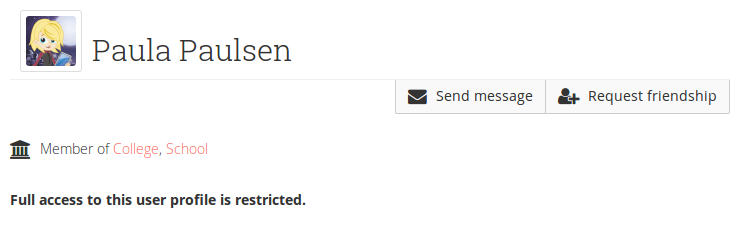
Restricted view of a profile
Edit access for users with an account
Basic settings
The Edit access page allows you to set the permissions for a single user or multiple users who should be able to view some of your portfolio pages or collections.
You can assign access to a single page or collection at a time or to multiple pages and / or collections at once.
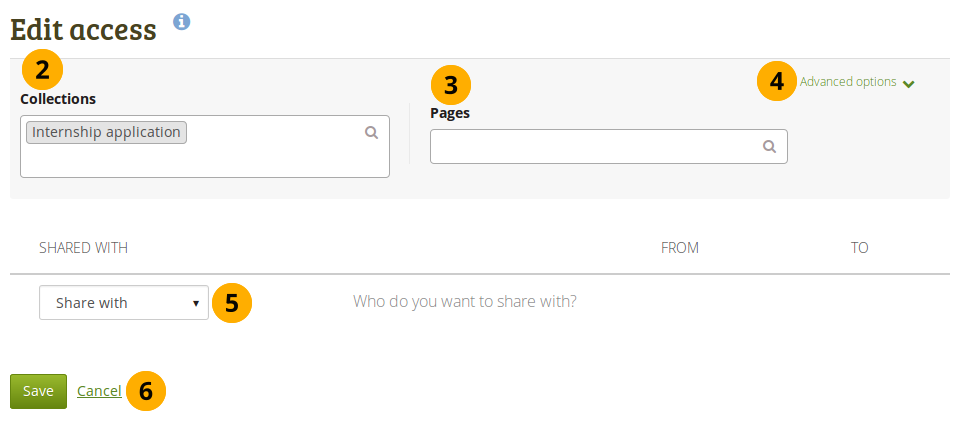
Users and groups to whom you can give access to pages and / or collections
- Click the Edit access icon next to the collection or page for which you want to give access permissions under Portfolio → Shared by me. On the next screen…
- You see the collection displayed if you selected one in step 1. You can add more collections by searching for them in the select box if you want to give other collections the same sharing permissions.
- You see the page displayed if you selected one in step 1. You can add more pages by searching for them in the select box if you want to give other pages the same sharing permissions.
- Advanced options: You have more settings available that apply to all selected collections and pages.
- Use the Share with drop-down menu to select with whom you want to share your selected collections and pages.
- Click the Save button to keep your changes or click Cancel to abort the action.
If you select individual people or a group with whom to share your portfolio, they will receive a notification. That notification contains a link to your portfolio. If you restricted access for your portfolio to a particular time, that time frame is mentioned in the notification as well.
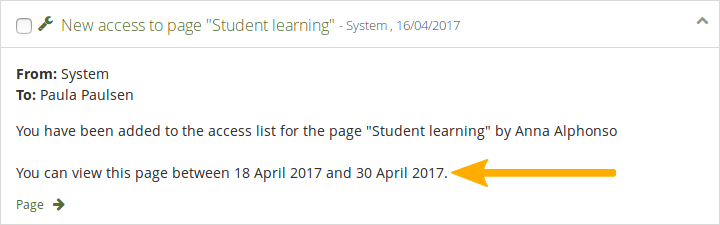
Notification with time frame in which portfolio is available
Advanced options
You can choose a number of additional options which are applied to all pages and / or collections that you selected.
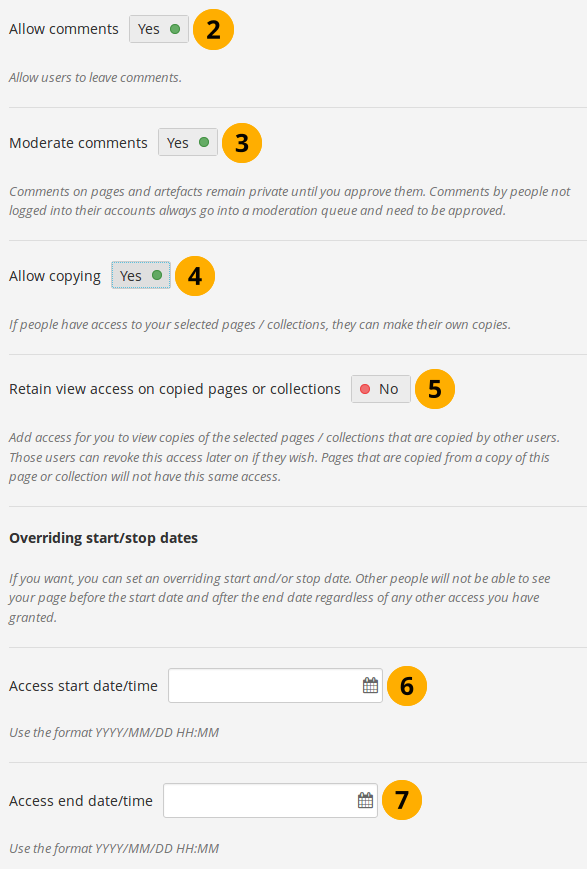
Advanced options for editing access to pages / collections
-
Click the Advanced options link to see all available options.
-
Allow comments: This switch is set to “Yes” by default to encourage you to allow others to comment on your pages and collections.
-
Moderate comments: If you wish to see any page or artefact comment before it is made public, i.e. can be seen by others who have access to the page on which the comment is made, set the switch to “Yes”.
Comments that are left on portfolios shared publicly or via secret URL by people who do not have an account are always moderated, no matter the decision you make here. They are only made public if the portfolio author wishes to do so.
If people can’t leave comments when they are not logged in, the site administrator did not allow anonymous comments. -
Allow copying: Set the switch to “Yes” if you want to allow the people who can view your page / collection to make a copy of it for themselves. Check the blocks that can be copied.
When you allow copying on public portfolios or portfolios shared via a secret URL, people who are not logged into Mahara can download the portfolio as a Leap2A export.
If you edit an institution or site page, you see the additional option Copy for new institution members / Copy for new members when you allowed copying. With this option you can place a page or collection directly into the portfolio of a new user. Existing users still have to copy the page or collection themselves.
-
Retain view access on copied pages or collections: This option only becomes available if you allow copying. When you set this switch to “Yes”, you as owner of the page / collection will have access to the copied page / collection automatically. However, the owner of the copied page / collection can take that access away at any time.
-
Access start date/time: You set the time frame from when on all users who have access to your page / collection can view your page or collection. The date here overrides any individual dates you may have set. You can type the date and time in the format YYYY/MM/DD HH:MM or click in the field to select the date and time.
-
Access end date/time: You set the time frame until when all users who have access to your page / collection can view it. The date here overrides any individual dates you may have set. You can type the date and time in the format YYYY/MM/DD HH:MM or click in the field to select the date and time.
If you set access dates for individual users or groups of users that differ from the access start and end dates here, you get a warning message after saving your settings so you can review the changes you just made and adjust the dates so that your portfolio viewers do not lose access earlier than expected.
If you have not allowed comments in general, you can still choose to allow them for a certain person or group of people who are in your access list. That way you can regulate very flexibly who shall be able to place comments on a page / collection and who cannot.
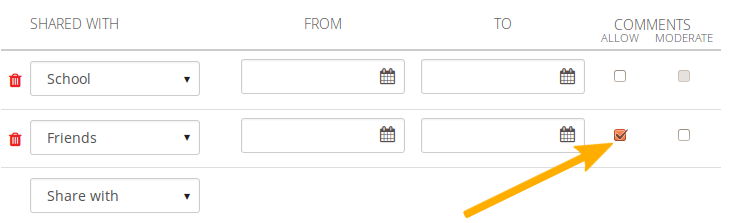
Allow comments on a user-by-user basis
Select users
As owner of your portfolio, you are in control with whom you want to share your work. If you have a lot of portfolios, i.e. pages or collections, you may wish to review the sharing options from time to time and see if they need updating.
You select the users or groups with whom to share your portfolio under Shared with.
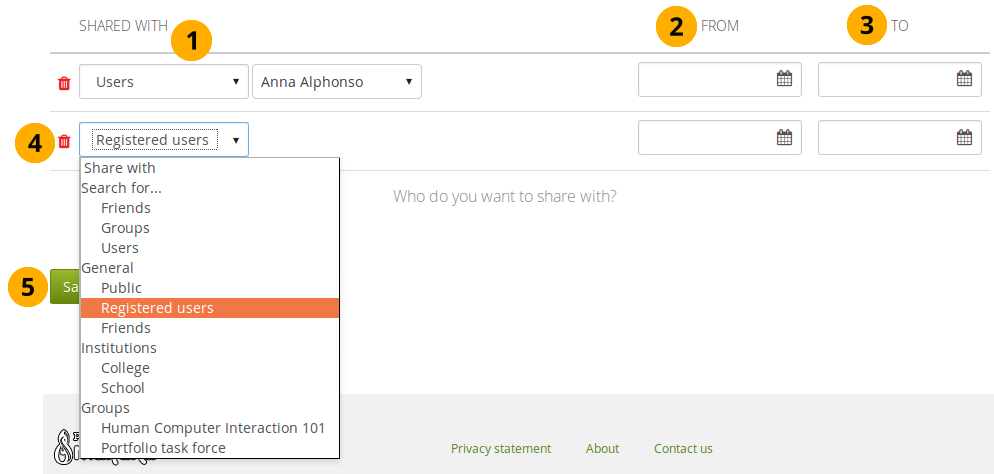
-
In the drop-down menu select with whom you want to share. You have many options:
-
Search for…
- Friends: Select this option if you want to share your portfolio with a specific friend. Enter the beginning of their name in the text field that is displayed once you selected this option and you can find them.
- Groups: Select this option if you want to share your portfolio with a specific group. You do not need to be a member of this group. Enter part of the group’s name in the text field that is displayed once you selected this option and you can find it. You then also have the option to decide whether to share your portfolio with everyone in the group, only members or tutors or administrators.
- Users: Select this option if you want to share your portfolio with a specific user who is not a friend. Enter the beginning of their name in the text field that is displayed once you selected this option and you can find them.
-
General
-
Public: Anybody online who knows the URL(s) can see your selection of pages / collections.
This option is only available if the site administrator allowed public pages under Administration → Site options → General settions → Allow public pages.
If you are on a multi-tennanted site, the institution administrator must also allow public pages in the institution settings.
-
Registered users: All users who have an account on the Mahara instance you are using can view your selection of pages / collections.
-
Friends: All your friends on Mahara can view your selection of pages / collections.
-
-
Institutions: If you are a member of one or more institutions, you can select one here in order to share your portfolio with everybody belonging to this institution.
-
Groups: If you are a member in one or more groups, you see them listed here as a shortcut and can choose them easily.
You are not able to narrow down the sharing options for the group like you can under the general group option above. When you choose a group here form the shortcuts, you always share your portfolio with everyone in the group.
-
-
From: You can choose a start date and time from when the specific person or group of people shall have access to your selected pages / collections. You can type the date and time in the format YYYY/MM/DD HH:MM or click in the field to select the date and time.
-
To: You can choose an end date and time until when the specific person or group of people shall have access to your selected pages / collections. You can type the date and time in the format YYYY/MM/DD HH:MM or click in the field to select the date and time.
-
Click the Delete icon if you want to remove someone from the access list.
-
Click the Save button to keep your changes or click Cancel to abort the action.
Your friends or individual users with whom you shared your pages / collections receive a notification. Group members also receive a notification that you shared a page with them if the group administrator allowed that. You as page author and member of the group with which you shared your pages / collections do not get notified.
You do not receive a notification when users share their page with the public, all registered users, an entire institution or friends.
If you use the web services plugin, you can also share pages with “favourite users”. For more information, please refer to the specifications for this feature.
Edit access for users without an account
Besides giving users who have a login or the entire public access to your portfolio, you can also give users who do not have an account on Folioz access to your portfolio pages and / or collections without making your work publicly available and searchable by search engines. This can be interesting, e.g.
- when you create a portfolio for a job application and the prospective employer does not have a login and cannot get one.
- when you want to share your portfolio with your parents and also get feedback from them.
- when an external assessor shall evaluate your work.
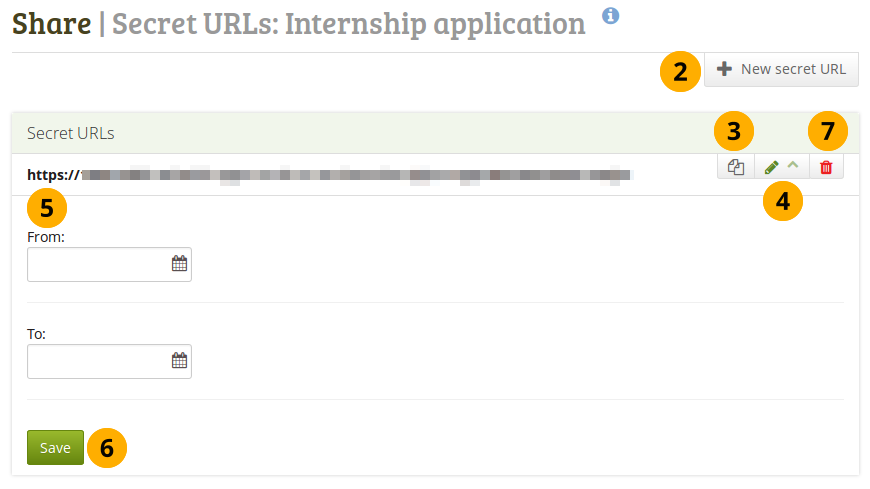
Add one or more secret URLs to a page or collection
You can create a secret URL the following way when you are on the share overview page:
- Click the Edit secret URL access icon next to the collection or page for which you want to give access permissions under Portfolio → Shared by me. On the next screen…
- Click the New secret URL button to generate a new secret URL. You can add as many secret URLs as you wish.
- Click the Copy button to copy the secret URL to your clipboard. You can then paste it into an email to send to somebody. The Copy button does not rely on Flash anymore and thus does not need a special plugin to work.
- You can click the Edit button to add a time restriction for access to your page / collection via this URL. The “From” and “To” date fields become visible when you click the Edit button.
- Type a start and / or end date (and time) manually following the pattern of YYYY/MM/DD HH:MM or select the date by clicking in the text field.
- Click the Save button to save the date access changes.
- Click the Delete button if you do not want to use this secret URL anymore.
Logged-out users or those who do not have an account can only leave comments on public pages or pages which they can access via a secret URL if the site administrator turned on the Anonymous comments function under Administration → Configure site → User settings.
Privacy
Nothing is public by default. Your profile page, which you can leave empty, is only viewable to those in the same institution but can be made public. Search engines cannot index your eportfolio unless it is made public.
You can create a portfolio using the collections feature and add pages to this collection:
There is no access to anything in your pages and collections until you set whether you only want friends or the public to have access:
You can set no access except those who have the secret link which you can send to classmates or instructor:
Skins
You can create skins yourself, edit them, use other people’s skins, and use them on your portfolio pages and your profile page.

Your Skins overview page
-
Click the Create skin button to design a new skin.
-
Click the Import skin(s) button to import skins that others have shared online.
-
Click the Export skin(s) button to export all your personal skins.
-
You can decide which skins you want to display:
- All skins: All skins that you have access to
- Site skins: Only skins created by a site administrator
- My skins: Skins created by yourself
- Public skins: Other people’s skins that they shared publicly on the site
-
Click the View skin information icon to see metadata in a pop-up window about the skin such as:
- Title
- Owner
- Description
- Creation date
- Modified date
-
Click the Edit button to make changes to this skin.
-
Click the Export button to export only this one skin.
-
Click the Delete button to remove this skin.
You only see the Edit, Export and Delete buttons when you have the permission to perform these actions for a skin.
-
Click the Like button to mark someone else’s skin as one that you want to use on your own pages. The icon will turn grey. Clicking the button again will allow you to remove the skin from your list of favourite skins.
You can only like another user’s skin, but not site skins. You can always select a site skin for a page, but only select other people’s skins when you liked them.
Create a skin
You can create skins as:
- individual user
- site administrator
Depending on the settings of your skin, it will be available only to you or others.
In the following, the individual skin settings will be described. You do not have to change all settings for a skin but can pick and choose which elements of the theme that your page has you would like to change.
General Tab
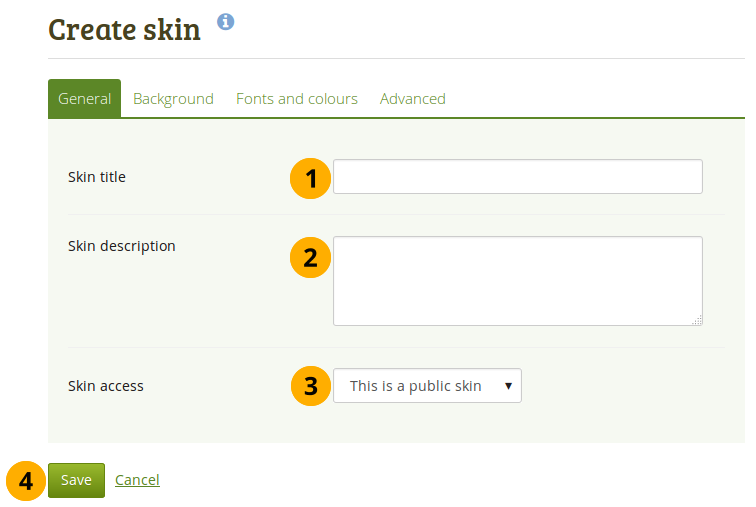
General settings for your skin
- Skin title: Give your skin a title. You will see that on the Skins overview page.
- Skin description: Describe your skin here and add any details that will help you in the future to remember why you created the skin, what is special about it etc. You can expand the text box if you need to enter a long description by dragging its bottom right corner.
-
Skin access: Decide here who shall have access to your skin. The default is This is a private skin.
- This is a private skin: Only you can use this skin on pages.
- This is a public skin: Others can see your skin and use it.
- Click the Save button to accept your changes or click Cancel to abort your changes.
Background Tab
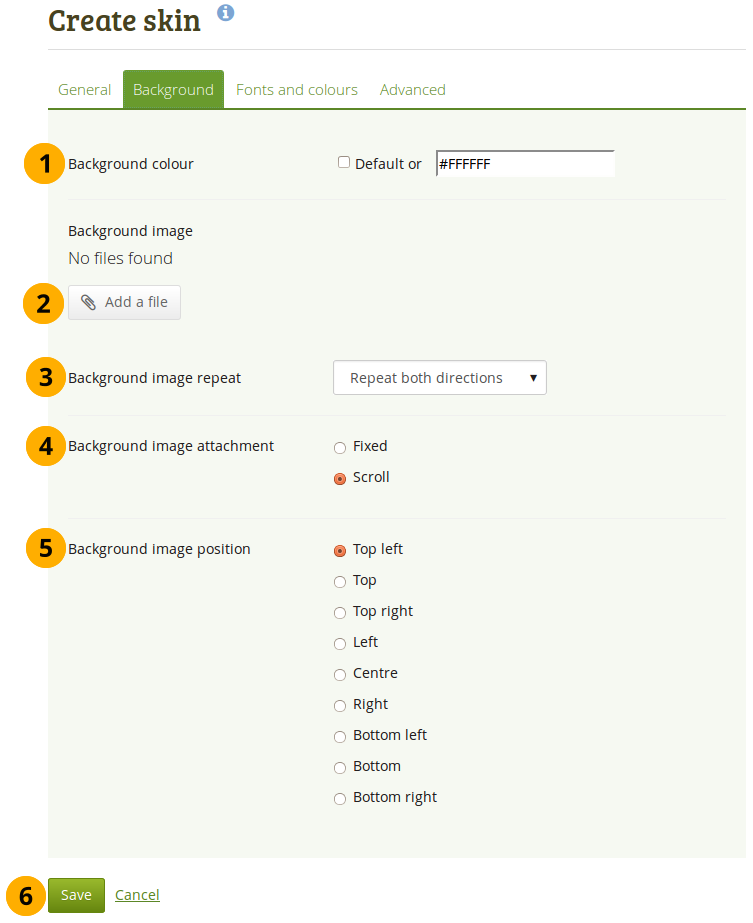
Choose the background for your skin
- Background colour: You can tick the checkbox to have no special skin background but use the theme’s background. Alternatively, you can click into the field and select the colour you would like to use or type the colour code in.
- Background image: You can choose to use an image as background. Click the Add a file button to choose an image from your files area.
-
Background image repeat: Decide whether you want to repeat the background image. This setting is useful if your image is smaller than your page. If you do not choose a repeat option, the background will not be filled with the image entirely. Your options are:
- Don’t repeat: No repetition of the image. This option should only be used if you have a very large image or if the image is larger than your page.
- Repeat only horizontally: Your image will only be repeated horizontally, but not vertically. This setting can work for a very wide but short page.
- Repeat only vertically: Your image will only be repeated vertically, but not horizontally. This setting can work for a narrow but long page.
- Repeat both directions: Your image will be repeated both horizontally and vertically. This setting is the most flexible for your page.
-
Background image attachment: Decide whether your background should scroll or stay fixed.
- Fixed: If you select this option, your background stays in place and does not move. Only the page content will scroll.
- Scroll: If you select this option, your background will scroll together with the page.
- Background image position: Decide where your background image shall be anchored. Click one of the options to select the position.
- Click the Save button to accept your changes or click Cancel to abort your changes.
Fonts and colours Tab

Change font properties
-
Heading font: Choose the font for your headings. You can choose from any of the installed fonts. The font will be applied to all your headings, e.g.
- page title
- block titles
- headings in the text if you marked them as headings
- Text font: Choose the font for all other text. You can choose from any of the installed fonts.
- Font size: Choose a relational font size. Headings will be changed proportionally.
- Text colour: Decide on the colour for text that appears on the page.
- Heading text colour: Choose the colour of your page heading.
- Emphasized text colour: Choose the colour of your block titles and other emphasized text.
- Normal link colour: Choose the colour in which links shall be displayed.
- Underline link: Change the switcher to “Yes” if you want your links to be underlined.
- Highlighted link colour: Choose the colour of your links when you hover over them.
- Underline link: Change the switcher to “Yes” if you want your highlighted link to be underlined.
- Click the Save button to accept your changes or click Cancel to abort your changes.
Wherever you have a colour field, you can either click into the field and select the colour you would like to use or type the colour code in.
If you do not want to use a custom colour but retain the theme colour, tick the checkbox Default.
Advanced Tab
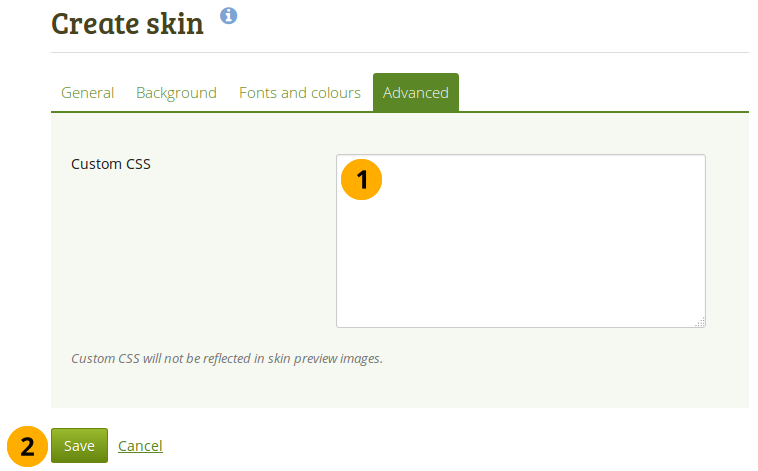
Add custom CSS
- Custom CSS: If you know how to change CSS, you can change other styles for your skin here and overwrite other elements on a page. You can expand the “Custom CSS” text box if you need to enter a a lot of custom CSS code by dragging its bottom right corner.
- Click the Save button to accept your changes or click Cancel to abort your changes.
Choose a skin
Portfolio → Pages → Edit a page
When the Skins feature is turned on, you see another item in the page editor navigation: Choose skin.
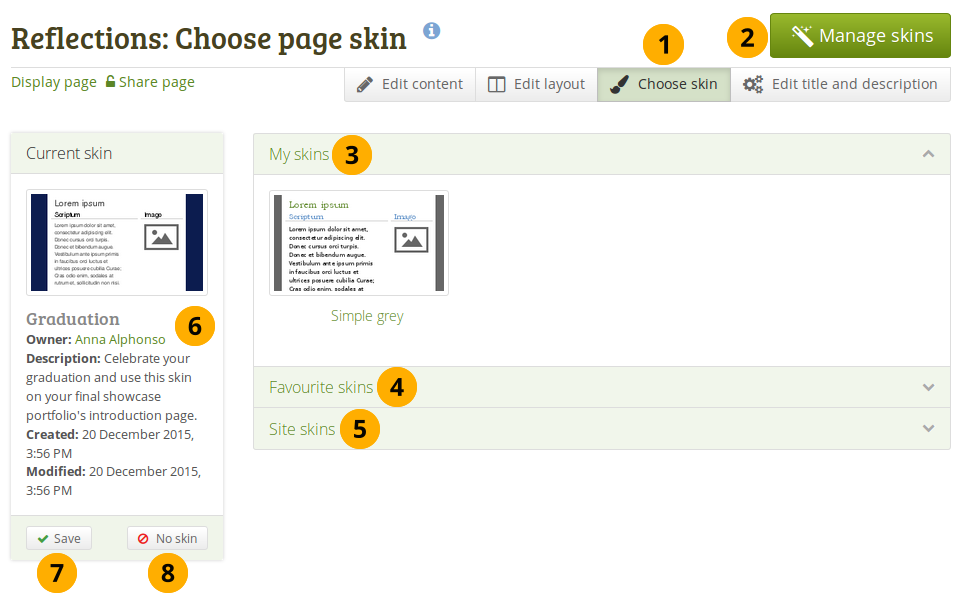
Choose a skin
- Click the Choose skin navigation item to see all skins that are available to you for this page.
- If you do not see a skin that you are looking for, click the Manage skins button. You will be taken to Portfolio → Skins where you can add or remove skins.
- My skins: Skins that you created are displayed in this area. Click the title of a skin or the preview image to select it.
- Favourite skins: Skins from other people that you like are displayed here. If you do not see a skin, click the Manage skins button. You will be taken to Portfolio → Skins where you can favourite more skins. Click the title of a skin or the preview image to select it.
- Site skins: Skins created by site administrators on the site level are displayed. Click the title of a skin or the preview image to select it.
-
You can see skin information such as:
- Title
- Owner
- Description
- Creation date
- Modified date
- Once you have selected your skin, click the Save button to select it for your page. You are taken out of the edit mode because you can only view your skin when the page is displayed. If you want to make further changes to your page content, click the Edit this page button.
- If you do not want to use the skin that you selected, click the No skin button to reset your selection.
The skin is only shown when you display your page. When you edit your page, you see the standard theme.
View a page with a skin
This is what a skin applied to a page could look like.
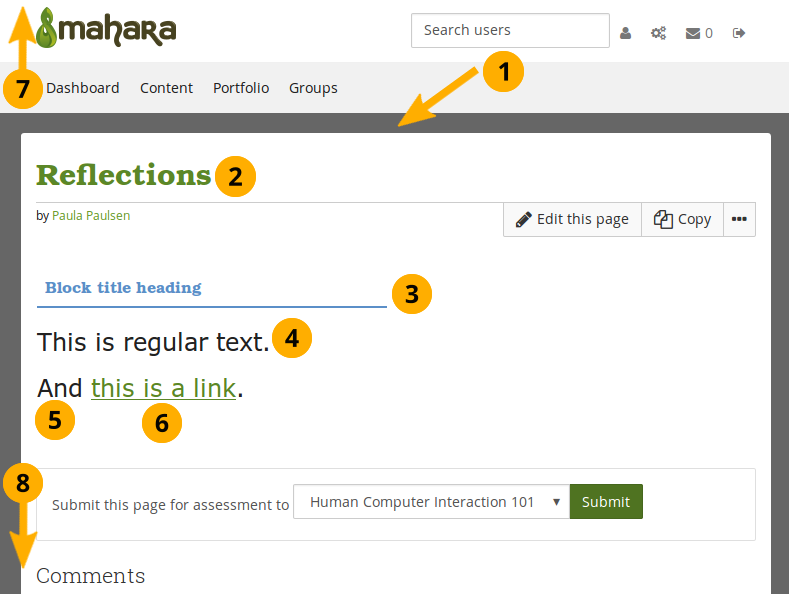
Example of a skin on a page
- Background. This is either a solid colour or an image.
- Heading font and Heading text colour.
- Heading font and Emphasized text colour.
- Text font and Text colour.
- Font size.
- Normal link colour and decision on whether to underline the link or not.
- The header is not changed. You may be able to do so if you employ Advanced CSS.
- The bottom of the page is not changed either.
What is the difference between themes and page skins?
Themes
-
Have been present in Mahara in their current form since 1.2.
-
Must be uploaded directly onto the web server by a system administrator.
-
Can override the page template for every single screen in Mahara, giving total control over how everything is displayed.
Skins
- Can be created, shared, exported and uploaded by users via Portfolio → Skins.
- Are less powerful than themes. They can only change page colours, fonts and background images, and add extra CSS. Basically they add one additional user-controlled CSS stylesheet to a page.
- Can only be applied to user-created portfolio pages. They don’t change the way any other part of Mahara is displayed.
When skins and themes collide
- If users apply a skin to one of their pages, it adds one additional CSS stylesheet to the page. This is in addition to the CSS from the theme.
- Naturally, any particular skin might not look good in all themes, especially if the theme has changed the underlying page templates for portfolio pages.
SmartEvidence
SmartEvidence allows you to work with competency frameworks in Folioz and associate them automatically with an evidence map for a visualisation of the competencies already gained, in progress, and not yet started.
“Competencies” is used in a wide sense here. SmartEvidence can be used for multiple purposes including competency-based assessment, graduate attributes, skills accomplishment and many more. It can also be used for self-assessment purposes.
The implementation of SmartEvidence is experimental. While the majority of the functionality works as intended there are a few areas that still need to be sorted out, e.g. the export of the SmartEvidence map in both HTML and Leap2A.
Set up a SmartEvidence framework
If you have an assessment matrix you can request an admin to create a framework for you.
Select a framework
When an institution allows SmartEvidence, any user in that institution can work with the frameworks that are available. The framework is selected on the collection’s Edit screen for institution or personal collections.
Create a collection
-
Click the New collection button under Portfolio → Collections. On the next screen…
-
Collection name: Provide a title for your collection.
-
Collection description: Optionally, you can write a short description about your collection. You do not have a visual editor, but just a plain text box.
-
Tags: Enter tags to find your collection more easily at a later stage. You can choose from your existing tags by starting to type a letter and then selecting the tag you want to use. You can also type a new tag, and it is added to your list of tags.
You can find more information on how to use the tag selector in the “Tags” section.
-
Page navigation bar: Choose whether you wish to display a tabbed navigation or not. If you choose not to, you will have to include the navigation block for you to go from one page to the next on the individual pages that belong to this collection.
-
SmartEvidence framework: Select the framework that you want to associate with your collection. You can change the collection as long as you have not put an annotation onto a page within the collection.
-
Click the Next: Edit collection pages button or click Cancel if you want to abort adding your collection.
Add an annotation
You can add as many annotations to a page for different standards as you wish. When you place an annotation onto the SmartEvidence map, it is automatically added to your page.
Write an annotation
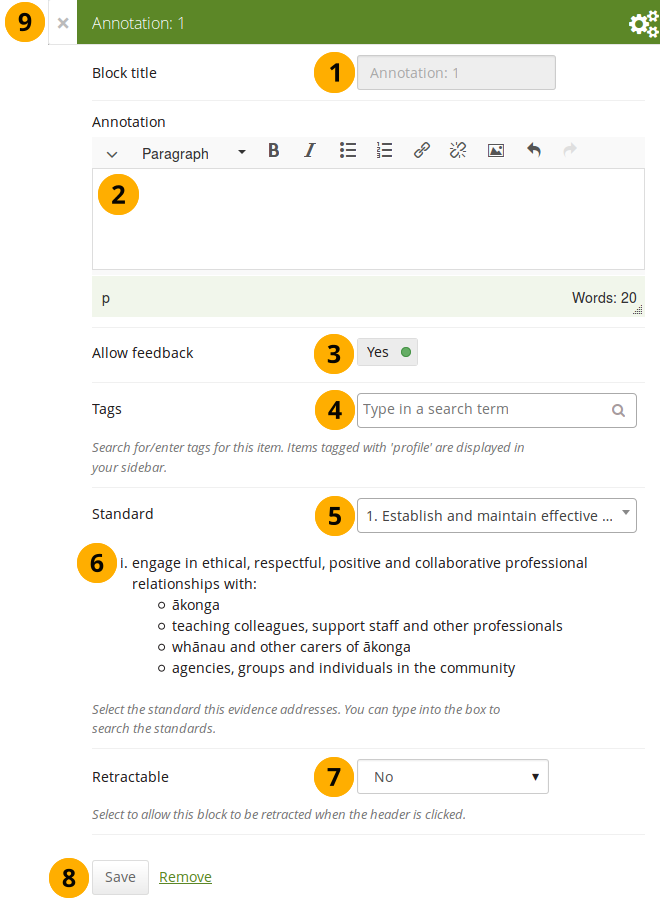
Configure the Annotation block
-
Block title: The block title is set automatically based on the standard selected. It takes the form of “Annotation: Shortname of the standard” and cannot be changed.
-
Annotation: Write your annotation for your portfolio page. The annotation helps connect the evidence on the page to the standard or competency you selected to associate it with in the competency framework.
You can change the text as long as no feedback has been placed on the block. In order to change the text, you go into Edit mode of the page and then choose the Configure icon of the Annotation block that you want to change. You cannot change the annotation from the SmartEvidence map.
-
Allow feedback: When you allow feedback on your annotation, others can leave feedback as usual. However, as soon as the first feedback has been added, you will not be able to make changes to your annotation text anymore. That is to ensure that the feedback still relates back to the annotation.
-
Tags: Enter tags to find your annotation more easily at a later stage. Separate your tags with commas. If you already have tags, you can click on the link Show my tags and select the ones that you think will fit for this collection as well. They will be entered into the text field for you.
-
Standard: When you place the Annotation block on the page, you can select the standard with which the page shall be associated based on the SmartEvidence framework selected for the collection. You can change the standard until somebody leaves feedback or makes an assessment. If you select the page from the SmartEvidence overview page, the standard is pre-selected and cannot be changed.
You can use the Annotation block without SmartEvidence, but then you can’t choose a competency standard.
-
The description of the selected standard is displayed so you can easily reference it.
-
Retractable: Choose whether you want to allow users to reduce the block to its heading on a page or see just the heading only automatically. The options are:
- No: The block and its content is displayed at all times.
- Yes: Allow users to reduce the block to just the heading by clicking the Retractable icon .
- Automatically retract: Only the heading of the block is visible, and the user can click the Retracted icon to view its content.
-
Click the Save button to accept your changes, or click Cancel to leave the block’s content as it is. Remove is shown only when you place the block into the page for the first time.
-
You can also click the Close button in the top left-hand corner of the modal window to either remove a newly created block before it is being saved or to cancel any changes and leave the block’s content as it is.
Respond to an annotation on the SmartEvidence map
When you have access to a collection that contains a SmartEvidence map, you can leave feedback on an annotation. You may be able to assess it if you have staff or institution administrator permissions in the same institution as the portfolio author unless it is a self-assessment framework.
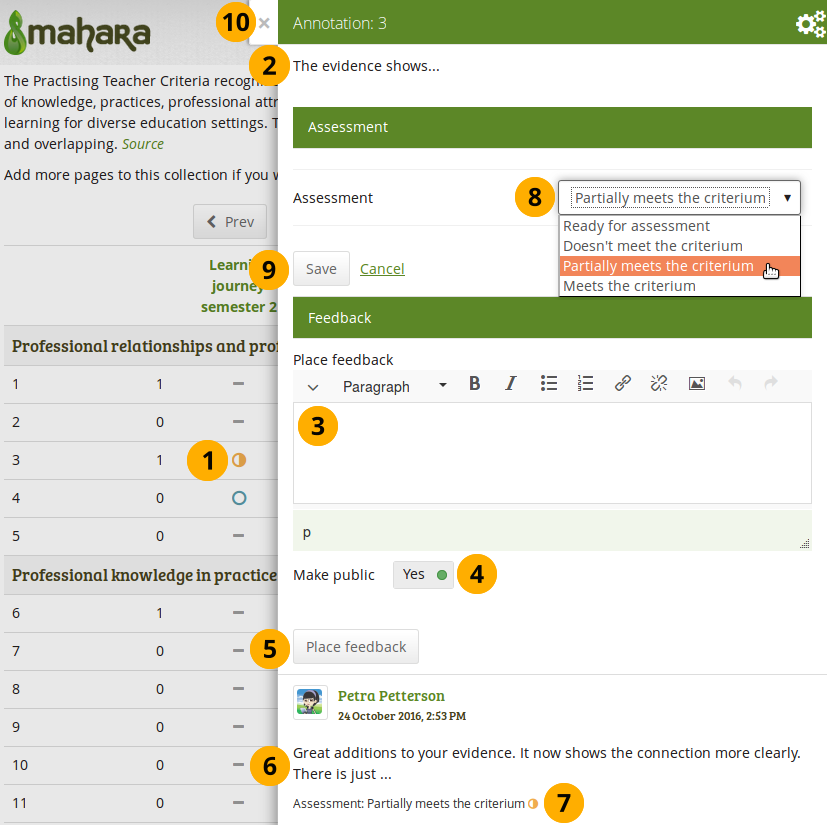
Respond to an annotation
-
Click the annotation on the SmartEvidence map that you wish to take a closer look at. A modal window opens with the annotation.
-
Read the annotation.
-
Place feedback: You can leave feedback on the annotation.
-
Make public: Decide whether everybody who has access to the page can view your feedback or just the portfolio author.
-
Click the Place feedback button to add your feedback to the annotation.
-
You can view the feedback of others.
-
If an assessment was already made, you can see it here. This also serves as log of the assessment changes throughout the lifetime of the annotation.
-
Assessment: If you have the permission to assess the standard, you see a drop-down menu here with the possible statuses that you can use. Select one of them.
The assessment statuses are defined in the SmartEvidence framework file.
-
Click the Save button to keep your selection or click Cancel to abort the assessment.
-
You can also click the Close button in the top left-hand corner of the modal window to either remove a newly created block before it is being saved or to cancel any changes and leave the block’s content as it is.
Respond to an annotation on a page
You can provide feedback to an annotation, and assess it if you have the appropriate permission, also from the portfolio page on which the annotation is placed.
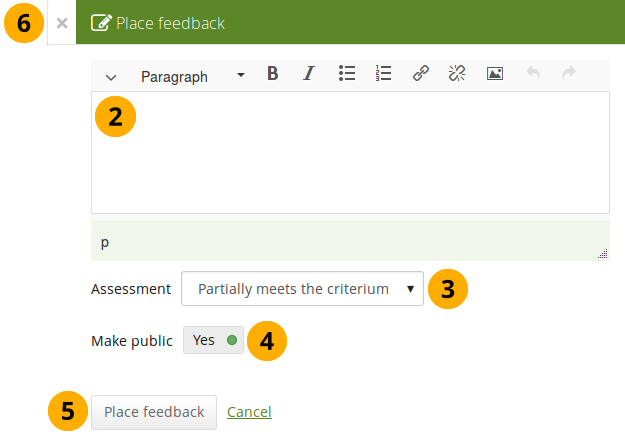
Respond to an annotation on a page
-
Click the Place feedback link at the bottom of the Annotation block.
-
Write your feedback.
-
Assessment: If you have the permission to assess the standard, you see a drop-down menu with the possible statuses that you can use. Select one of them.
The assessment statuses are defined in the SmartEvidence framework file.
-
Make public: Decide whether everybody who has access to the page can view your feedback or just the portfolio author.
-
Click the Place feedback button to add your feedback to the annotation or click Cancel to abort the assessment.
-
You can also click the Close button in the top left-hand corner of the modal window to either remove a newly created block before it is being saved or to cancel any changes and leave the block’s content as it is.
Delete an annotation
When you delete an annotation, all its feedback is deleted as well. You cannot retrieve it again easily.
SmartEvidence map
The SmartEvidence map, which is displayed as the first page in a collection that is associated with a framework, is modelled after an evidence map. It visualizes which areas of the framework have already been completed and where there is still more work to be done.
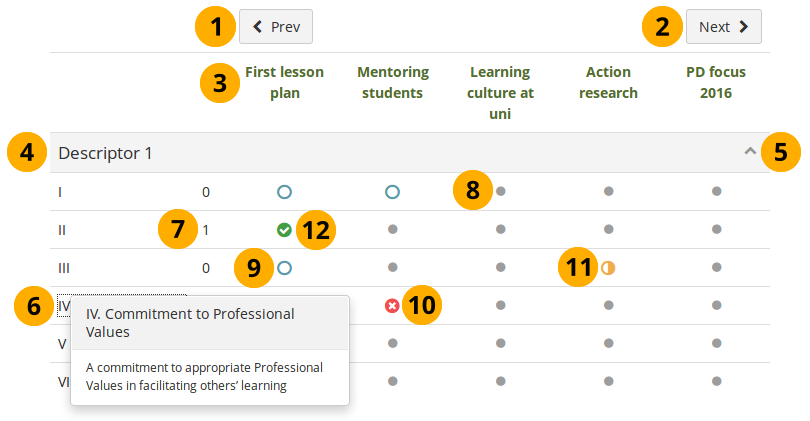
SmartEvidence map with competencies in different states of completion
-
Click the Previous button to go to a page in the collection that comes before the first one shown if there are many pages in the collection.
-
Click the Next button to go to a page in the collection that comes after the last one shown if there are many pages in the collection.
-
The titles of the pages are displayed.
-
Heading for the standard group.
-
Click the Collapse icon to only show the heading of the standard group. Click the Uncollapse icon to show all items in the group.
-
The shortname of a standard or sub-standard is displayed. Click it an a full description is shown.
-
A count of how many pages have been set to fulfill the criteria for a particular standard.
-
A dot means that the page has not been associated with the selected standard.
Everybody but the portfolio author sees a grey line.
-
The circle indicates that this page is ready for assessment for the selected standard.
-
The cross means that the evidence displayed on the page is not sufficient to demonstrate this particular standard.
-
The half moon shows that this page still needs some work before it can be marked as fulfilling the standard.
-
The checkmark is displayed when the assessor agreed that the page fulfills the criteria for this particular standard.
Copy a SmartEvidence collection
You can copy a SmartEvidence collection. When doing so, the annotations are retained, but the feedback on the annotations is not. You can then make changes to the collection and update the annotations before submitting the new collection for assessment.
Troubleshooting
Password reset links don't work
If you see an error message about the reset link you get in your email not being valid it could be that it expired or the link might have a space at the end. If you follow the link but you are not given the option to set a new password it could be the browser cookies.
If your browser has not refreshed your cookie information you could be accessing your pages with expired session information. Restarting your browser might clear the old information or you might need to delete the Folioz cookies.
Delete cookies in Firefox
In Firefox you can type about:preferences#privacy in the address bar and click on the "Manage Data" button under the "Cookies and Site Data" heading.
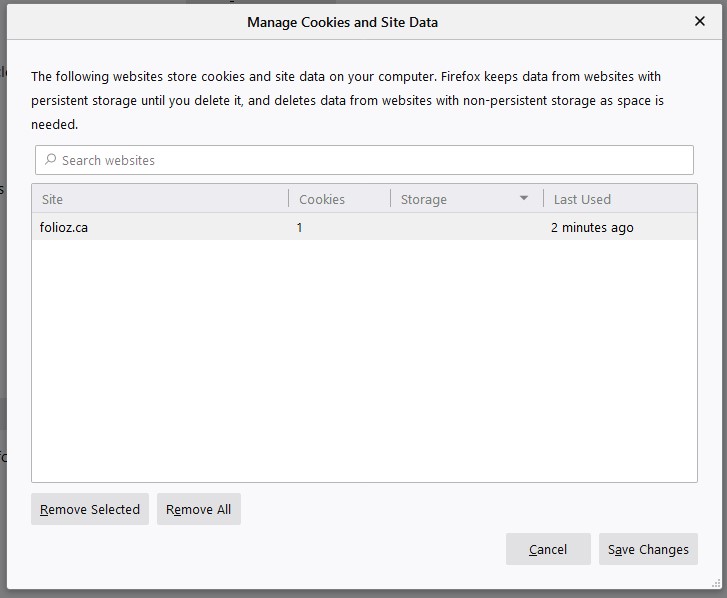
Delete cookies in Chrome
Choosing to delete all the cookies will mean that you will probably have to login one more time but this will give updated session information.
I need to reset my password
There are two different account types in Folioz and resetting your password depends on the type of account you have. If you registered using the online form then you need to request your password be reset here.
If you have a ClassCloud Key as part of your school's class membership to our service you can go to the ClassCloud website to reset your password.
Notification of full file storage
If you have received a notification that your file storage is near full you might want to review what files are too big. The default file storage space is 50 megabytes which should more than enough to upload support documents and some pictures. The only way to raise the limit is for the Institution to subscribe for more space.
Folioz is designed to be a "hub" for you to collect all your evidence of learning from all over the internet. Most people use Google docs and YouTube channels where they can upload their larger files. Folioz has "External Media" and "Google Docs" blocks that make it easy to add content to your pages.
If you are a ClassCloud subscriber you already have a place to share your DOC/PPT/PDF files with Folderz and video/audio with Videoz. There really is no need to have large files consuming your Folioz space.
You can see and manage your files here, scroll past the upload boxes to the bottom:
https://folioz.ca/artefact/file/index.php
The kind of files that waste the most space are usually video and PowerPoints. Video is best uploaded to a service specifically designed to deliver an optimized streaming experience and greatly reducing the bandwidth needed to view. Can you imagine having to download a 1 gigabyte or more video file every time you wanted to share it with someone?
You can also reduce the size of your PowerPoint presentations by optimizing it: https://www.howtogeek.com/424648/how-to-reduce-the-file-size-of-a-powerpoint-presentation/
If you are using voice over in your PowerPoint converting it to video is quite simple: https://support.microsoft.com/en-us/office/turn-your-presentation-into-a-video-c140551f-cb37-4818-b5d4-3e30815c3e83
You also should consider converting it to a PDF as it will optimize the slides and greatly reduce the file size, the only things you lose are the slide transition effects and embedded audio/video. Embedded audio and video hardly ever work anyway as they are linked and not embedded into the PPT file. Converting a voice over presentation to a video in PowerPoint would be a better way to share the presentation:
https://support.office.com/en-us/article/Turn-your-presentation-into-a-video-C140551F-CB37-4818-B5D4-3E30815C3E83#OfficeVersion=newer
Then you can easily upload it to Videoz, Vimeo or YouTube and embed it into your portfolio page.
Institutions
Institution staff access
Institution staff members enjoy a number of additional rights to regular members, for example:
- creation of controlled groups
- viewing of the real names of users
- access to the User search page in the administration
- viewing of the access list of user’s pages if allowed
Institution staff members have an additional navigation item: Institution information.
User search
Staff members have the majority of the functionality available on this page as institution administrators.
When you are on the User search page, you can view all members of your institution or just a select few. You only see the following options if you have the permission to access user reports.
Staff members cannot manipulate user account information or access user pages to which they have not received direct access from the user. The reports page only lists the pages, but does not give default access.
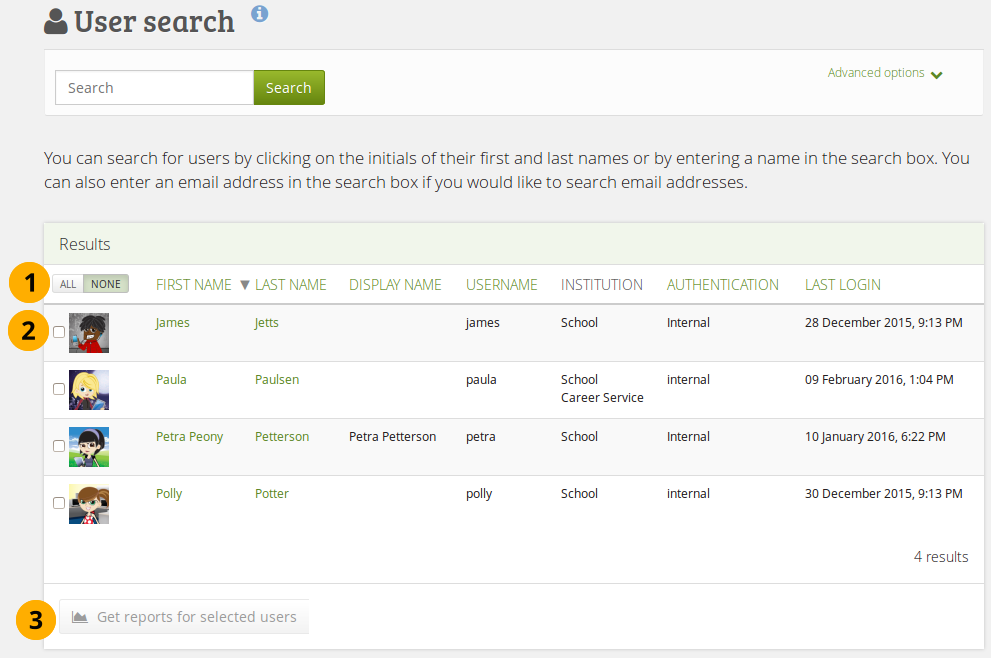
User search page as viewed by a staff member
Reports
The functionality available to staff members is similar to the one for institution administrators in the “Reports” section if the site administrator allowed staff members to view reports.
Institution administrators
You can give users administrator rights in an institution in which they are members. The administrator role will allow them to manage users in their own institution. This page allows you to do that in bulk for many users at once.
You can also give admin rights on the user account settings page.
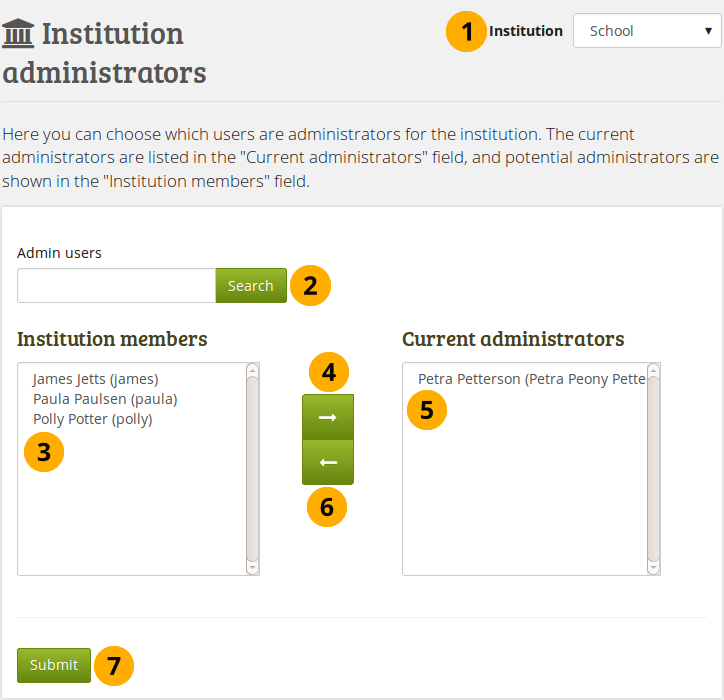
Give users institution admin rights.
- Institution: Choose the institution from the drop-down menu for which want to give admin rights to members. If there is only one institution, its name will be displayed without the drop-down menu.
- Admin users: You can search for users in the search box if there are too many names listed.
- Institution members: Select the institution members who shall get administrator rights.
- Add the users to the list Current administrators by clicking on the right-arrow button .
- If you put a user into the institution administrator list by accident or want to remove existing administration members and return them to normal membership status, select them.
- Then click on the left-arrow button , and they are removed from the list.
- When you have all the members you wish to have as administrators in the institution, click the Submitbutton.
Admin notifications
The Admin notifications page lists all users with institution and site administrator access on your site. It shows their selected notification preferences for all admin notifications. There should be at least one administrator receiving each type of message generated.
Institution administrators only see admin notifications for their own institutions.
Admin notifications are:
- Contact us
- Objectionable content
- Repeat virus upload
- Virus flag release
- Objectionable content in forum
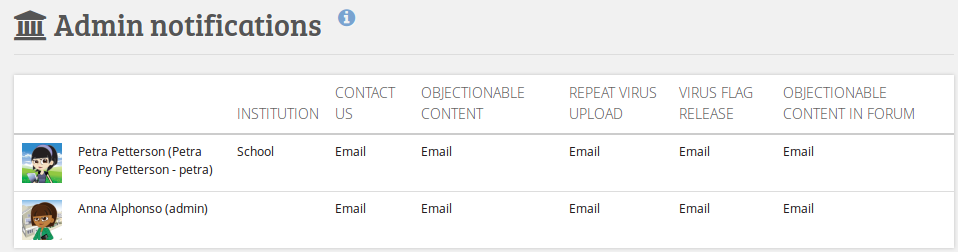
Overview of the admin notification types
Glossary
The glossary has two parts. Every user encounters the basic terms in Folioz. The advanced terms are for users who want to understand more and are especially for administrators.
Access
Your content is generally protected and private and not accessible to others by default. You put your content into pages and collections. Then you decide to publish your pages and collections for other users, groups or the public.
Access means that depending on the access permissions you give for a page or collection, individuals, members of a group, all users on your Folioz instance or anybody online can read and possibly also comment on your content if that functionality is enabled.
Account
You have personalised access to Folioz via a login and password. Your account identifies you in the system. Your name (and profile picture) are displayed around the system, e.g. on your profile page, forum posts, portfolio pages etc. You can manage your account in your settings.
Artefact
Artefacts are all types of content that you add to your personal content area, i.e. text, journal entries, pictures, audio files, video files, images etc.
Authentification
Folioz can administer users fully internally by creating accounts manually of by CSV file. If user account data is stored in external applications, e.g. an LDAP directory, a SimpleSAML identity provider or Moodle, users can use their usual logins and passwords to connect to Folioz. The authentication methods used in an institution are managed in the institution settings byt the site administrator.
In general terms, authors are content creators and have the full rights on their works be it text, audio, video, still images or any other form of expression. If you are not the author of your own artefacts but wish to use somebody else’s work, make sure that you are allowed to do so. If you cannot use their work, you should not put it into your portfolio or use it in groups.
Block
Blocks exist on pages. They contain your artefacts that are displayed in context on a page to make up the portfolio.
Closed topic
A forum topic can be closed for members by the group administrator or forum moderator. The group members can read the topic content, but they cannot reply.
Collection
A collection is a bundle of pages that contain your artefacts. A navigation block or the navigation bar helps to move from page to page in a collection.
Comments
You can ask other users and / or friends to comment on your pages and / or collections that you have shared. Comments should be constructive and helpful. They should point out things that you did well and others that you may need to improve by providing constructive suggestions and encouragement for further learning.
The comments area is at the bottom of each page, but can also be turned off by the author of the page or artefact.
Controlled group
Controlled groups are similar to courses in learning management systems. The administrator can place users into the group who then cannot leave it. Usually, the administrator allows the submission of pages and collections to this group for assessment purposes.
Course group
Course groups allow the administrator to assign certain members the tutor role. Tutors can then give feedback on submitted pages and collections if these are allowed, but cannot add or remove users from the group.
Cover letter
Generally, the cover letter is the first page in an employment application and forms part of your résumé. It could be the first page in a collection for an employment or internship portfolio.
CSV file
CSV means “comma separated values” and describes the structure of a text file in which table columns are separated by a comma (or sometimes also semi-colon). You can create a CSV file with your data most easily in a spreadsheet software such as Libre Office Calc or MS Excel. You can use CSV files in Folioz to create and edit user accounts and groups as well as manage group members.
Dashboard
The dashboard is your start and overview page after you logged in. You can customise the information you see on your dashboard and for example have easy access to pages shared with you, your notifications, forum topics you are following etc.
Display name
You may not want to use your first and last name around the site and can thus create a display name, i.e. a nickname, if the site or institution administrator allows that. Furthermore, in huge institutions where several members have the same first and last name, the display name can be used to differentiate between them.
Editability of a group
Group administrators can decide if group members should only be able to add content to a group during a certain time frame. This can be useful when a group is course-related and shouldn’t allow the adding of files or conversations after the end of a course. Group administrators and tutors can always add, edit and delete content at all times.
Embed code
You can make content from other websites such as videos, audio, animations and presentations visible in Folioz by linking to it. If the external content can be embedded via an iframe or code that starts with <object> or <embed>, it can usually be displayed in Text or Note block or journal entry. Iframes can also be displayed in the External media block on a page. The site administrator may need to add specific iframes that you wish to embed to the allowed iframe sources.
Exact search
Exact search reduces the number of search results you get for users. Only results that are identical to the search terms will be found. For example, if you search for “james smith” without exact search turned on, your results page lists everyone starting with “james” no matter whether the last name is “smith” or not. If you turn on exact search, only users whose first and last name is “james smith” will be found. There is no need to use quotation marks when searching. Quotation marks are only necessary if you want to search for a display name that consists of two names. You must be a site administrator to turn exact search on or off.
Feedback
See “Comments”
Files area
You can use files in different locations: in your personal portfolio, groups, institutions and on the site level if you have access to the latter ones. The site administrator defines the size of the files area. Organise your files area carefully by placing your files into folders and by adding metadata such as descriptions and tags to your files and folders. That makes it much easier to distinguish a file after months from dozens or hundreds of others.
Filter
You can limit your search results to find your search term in tags only when you search shared pages. Furthermore, you can also limit your search for pages that have been shared with you or others.
Forum
Written asynchronous discussions in groups are separated into topics for better organisation and make up a forum.
Forum moderator
Forum moderators can edit forum posts and add posts in closed topics. They can edit forum topics or create new ones in the forum for which they are moderators.
Friend
Friends are your contacts on the site. You can ask other registered users to become your friends. If they agree, you can then invite them into groups or share pages or collections with them more easily. However, you do not have to become someone’s friend to view their portfolio pages or collections. A user can always share pages or collections with you without making you a friend.
Grading
You can use the submission functionality in groups to lock portfolio pages or collections when giving feedback. Folioz itself does not have a gradebook, but you could still record any grading results in the comment section at the bottom of each page and make it visible only to the author. Some institutions use the rating functionality in the comments section for grading purposes.
For more formal assessments, you can link Folioz to a learning management system. In Moodle for example, you can use the Folioz assignment submission plugin to assess portfolios directly in Moodle using standard Moodle grading options such as outcomes or rubrics.
Group
You can create groups and invite other users into your groups to work collaboratively on projects. Groups can use forums for discussions, a group files area for sharing files, journals to reflect collectively and create and share pages and collections. The site administrator can disable the possibility to create groups for regular users.
Group administrator
Group administrators define group settings, create new forums and administer group members.
Group homepage
The group homepage is the starting point for activities in a group. You can show the group description, a list of group members, latest forum posts or any number of other blocks.
Inbox
Your inbox is the place where you can access the notifications and messages you received from other users or the system. You can decide whether you want to read your messages in your inbox or receive them via email.
Invitation
You can invite any other users to your groups if you are the group administrator, or you may be able to invite your friends into groups in which you are a member. The invited users can accept the invitation or reject it.
Institution
A Folioz site can consist of any number of independent institutions in which users and certain institution settings are administered. This allows the use of one Folioz instance for many organisations without the need to install Folioz for each.
Institution administrator
Institution administrators can manage institution settings and users. They do not have access to other institutions or settings on the site level.
Institution page
Institution administrators can create institution pages that can be used as examples or templates for institution members. They can be copied automatically into the accounts of new institution members.
Journal
You can collect personal reflections about a topic or learning progress in a journal. It consists of a series of these reflections that you write in individual journal entries. Per default, you have one journal, but you can add more if you enable multiple journals in your settings. You can add journals to pages as a whole, as individual entries or selected based on tags.
You can decide to publish a journal entry so others can see it if it is in a page or keep it as draft for yourself only.
Leap2A
Leap2A is a portfolio standard that is used by a number of ePortfolio systems for data exchange. In Folioz, users can export their entire portfolio or parts of it as Leap2A file and then have it imported into another Folioz instance or an ePortfolio system that supports Leap2A to continue straight away without having to re-create their portfolio. Since every portfolio system functions differently, a complete one-to-one transfer of information is not possible and in most cases some work is required after the transfer.
License
When you upload content to Folioz, you may need to agree to the upload agreement or specify a license for the content you upload so others know whether it is your own or was created by somebody else. You can use the Creative Commons block if you want to share an entire portfolio page under a Creative Commons license.
Mahoodle
Mahoodle is the term used for connecting Folioz and Moodle for single sign-on and content exchange.
Member
Users in an institution are institution members and users in groups are group members.
Message
Messages are sent to you by other users. The messages appear in your inbox and can be delivered via email as well.
Moodle
Moodle is a learning management system (LMS) and thus teacher-centred. Courses in Moodle are filled with learning content by teachers. Students (users) get access to the content and can discuss it and are often graded on their performance. Moodle and Folioz can be used in combination. If connected, users only need one account for both systems and can switch between them without a new login. Folioz can be used as personal repository for users, and they can copy their own assignments and course contributions into their Folioz account as artefacts.
Notification
Notifications are automatically created by the system and inform you about new feedback on your pages, new forum posts in groups, new access to other users’ pages and much more. The notifications appear in your inbox and can be delivered via email.
Objectionable material
On the page of a user to which you have access, you might come across content that is inappropriate, offensive or violates the terms of usage of the site. You can click the Report objectionable material link on the page or the artefact details page and give your reason why you marked this content as objectionable. Administrators are notified, can review the content and could block the offender from accessing the system until the content is removed. It cannot be defined in general terms what is considered inappropriate. The owner of the site has to define this based on the purpose of the site and the age of its users for example.
Forum posts can also be reported as objectionable by clicking the Report button.
Online users
Open group
Open groups can be joined by anyone without group administrator approval.
Owner
The owner is the person or group that has created a page or collection or to whom artefacts belong.
Page
You can design pages by arranging artefacts on them. You define the page layout and - if enabled - the theme for it. You give other users access to pages so they can view your work and comment on it. Several pages can be added to a collection. All users can create personal pages and group members may be able to create group pages.
Pages can also be created as templates for further use by others.
Page layout
The page layout is responsive and adapts to the size of the screen. You can place blocks onto a page and change their size.
Plan
Plans are simple ToDo lists consisting of tasks. You can add your plans as blocks into your pages.
Portfolio
Portfolios gather stuff, i.e. learning artefacts and evidence. In Folioz you place your artefacts into pages which you can bundle up into collections. A page or a collection can then already be your portfolio. Thus, you can create many different portfolios. You decide whether you want to share your portfolios with others or keep them for yourself. You can create portfolios for many purposes, e.g.
- reflecting on courses;
- creating and reflecting on projects;
- personal reflecting on individual development or separate learning processes;
- creating résumés and your learner biography;
- creating a showcase of your best work and much more.
Privacy statement
Information about the use of private data from the Folioz site. Usually, there is a link in the page footer to it.
Profile
Your profile page is visible to other users on Folioz. You should only display as much information about yourself as you are comfortable for other users to see. Your display name or if you do not have one, your first name and last name, is displayed along with your profile picture. Users may also be able to contact you and invite you to groups. All other elements on your profile page are optional.
Public group
Public groups are visible to anyone on the Internet. You do not have to be a member of the group to follow forum discussions or view pages. However, you need to be a group member to participate in the discussions or create pages yourself.
Recommendation
You can recommend a group to your friends if the group administrator allowed that. The group administrator then still needs to approve the group membership.
Résumé
The résumé details your education and employment history, your achievements as well as skills and interests in a tabular format. Generally, you use it when you apply for an internship or job. However, as the elements in your résumé are reusable, you can also use individual elements in other portfolios.
RSS feed
RSS feeds aggregate news from portal pages, forums or blogs. You can add RSS feeds from external sites to your pages using the “External feed” block. The content will be updated continuously. Folioz can also create RSS feeds for forums in public groups and journals that appear in public pages.
Search
You can search for pages by title, description or tags on “Shared with me” and will see a list of results immediately. You can also search for users by using the user search box. If the site administrator turned on exact search, you need to provide the complete name of users in order to find them. Otherwise, a part of their name is enough but often yields too many results. Fulltext search is not available if the site administrator installed Elasticsearch on the server.
Secret URL
You can create secret URLs for pages and collections to give users who do not have a login to the site access to your pages or collections. The difference to making pages or collections public is that search engines cannot find these pages (unless a link to them appears on a web page).
Single sign-on
Single sign-on (SSO) describes the process to log in to one application and switch to another connected application without having to log in again. Moodle and Folioz are often connected via SSO, which is called MNet. The other built-in SSO authentication method in Folioz is SAML. Others can be added via plugins.
Site
Site means the whole site and the administration on the global level for a Folioz instance.
Site administrator
Site administrators can define system (site) settings for an entire Folioz instance. They can add, edit and delete user accounts and have access to all content even in private user areas as they can log in as any user, e.g. to assist with troubleshooting issues.
Site files
Files area on system (site) level that the site administrator can work with. Files that are placed in the public folder in the site files are available to all users.
Site page
Pages created on site level that can be put into new user accounts automatically as templates.
Skin
A skin is a way of customising the look of a portfolio page on top of a theme. The use of skins must be allowed by the site and institution administrator. If they are allowed, users can create them themselves and change the background, fonts and font color for certain elements on their page. Skins can also be shared with others on the site or exported and imported.
Staff
Staff on the site or institution level have a few additional permissions compared to regular users. For example, they can create controlled groups and hide groups, and they can also view statistics if the site administrator allowed that. Institution staff are also listed alongside institution administrators on their institution’s contact page.
Sticky topic
Topics in a forum are sorted according to the date and time of posts. The topic with the latest post is normally shown first. Sometimes topics should get more attention even if there are no new posts. They can be marked “sticky” and stay at the top of the topics list. Group administrators and forum moderators can mark topics as sticky or disable this setting.
Tag
Tag cloud
You can display your most often used tags in the sidebar in a so called tag cloud. The tags are shown in different sizes: A tag that is used more often is bigger than a tag that is used seldom.
Task
Tasks are created as part of a plan to provide more details on it. They can also be used to list items on a ToDo list. A task is defined by a title, a description and a completion date.
Template
Pages and collections can be offered as templates to other users. They can be copied, or institution and site administrators can have them added automatically into the portfolio area of new users. Templates are used to jumpstart the collection of content and the creation of portfolios.
Terms and conditions
The terms and conditions define the appropriate use of the site. The site administrator can display a link to this page in the footer of every page and also ask users to confirm them during registration.
Theme
The graphical interface design is called theme. If you have institutions on your site, they can have their own theme. Users can also use individual themes for their portfolio pages if the site administrator allows that.
Topic
Discussion forums are made up of topics that represent a discussion around a particular theme each.
Tutor
Tutors only exist in course groups. They can give feedback on submitted pages that are locked from editing while they give feedback. After they are finished, they release the pages or collections and the portfolio authors can fully edit their content again.
User
Users are people who have access to the Folioz site and can log in in with a personal account.
Wall
The wall is a block on your profile page. Other users can leave a message on your wall.
Watchlist
You can add pages and collections that have been shared with you to your watchlist. You will receive notifications when these pages are updated.
Updates
August 2019 Update
Page header update
The page header area was revamped to allow for a full-width page header when in display mode of a page. This is the first step towards further changes to improve the look of a page.
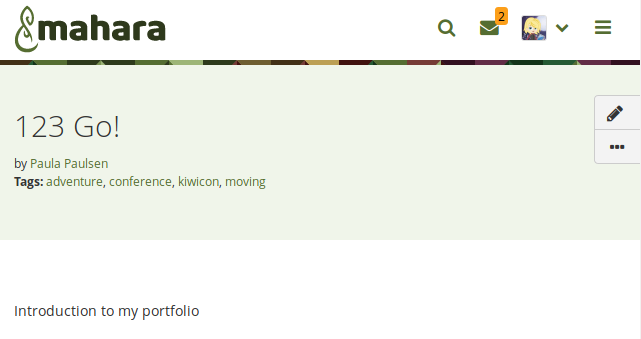
The profile page shows a few more buttons for the various actions that can be taken on the page, depending on who is viewing the page.
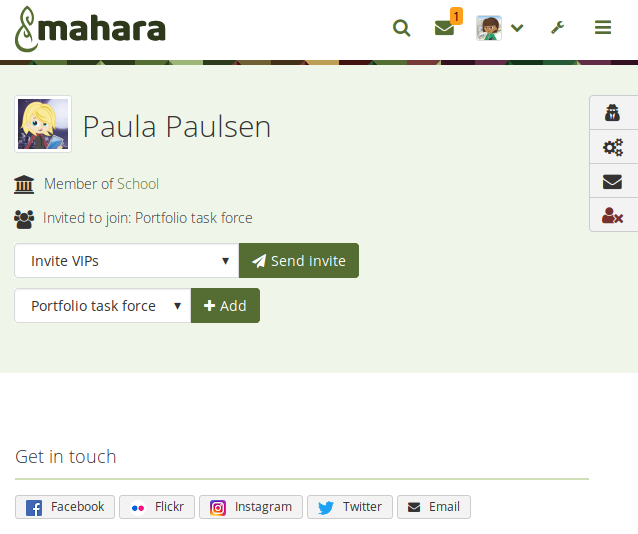
SmartEvidence editor
You can create, edit, and copy SmartEvidence frameworks directly in Folioz as site administrator. The SmartEvidence editor makes it possible. You can still upload existing framework files, but can also take advantage of a visual editor filling in the framework details into a form.
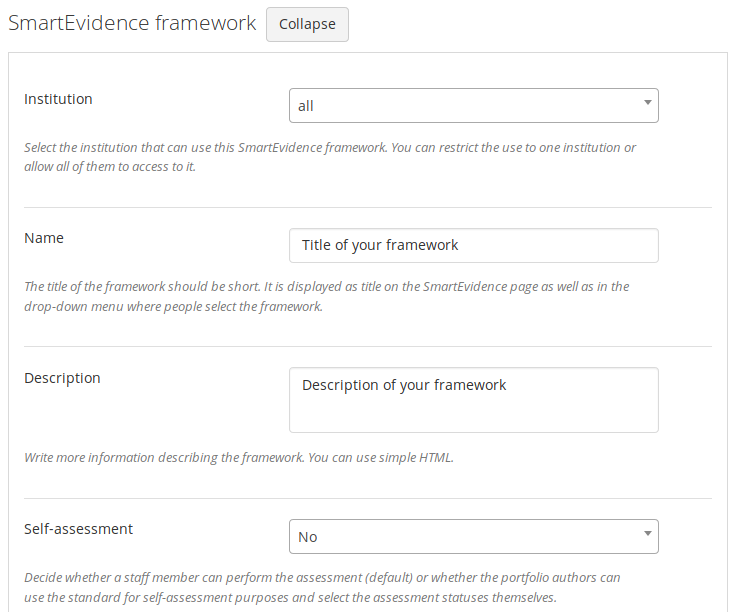
Fill in a form to set up a SmartEvidence framework
Open links in a new tab or window
Links to external web sites are opened automatically in a new tab or window, depending on your browser settings. You can also open Mahara pages in a new tab if you like when you set up your link in the visual editor.
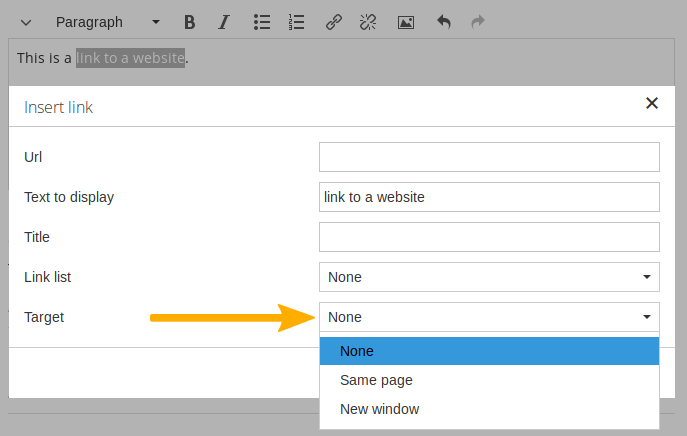
Open links in a new tab or window
Upgrade to Bootstrap 4
Folioz now uses Bootstrap 4 for theming taking advantage of changes and new functionality available in this responsive framework.
Forum enhancements
Enhancements have been made to the discussion forums in groups to offer additional features allowing group administrators more control over subscriptions and posts, especially in large groups and when groups are used in more formal learning settings:
- Forum posts can have file attachments.
- Forum posts can be placed into a moderation queue for approval before being sent out to all subscribers.
- Staff and administrators can set up forums that don’t allow group members to unsubscribe.
Consolidation of “People” and “Groups”
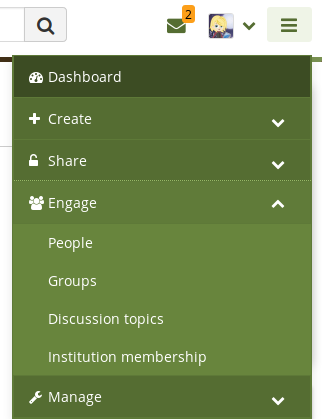
That makes it easier to search for and find relevant people and groups without needing to choose beforehand what to look for.
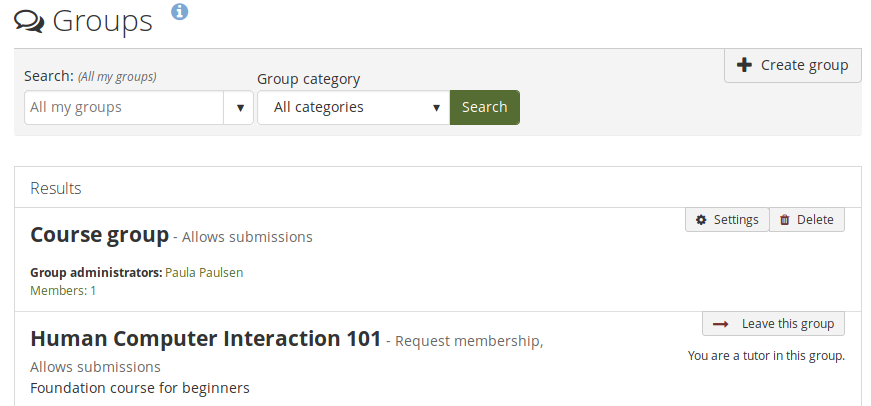
Isolated institutions
Isolated institutions allows for better separation between institutions. This is beneficial when privacy requires that people of different institutions shall not be able to contact each other or share portfolios.
Support Badgr for open badges
If you have an account on Badgr, you can display open badges from that account’s public collections in Folioz. You need to set up a connection to Badgr for that to work.
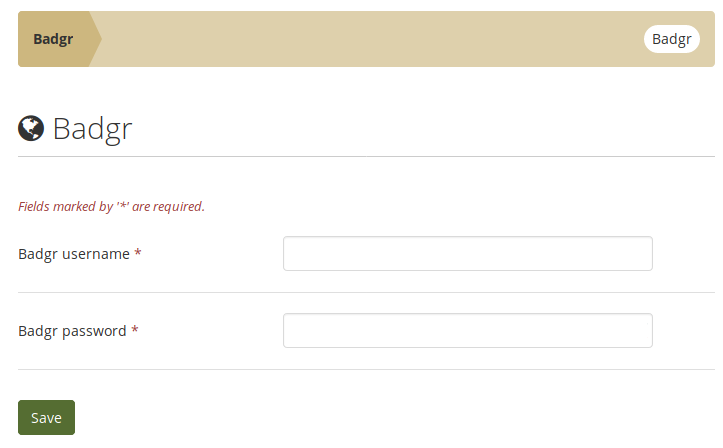
Add navigation block to all pages in a collection
When you add the “Navigation” block to a page that is in a collection, you can add the block to all other existing pages within that collection automatically.
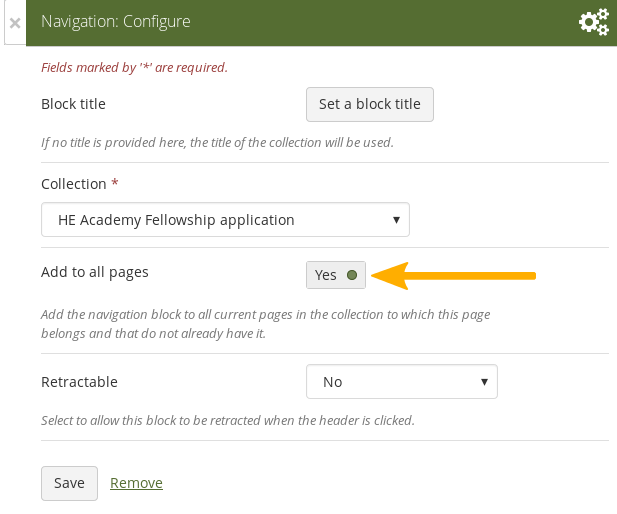
Show person who uploaded a group file
When you upload a file to a group, the group becomes the owner of the file. Now you can see who uploaded the file in the group’s file area as well as when you view the details of a file when coming from a group page.
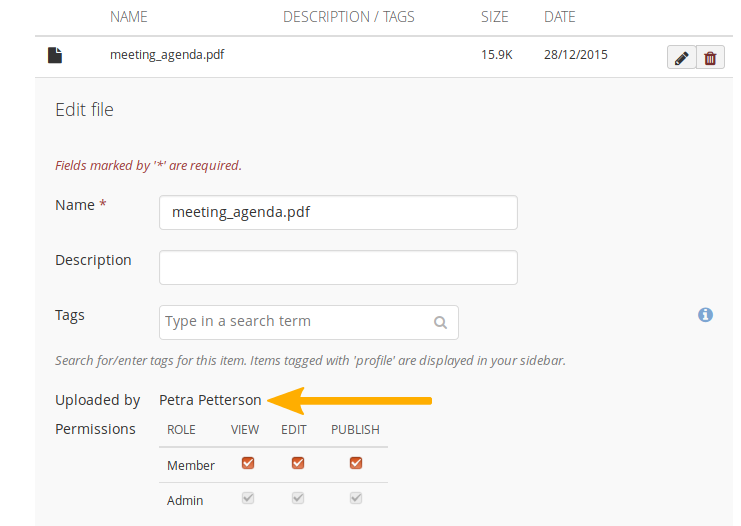
Navigation changes
- Create: Create and upload artefacts, and create portfolios
- Share: Share portfolios and view shared portfolios
- Engage: Engage and collaborate with others in groups
The additional item of “Manage” was added for the items that did not fit in any of these categories.
Populate a page automatically with tagged content
If you tagged content, e.g. files, journal entries, or plans, and blocks, then you can create a new page based on that tagged content. Choose the tag or tags for which you want to see all content items. They will be added to the page automatically.
You can then arrange the resulting blocks as you like or remove them.

Set up institution tags
Institution administrators can set up any number of ‘official’ tags. These can be used by institution members to ensure that they are using the correct tags at all times. Institution tags cannot be edited by institution members.
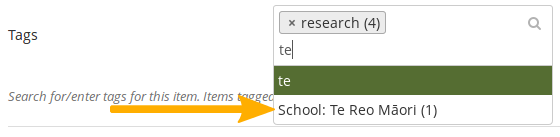
View someone else’s content based on a tag
If you are on a portfolio page by somebody else, and you want to know all the content that they have tagged with a specific tag, you can click the tag at the artefact or the page and see a list of all content items with that tag to which you have access.
Support the creation of templates more
There are a number of new features that support the creation and use of templates. These features are geared towards scaffolding the portfolio creation process and give people who are new to portfolios or need to create a compliance portfolios tools at hand to facilitate their work.
- Blocks in all contexts: Blocks that could only be used by individuals can be put onto group, institution, and site pages for easier copying. While content may often not be added itself, the block can be prepared for the people using the template.
- Page instructions: Pages can be set up with instructions that sit at the top of the page rather than needing to use a block for that.
- Lock blocks: You can lock blocks to a page preventing their deletion from the page. While a portfolio author can remove the lock, at first look it is not possible to delete the blocks.
- Copy group portfolios automatically: You can copy a group portfolio automatically into the accounts of existing group members. Administrators and tutors are excluded from the copying.
Submit a portfolio via LTI to an LMS
Personal portfolios can be submitted to an LTI-enabled learning management system (LMS). Assignments are set up in the LMS with the connection to Folioz. Portfolios are graded in Folioz, and the grade is transferred to the LMS via LTI. These portfolios can be archived in Folioz automatically if needed.
View old versions of a page on the timeline
You can save versions of your portfolio to your page timeline and jump back to old versions. This allows you to see how your portfolio has developed over time, what you have added, and what you have deleted.
Make a peer assessment
Peers can perform a blind review of a portfolio authors skills and competencies when the “Peer assessment” block is on a page. They are not able to see any content of the person they are assessing. Peer assessments can be saved as drafts before making them available to the portfolio author and others.
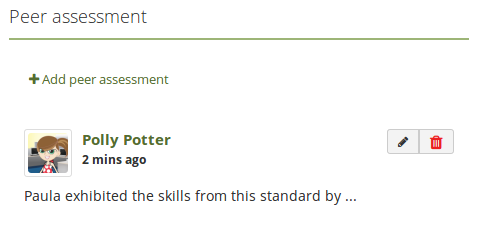
Sign off and verify a portfolio page
When portfolios don’t use SmartEvidence for assessment purposes, it’s still good to know which pages are ready for review and when they can be sent for assessment. That is where the sign-off and verification functionality comes in.
Adding that to a page allows the portfolio author to sign off their page indicating to a selected manager that their portfolio is ready for review. If required, the manager can then verify the content showing that they are happy for the portfolio to be taken to the next step in the evaluation process.
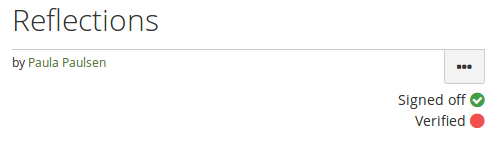
Revoke access to portfolios containing objectionable material
An institution or site administrator can revoke access to a portfolio temporarily when it was reported as containing objectionable material. While the portfolio is under review, nobody who would normally have access to it are able to view it until the administrator is satisfied that all objectionable material has been dealt with.
This allows the administrator to communicate with the portfolio author directly through Folioz and also view a report of all current objectionable material.
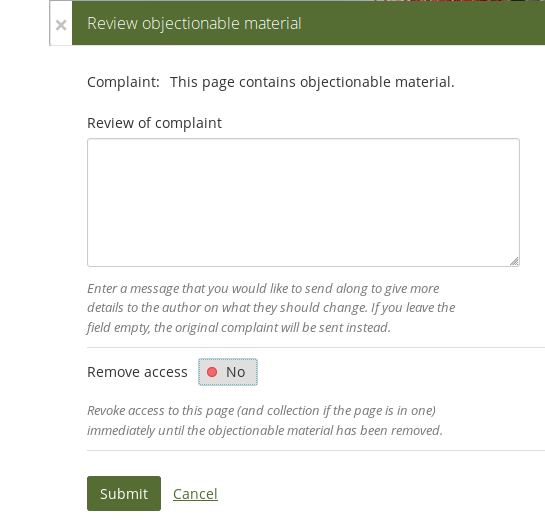
Update plan tasks directly on a page
You can update the status of a plan task or edit tasks of a plan directly from a portfolio page making it faster to keep your plan up to date.
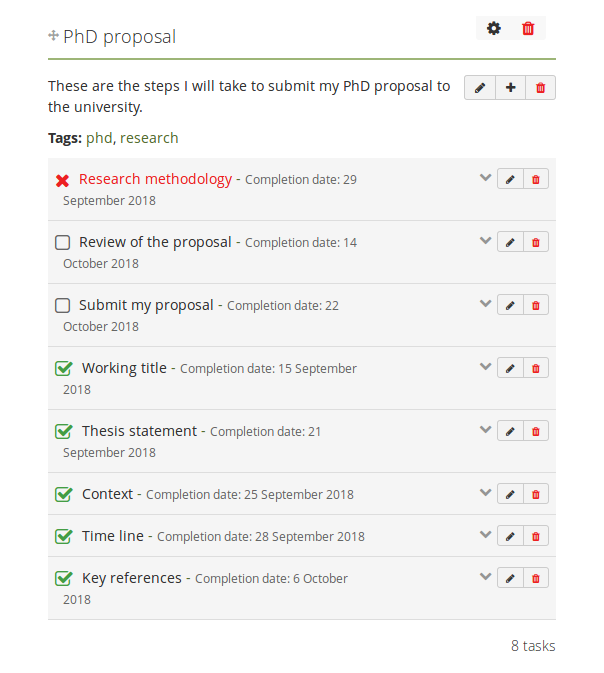
May 2020 Updates
Placeholder block
When you create a page, you do not have to decide on the block type from the start but can put a placeholder block onto the page instead. This is a great improvement for those working with templates as they can create the structure of a page and then let the learners decide what type of content they want to place into the individual sections.
Put a placeholder block onto a page
More flexible layout
When you have a block on a page, you can instantly change its size. Grab the arrow handles and resize it. You can also still move it around a page and align other blocks to it seeing changes instantly.
An accessible option to make changes via the keyboard only is available.
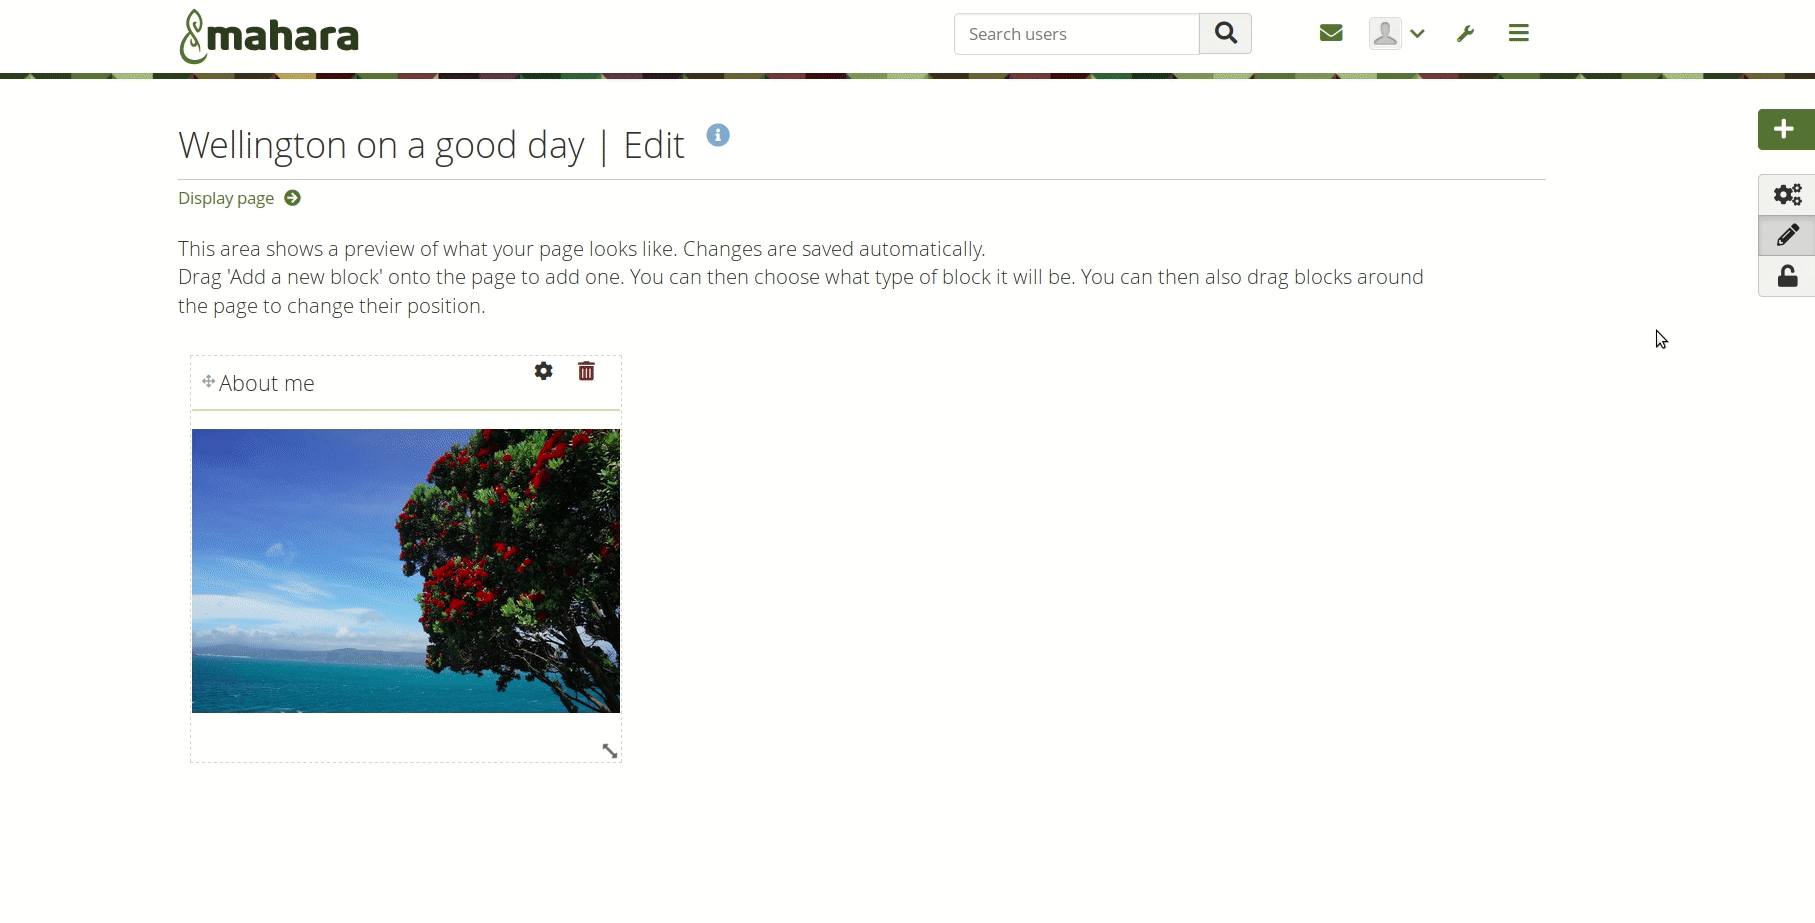
Change the layout directly from the edit screen
Comment on content without leaving the page
When you want to comment on a piece of learning evidence, click the evidence itself if it is an image or linked otherwise and you’ll see details about that evidence and can comment on it if the portfolio author enabled comments. There are no more “Add comment” and “Details” link below each artefact.
Click an image or a linked artefact to see its details
Details mode
Some artefacts are not so easily accessible for comments. In those cases, enter the details mode by clicking the “Details” button in the button bar and the blocks or individual pieces of evidence that have more information available are highlighted. You can then click on the comments and details bar to view metadata and leave comments.
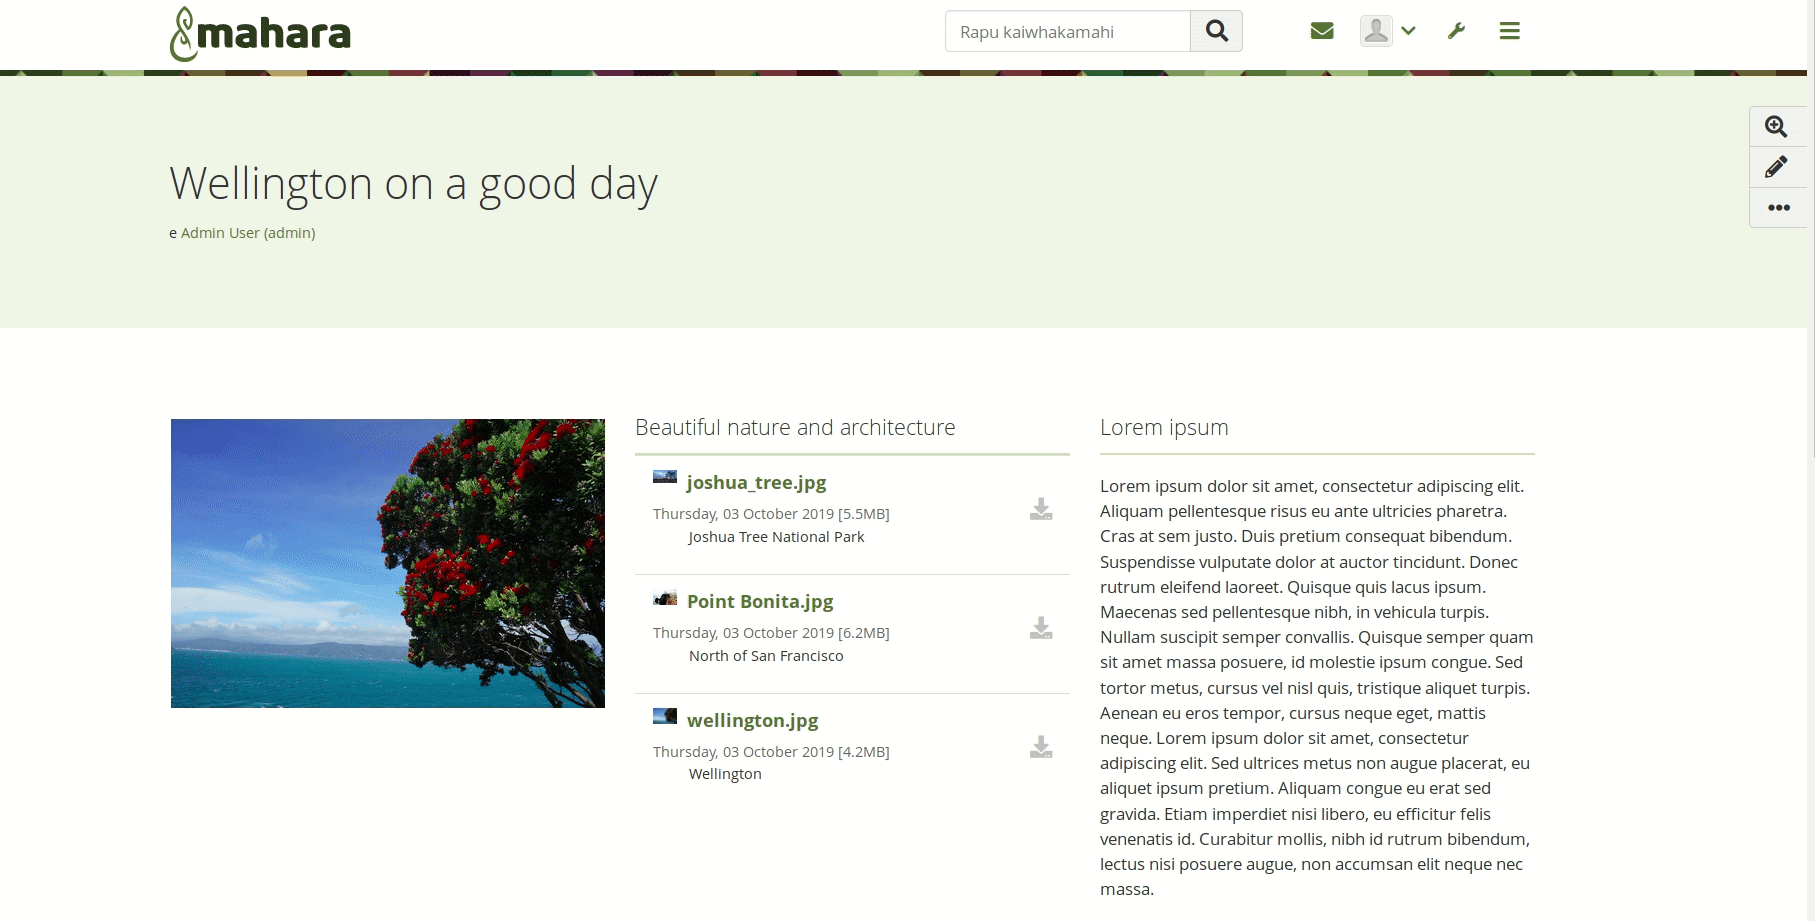
Click the “Details” button to enter the details mode
Add a page header background
You can change the background of the header area of a page if your site allows the use of skins. Select a background colour and make sure that the text colour matches and is readable. When you view your page with that skin applied, you will see the change instantly. You can then apply that skin to any of your other pages that should have the same header.

Change the colour of the page header are
You can also upload a background image to the header area. For best results, make sure to follow the sizing instructions. You may also need to try a few variations to see which one works best.
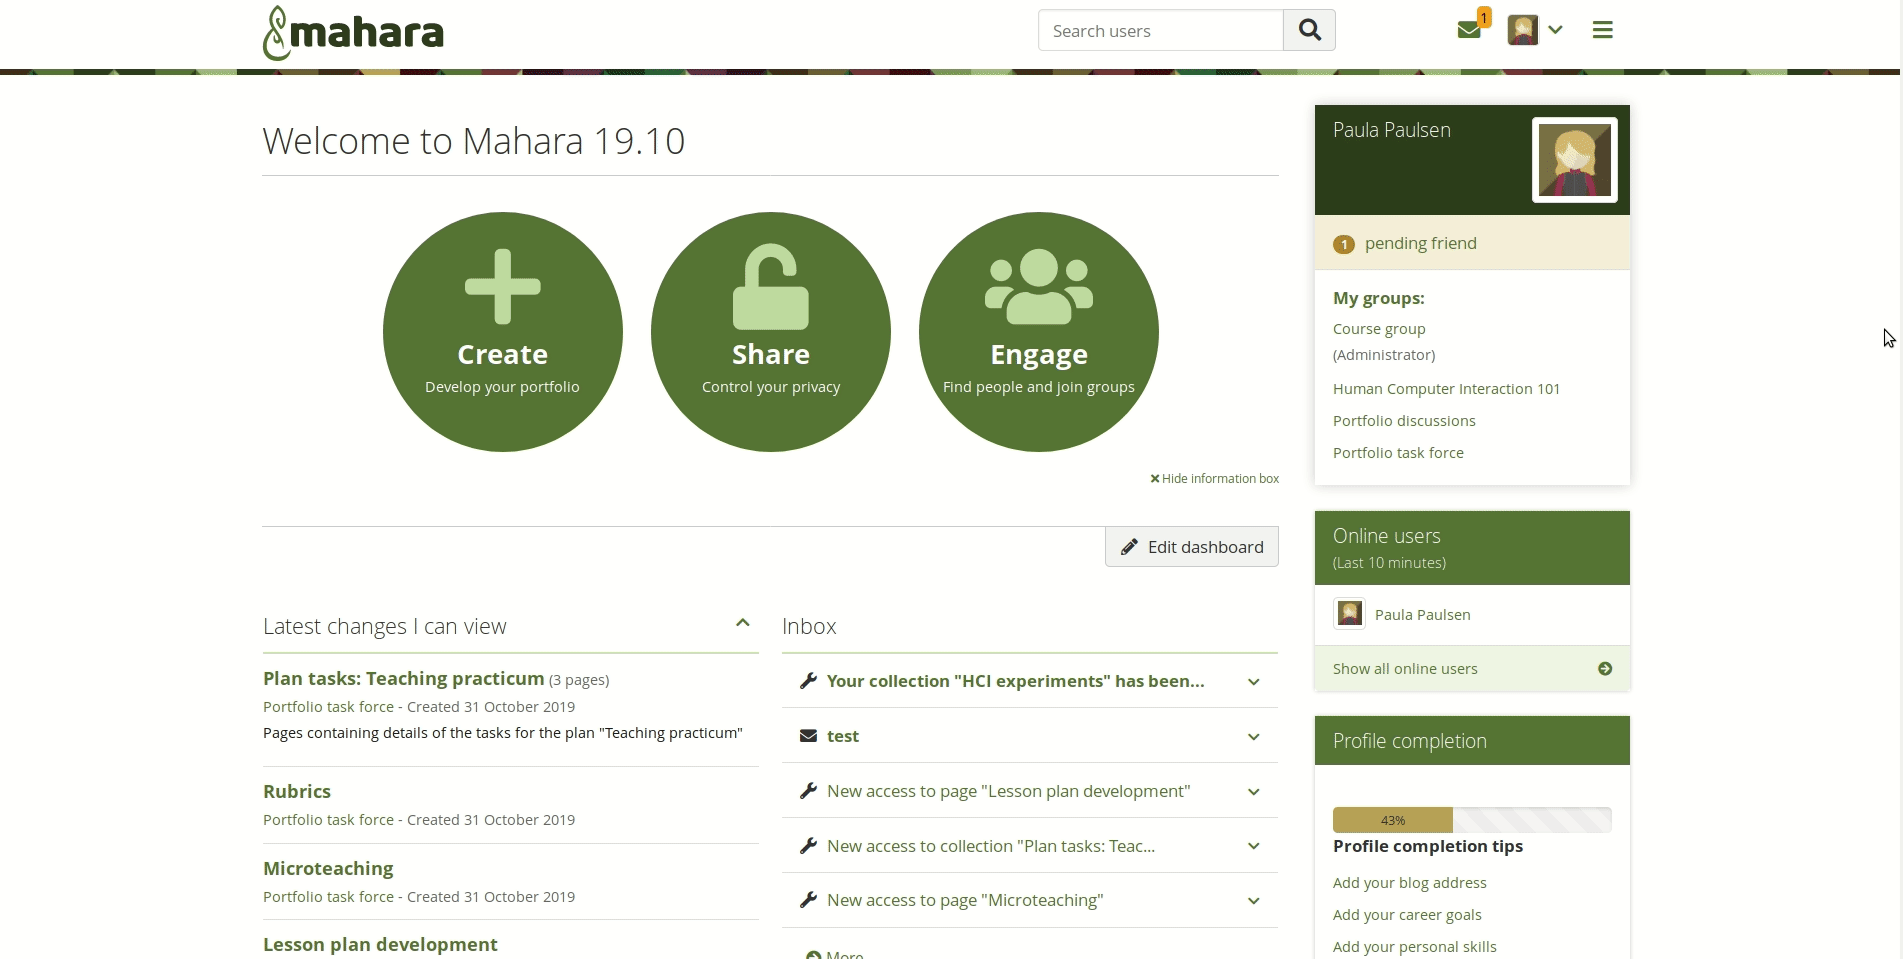
Change the background of the page header area
It is possible to also use theme fonts in skins now.
Assignment plans
It is possible to create plans in your personal portfolio area that serve as templates and that can be used for assignment purposes. When you create a template plan, you can copy it into a group. Any associated task pages and template portfolios are copied along.
A learner can then select what tasks they want to complete. Any associated portfolios are automatically copied into their account and are ready for use.
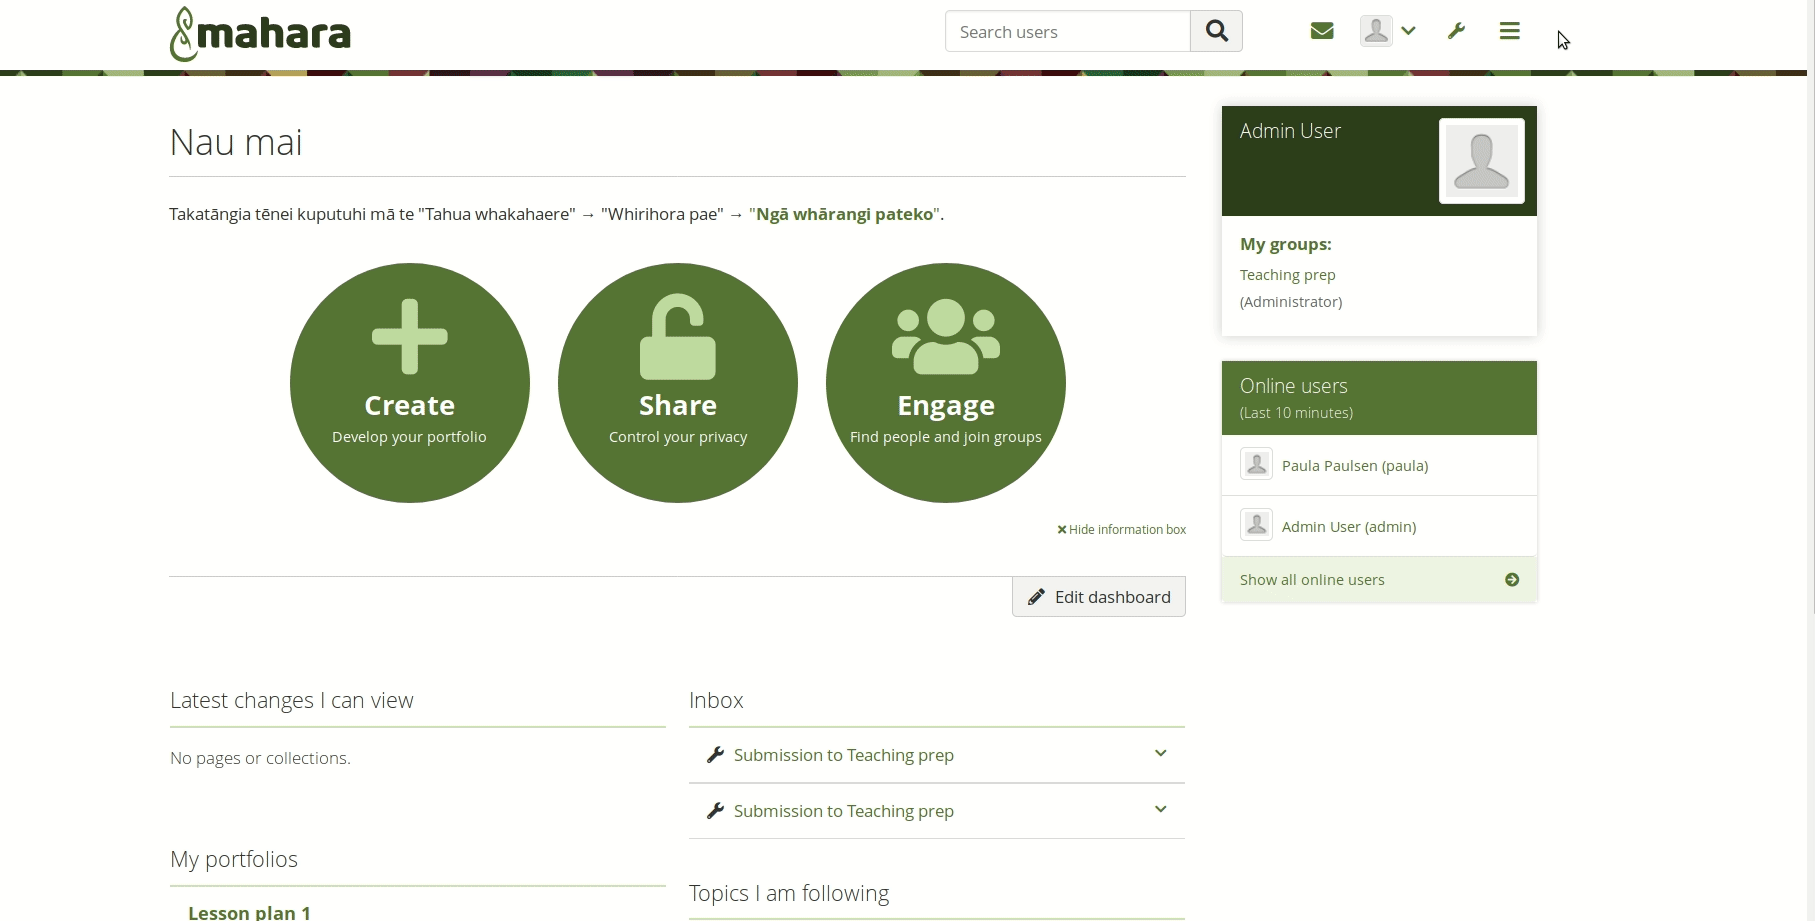
Assignment plans
Notification about submission and submission report
When you submit a portfolio to a Folioz group, a notification advises you of that. You can keep that notification as proof that you submitted a portfolio.
An institution or site administrator can run a report over the submissions to groups to get a quick overview of the submission status.

Report of submitted portfolios
Support for embedding .m4a and .wav media files
You can embed .m4a video and .wav audio files via the “Embedded media” block making it possible to use video and audio recorded on your mobile device if the native formats are not .mp4 and mp3.
Revoke portfolio submission done via LTI
When you submitted a portfolio to an LMS that allows assignment submission via LTI and you want to or need to make changes to your portfolio, you can revoke the submission if the teacher hasn’t yet graded the portfolio.
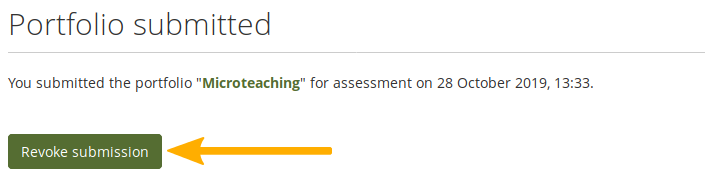
Revoke the submission of a portfolio
Group category filter in administration area
A group category filter is available in the administration area of the groups to make it easier to find groups on large sites.
Group category filter
Sept 2020 Updates
Users are now people
The language on the site has changed away from ‘users’ in English because of the negative connotations of the term. Instead you will see:
-
People
-
Portfolio authors
-
Group members
-
Owners
-
Account holders
There is still the occasional ‘user’ around, in particular when the term is used in the administration area and better shows what is used in third-party piece of software.
We will update all the screenshots with time, and focussed on creating screenshots of new functionalities for the time being.
Note: The term ‘username’ has been retained for the time being.
Language toggle
If the site has more than one language installed, you can switch between languages easily by using the language toggle in the main navigation bar.
It allows you to change the language at any point in time. Note though that the page is reloaded. Thus, if you wrote some text, you’ll be asked if you want to leave the page or not to prevent that your text will be lost.
Priority to institution members
When you want to share your portfolio with other people, you can search for them on the Edit access page. Now you see members from your own institution or institutions first as it is most likely that you wish to share your portfolio with them.
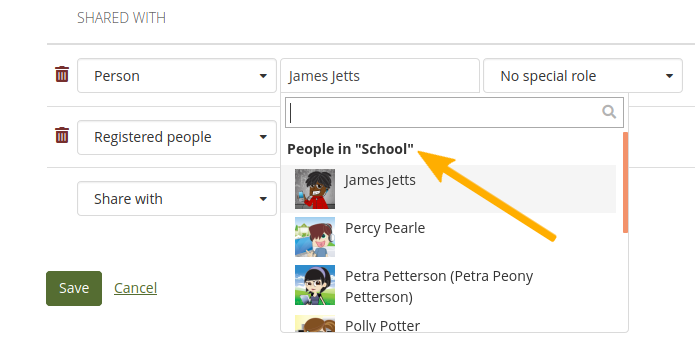
Default group settings
Site administrators can change the default group settings to determine settings that are more suitable to their environment from the get go. Group administrators can still adjust them as usual.
Personal group labels
You can label groups in which you are a member. That allows you to filter for them on the Groups overview page, in the sidebar, and on your profile page, allowing you to focus on current or most frequently used groups. This functionality is particularly good for those that are in many groups and where some of these groups may not be active (any more).
Combined export
You export your portfolio content now in all available export formats. Per default, HTML and Leap2A are enabled and PDF may be available. This allows you to export everything in one go and be more flexible later on when you may need the HTML export yet also the Leap2A one. You no longer need to run two exports to get both formats.
Bulk export formats
You can export accounts in bulk not only in Leap2A but also any other available export format. Per default, HTML is available. Some sites may also activate the experimental feature of the PDF export.
Cover images for pages and collections
You can add a cover image to every page and collection. They are displayed on your Pages and collections overview page to make it easier to find your portfolios.
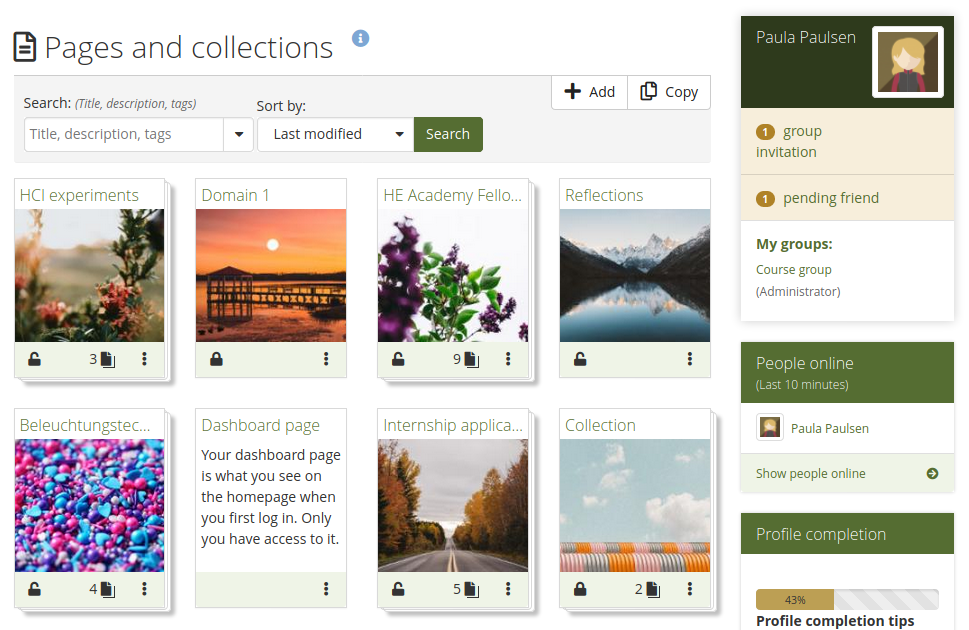
Overview page for ‘Pages and collections’ with cover images
Sign-off and verification details
You can see when a page was signed off by the portfolio author and verified by a manager, if verification is necessary.
See details about the sign-off and verification
Restrict file types to upload
You can restrict which file types account holders are allowed to upload via the config.php file. That gives you more control over the file types you consider safe to upload.
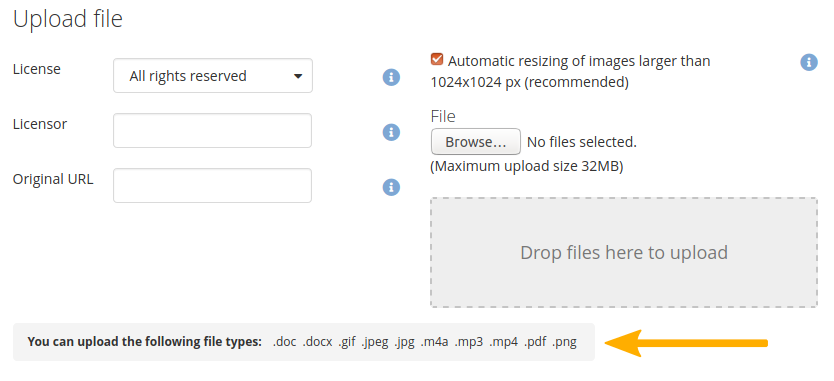
See which file types you can upload if there is a restriction in place
Delete entire sections of a SmartEvidence framework
When you set up a standard and associated standard elements with it, you can now delete all of them at once. Also, if you have a standard element that is a parent to others, you can delete all of them in one go, making it faster to change your framework and remove unwanted elements.
Move account to an SSO institution
You can move your account without administrator intervention on your own from one institution into another as long as the intaking institution uses SAML SSO. That allows you to side step seeking approval for the move and handle everything on your own.
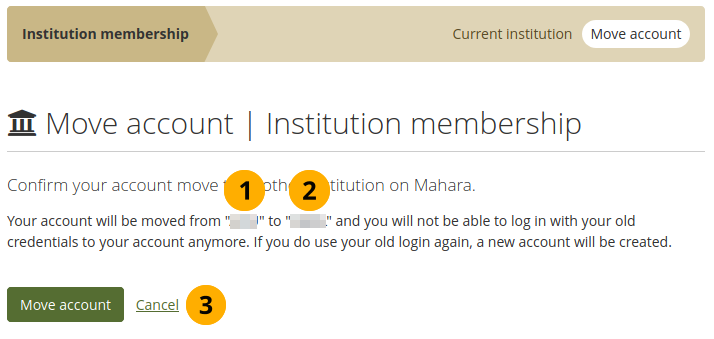
Confirm your account move
More prominent SSO login button
Typically, when single sign-on via an external IdP is used on a site, the regular login form becomes secondary and is only used by administrators. In the past, the SSO login button was very subtle. Now it is displayed more prominently and easier to see for people thus preventing that account holders try to use the regular login form that wouldn’t allow them to sign in.
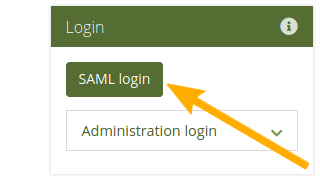
More prominent SSO login button
Single sign-on automations
There is a range of improvements to single sign-on to be found in Mahara 20.04. These changes make it easier for large organisations or groups of organisations to manage institutions and accounts on Mahara.
-
Diagnose problems more easily by setting the ‘saml_log_attributes’ config.php variable.
-
Assign site administrator and staff and institution administrator and staff permissions automatically.
-
Set up and configure additional organisations from within a parent IdP automatically.
-
Assign a role to an account that is added to every group in the institution (or even on the site).
-
Move your account from one SSO institution to another by yourself.
May 2022 Updates
Institution support administrator role
People providing support for an institution, e.g. helpdesk or hotline support, can now receive the ‘Institution support administrator’ role, which includes all permissions from the ‘Institution staff’ role and the possibility to masquerade as a regular institution member and as institution staff.
Install languages in the site administration
Site administrators can install any translation of Mahara directly in the site administration area. Languages can also be updated there. The translations make the interface available in languages other than English. No matter the interface language though, account holders can type text in any language.
Set up portfolio completion in group collections
If a group is created in an institution that allows the use of the portfolio completion functionality, you can set up group portfolio templates that add this page. Learners can then copy the template and have the page ready to go on their personal portfolios.
Prevent changes to ‘Sign-off’ block on copied templates
To prevent accidental changes to the ‘Sign-off’ block on portfolios that are copied from a template, the block settings are not available to portfolio authors once they made a copy of the template.
Download SmartEvidence framework
If you created your SmartEvidence framework on your Mahara site instead of uploading it as a JSON file, you can now download it from the SmartEvidence framework management page and upload it to another Mahara site. This makes sharing of frameworks easier and doesn’t require that they are uploaded first, but they can be created directly in Mahara.
Limit the number of groups in an institution
Site administrators can limit the number of groups that can be created in an institution in the institution settings. This allows for greater control over groups on multi-tenanted sites.
Upload files via web services
If you want to upload files directly into accounts via a third-party application, you can do so using the new file upload web services connection. It allows you to send a file from a third-party application with the consent of the account holder to Mahara.
Résumé changes
Education and employment histories are now separate menu items to be able to deal better with dragging and dropping files.
You can attach files on an education or employment history item or an achievement either directly from your Mahara files area or by uploading a file from your device.
‘Contact us’ notifications to institution administrator
Notifications sent by logged-in institution members go to the respective institution administrators instead of the site administrator. That way, site administrators do not have to forward requests meant for institution administrators as frequently. Notifications sent by someone not logged in still go to the site administrator.
SmartEvidence for group templates
If an institution allows to use SmartEvidence, a framework can be added to a group portfolio used as template for the creation of personal portfolios.
Include or exclude private comments from export
Decide whether you want to include or exclude private comments from your portfolio export to retain the original setting on private comments and not make them viewable by others.
Collapsible page comments
When you open a page, the comments area at the bottom of a page, when the portfolio author allowed comments, is collapsed per default to save space.
Skin stays with copied page
When you copy a page or a collection that has one or more skins applied to its pages, the skins come along with the pages if they are public or site skins that you are allowed to use.
LTI Advantage
LTI Advantage is implemented as experimental feature. At the moment, it has been tested with the Brightspace learning management system. The recording showcases the three main functionalities that are achieved:
- Authentication
- Setup of groups based on courses and enrolment information
- Portfolio submission
Current submissions across the site
View current submissions to the site from groups or external hosts that use LTI Advantage. The overview page allows site and institution administrators to quickly release portfolios that were submitted accidentally.
Accessibility improvements
We are consistently improving the accessibility of Mahara. In this release, we increased the base font size, made the viewing area of a page wider, and also corrected the heading levels so they now follow stricter rules.
In the visual editor, you now only have three headings available that comply with the heading level structure more closely.
Maroon theme
Folioz comes with a number of built-in themes. We added a new theme, ‘Maroon’, as alternative to these. It has an edgier feel with its slanted lines. Like the other themes, it can be used as basis for your own theme by using the ‘Subthemestarter’ kit.
Portfolio completion
The portfolio completion progress page can be used in conjunction with page sign-off and verification. It shows how many of these have already been attained, and which ones are still outstanding. The page displays a progress bar for a percentage overview of all sign-offs and verification as well as a list of all pages within the collection along with their sign-off and verification status.
Quick edit for ‘Text’ blocks
When you have a ‘Text’ block, you can now edit it directly from the ‘Display’ mode of a portfolio page. When the ‘Details’ mode is turned on, you see ‘Quick edit’ at the top of any ‘Text’ block and can open the configuration modal to start editing.
Instructions on ‘Text’ block
You can add instructions to any ‘Text’ block. They are displayed in both ‘Edit’ and ‘Display’ mode allowing assessors to see them as well. When a template page is copied, the instructions cannot be changed.
Lock instructions
You can mark a page as ‘Template’ in the page settings. At the moment that means that you can lock instructions, both page and artefact instructions, e.g. on ‘Text’ and ‘Peer assessment’ blocks. Direct copies of the template won’t allow changes to instructions.
Display course completions
You can display course completions from a learning management system (LMS) if you configured for both to exchange data. Depending on the configuration, you can see the course title, number of hours, organisation, and course type.
Assignment submission plugin for Moodle
A new Mahara assignment submission plugin is available for Moodle. It is based on web services and LTI rather than MNet and allows for the archiving of portfolios along with the previously available functionality.
URL redirect for external authentication methods
When you log in via an external authentication method on a multi-tenanted Mahara instance, you can now be redirected properly to the login screen for your authentication method as that can be configured, e.g. for LTI, if it doesn’t happen automatically.
Change Logs
A more technical breakdown of fixes and features found in updates to Folioz.
Sept 2020 Fixes
* Bug 1800319: Revise merging of sharing permissions for a collection
* Bug 1829943: Error deleting institution due to foreign key constraint with view table
* Bug 1836984: Elasticsearch not restricting the user search when isolated institutions turned on
* Bug 1840099: Library upgrade: CSS Tidy to 1.7.1
* Bug 1840201: Elastic search: Search results are not restricted for aretfacts on pages shared with group
* Bug 1843206: Peer assessment sign-off block has incorrect message
* Bug 1843357: Library upgrade: remove jquery deprecations
* Bug 1843847: Select2 accessibility for labelling and removing tags
* Bug 1845228: Mahara installation issues with MySQL 8.0.17
* Bug 1846994: Mozilla Backpack needs to be deprecated
* Bug 1847379: The 'read' column for module_
* Bug 1848100: Skins - cannot Save changes once background image file previewed
* Bug 1849771: Need a isGridstackRend
* Bug 1850220: Can't get to site's contacts page from profile page
* Bug 1850578: TinyMCE editor does not appear in Chrome on Android
* Bug 1850786: Upgrade script to 19.10 from 19.04.1 fails when converting artefact audio - elasticsearch triggers
* Bug 1850859: Consolidate CSS for skins to work better with new header and details mode
* Bug 1850869: Text block - internal anchor does not work
* Bug 1851155: LTI duplicate email addresses causing problems
* Bug 1851165: display_tag() missing index error
* Bug 1851174: 19.10 upgrade is failing at artefact_plans_plan
* Bug 1851175: Unformatted table name breaks matrix
* Bug 1851176: Unformatted table name breaks skin editing
* Bug 1851288: Error when altering the block placeholder name before choosing block type
* Bug 1851418: Security upgrade simplesamlphp to 1.17.7
* Bug 1851557: Members from other institution can be seen when sharing portfolios despite isolated institutions
* Bug 1851699: cron.php with '$cfg->urlsecret' dosen't work on cronjob under PHP FastCGI enviroment.
* Bug 1852020: Nav menu missing import / export items
* Bug 1852522: 'Display page' button should not be displayed for site templates
* Bug 1852584: Cannot delete a group collection if already pushed to users
* Bug 1852644: Allowing a site admin to set an external app owner to be someone other than themselves
* Bug 1853189: Not all fields are showing in xml-rpc auth modal
* Bug 1853364: find_by_
* Bug 1853387: jsform field defaults to no when field is disabled
* Bug 1855023: Warning produced when adding/ editing an image gallery block
* Bug 1855373: Update gulp
* Bug 1855614: Problems with restricting profile access
* Bug 1856506: gridstack - too much recursion error when translating from old layout
* Bug 1856759: Issues with layout/
* Bug 1857274: "Display page" button is highlighted in edit mode when it shouldn't be
* Bug 1857379: File attachment display consolidation
* Bug 1857380: Profile picture settings page needs its own form_id
* Bug 1857381: Cover letter styles can't be targeted independently for full resume and individual item
* Bug 1858512: Stop displaying an email profile field as one of the normal fields
* Bug 1859127: When having restricted file uploading it fails to restrict list on subsequent upload
* Bug 1859355: Peer assessor can delete another peers assessment
* Bug 1860050: module_
* Bug 1860368: Arrow bar in Modern and Ocean not correct wen hovering over non-active tab
* Bug 1863043: Don't display personal information beyond what is necessary in "Edit access" Ajax response
* Bug 1863197: Primary school theme home page and dashboard widgets display incorrectly
* Bug 1863820: navigation block html export - views titles link back to original site
* Bug 1864757: Can't comment on artefacts on public or secret URL pages
* Bug 1865400: Security Upgrade SimpleSAML 1.17.7 to 1.18.4
* Bug 1865822: tagged posts blocktype broken when displaying a view
* Bug 1866773: Auth SAML get disco list issue
* Bug 1866942: user creation will set groupsideblockl
* Bug 1868613: Design freeze prep for Mahara 20.04
* Bug 1868916: Image Gallery Blocks do not allow retractable option other than no
* Bug 1869548: Language string review for Mahara 20.04
* Bug 1870256: Path to file listed in pdf export is not correct
* Bug 1870989: Warning produced when trying to copy a group page
* Bug 1870993: Site not respecting the usepdfexport flag
* Bug 1871018: Importing page with embedded image not working in all cases
* Bug 1871473: Incorrect theme displayed for new pages when saved
* Bug 1873112: Export collections not creating the export pdf
* Bug 1873113: Pdf export: print preview layout can cause placement / truncation issues of text / images
* Bug 1873121: HTML / PDF export of Gallery block in slideshow mode is broken
* Bug 1873357: Have exported pdf files for pages / collections end up in a PDF/ directory next to the HTML/ one
* Bug 1874540: Page settings form not behaving as expected
* Bug 1874961: 'Publish' button in peer assessment block does not have primary brand colour applied in theme 'Default'
* Bug 1875103: Change the menu item and page 'Group settings' to 'Default group settings'
* Bug 1875267: 'Login' button not visible in 'Default' theme when only a link
* Bug 1690291: Behat: Combine multiple tests for webservices into one
* Bug 1759054: datepicker not accessible by screen reader
* Bug 1762845: HTML export still contains the 'details' /'add comment' links for blocks on the pages
* Bug 1821813: Behat: Add inbox notifications functionality to Objectionable content
* Bug 1823801: Behat: Confirm Inst tags can be used on Inst pages
* Bug 1825918: A bit more space between action buttons and skin cards
* Bug 1829080: Behat: SmartEvidence framework matrix editor functionality
* Bug 1830811: Mahara.org feeds don't work in rss block
* Bug 1837340: Behat: Isolated institutions scripts needed
* Bug 1841501: Behat: check required to verify that the share icon is not displayed for Site page templates
* Bug 1844076: Only 1 error message shown even though there are 2 on "Site options"
* Bug 1845133: "Delete" button visible on timeline for comments
* Bug 1848130: Behat: group_view_
* Bug 1850559: Problem with deleting a plan task
* Bug 1850865: iPad iOS 13.1 block comments and details modal content scrolls horizontally
* Bug 1850880: Profile completion tips links - some are inaccurate
* Bug 1851193: 'skip to main content' link is not working
* Bug 1851589: Console error in image gallery
* Bug 1852513: Behat test coverage for details mode and changes to skins
* Bug 1853230: Library upgrade: jTLine needs updating to fix jquery deprecations
* Bug 1853905: keyboard navigation options not working in FF / Chrome
* Bug 1854421: Get site options form to reload page on updating certain fields
* Bug 1855349: Tagged Journal Entries are not importing in Leap2a
* Bug 1857255: signoff/verify modal issue in IE11
* Bug 1857370: Adjust color of "No tasks yet" in "Plans"
* Bug 1857371: Left-align performance footer messages
* Bug 1858707: Links in a header with skin turned on shows normal link color instead of header color
* Bug 1859364: The gridstack drag icon is showing on the display page as well as edit page
* Bug 1859528: Update adodb to version 5.20.16
* Bug 1859605: Mahara portfolio as Moodle assignment cannot be previewed
* Bug 1861046: Increase contrast of the class "text-midtone" to be accessible in all themes
* Bug 1861370: group member search could result in fatal error message
* Bug 1864581: Plan tasks in a block in 'Edit' mode need to have more space
* Bug 1865409: Replace "user" with more appropriate term on auth.saml.php
* Bug 1866148: add a function in class Collection to get the first view in the collection
* Bug 1866528: Reorder options in the site options panels
* Bug 1866710: Update PHP Mailer to 6.1.5
* Bug 1866713: Update Chart.js to 2.9.3
* Bug 1866720: Update htmlpurifier to 4.1.12
* Bug 1866934: Upgrade Library: popper to v1.16.0
* Bug 1867707: Add comments and details block headers not changing colour when active
* Bug 1867999: Empty annotation in peer review mode is not working right
* Bug 1868657: Image Gallery blocks that display from individually images don't have the details block header
* Bug 1869966: Multiple html p tags on lang/en.
* Bug 1870998: Can accidentally choose yourself when sharing a page when isolated institutions is on
* Bug 1871219: Footer help link to manual is incorrect during rc release
* Bug 1871504: error when exporting an empty page
* Bug 1871515: pdfunite and ghostscript availability check for RHEL/CentOS
* Bug 1871718: Chrome browser availability check for RHEL/CentOS
* Bug 1871722: manage collection pages: needs a cancel button and missing lang string
* Bug 1872860: Choose skin option on edit page settings needs style fix
* Bug 1873115: Page comments in html export not present in the pdf export
* Bug 1873122: Comments block not displaying as expected in HTML / PDF export
* Bug 1874140: Collection exported in PDF has page links that are not helpful
* Bug 1874143: Websservice configuration page needs some UX tidying
* Bug 1874375: file uploading message has a 'tick' background
* Bug 1875118: When clicking a group label on 'All groups' screen, switch to 'All my groups' screen
* Bug 1838999: Recaptcha link in admin is a 404
* Bug 1852026: using URLSearchParams to get url parameters in js
* Bug 1852358: need to update the name for Macedonia
* Bug 1854297: Behat: fix custome_
* Bug 1855348: Missing language string in elasticsearch: 'servererror'
* Bug 1855553: Not show the change password required heading when auth method doesn't allow this
* Bug 1860049: Webservices logs page fails to sort results correctly
* Bug 1861252: JSON editor library - removed duplicated libray code in src/editors directory
* Bug 1863804: "Can't use function return value in write context" for finding dwoo directory
* Bug 1866289: obsolete code in groupviews.php
* Bug 1825231: Allow bulk export page to export in options other than Leap2A
* Bug 1826284: PDF export for collections and entire account
* Bug 1833664: "Lock blocks" doesn't work in group pages
* Bug 1839411: Update codebase for php 7.3 and php 7.4
* Bug 1840195: Add a function to check if a cron callfunction needs to run before actually executing it
* Bug 1846412: To be able to migrate a SAML authed account from one IdP to another
* Bug 1848092: Add personal labels to groups to allow group filtering
* Bug 1853066: Allow behat suite to ignore some features
* Bug 1853069: Combine export options into one export file
* Bug 1855327: Allow Mahara to record SAML auth attributes to help diagnose auth problems
* Bug 1855331: Allow one to toggle language setting easier
* Bug 1855333: Create groups with a pre-defined set of settings different to the default options
* Bug 1855344: Allow institution short name to be a string containing numbers and allow the string to be minimum 1 char long
* Bug 1855351: Allow the site to restrict what files are allowed to be uploaded
* Bug 1855358: Allow the login box to adjust if there are both internal and external login options available
* Bug 1855383: Create new user_roles system where you can assign custom roles to a user
* Bug 1855556: Allow minimum information when creating a user via SAML
* Bug 1855560: Allow SAML auth to set admin/staff roles on create user
* Bug 1855561: Only set the Strict-
* Bug 1855622: Allow SAML to create institution if it doesn't exist before adding new user to it
* Bug 1855771: Allow non-mahara exceptions to show a bit more detail
* Bug 1856260: SmartEvidence framework editor improvements
* Bug 1857366: Allow Artefact File save_file() function to save image as profileicon if needed
* Bug 1857374: Make the mobile logo appear at a proper break point
* Bug 1857401: Make Mahara theming more efficient by consolidating elements and using variables
* Bug 1857929: Add sign-off and verification details
* Bug 1857934: Alert to peers when page has been signed off
* Bug 1857935: Display people from own institution(s) first when searching for them during portfolio sharing
* Bug 1858143: Replace "user" with a more appropriate term where possible
* Bug 1859115: Allow SAML UserNotfound be SAML specific
* Bug 1859120: Allow a 'parent' saml auth instance update the roles for all the similiar instances
* Bug 1865095: when using mahara.php json_reply() function we are not able to return data on error
* Bug 1870444: Cover image for page and collection to be seen on 'Pages and collections' overview page* Bug 1888163: Security issue: File / folder name not being escaped correctly in filebrowser
* Bug 1889485: Security Upgrade SimpleSAML 1.18.4 to 1.18.7
* Bug 1875154: PDF export not mentioned on export page when it's available
* Bug 1876625: Date picker not working for Admin -> People when selecting a date to filter users
* Bug 1876810: More of the count(): Parameter must be an array or an object that implements Countable
* Bug 1877001: Skins not showing after upgrade
* Bug 1879410: Add a text block in Dashboard page using TestingDataGene
* Bug 1880803: errors when copying a page after editing column widths manually
* Bug 1882103: Wrong redirect when creating Pages when Mahara is in a subdir
* Bug 1883043: collection pages unavailable as link options in tinyMCE
* Bug 1885231: Class 'Institution' not found when viewing another user's profile page
* Bug 1885784: Need to update site options submit function to use alias
* Bug 1871280: Allow grouproles to be reset for users when roles updated via webservices
* Bug 1875785: External links in Mahara no longer open in external tab/window by default
* Bug 1875973: Mahara: Site information block needs link to download updated
* Bug 1877906: MariaDB error when creating secret URL
* Bug 1879847: String missing for allow public views in Reports
* Bug 1882870: Button obscuring text on Install Fonts page
* Bug 1883031: The cancel link (button) on forms has an odd style once clicked
* Bug 1883179: Profile Completion has incorrect instructions
* Bug 1883471: reduce block margin on gridstack
* Bug 1886371: Migrate Institution is producing a warning message
* Bug 1886596: Behat testing data generator throws null on openbadgedisplayer
* Bug 1887317: LoadXML error when upgrading from 18.10 to 20.04
* Bug 1875958: 'My groups' sidebar can get very long if you are in lots of groups
* Bug 1880771: When adjusting group membership via the Engage -> People page the modal doesn't close on submit
* Bug 1884466: The delete_
Exporting your eportfolio
Export all or part of a portfolio
You can export all or part of your portfolio to a single zip file containing the following:
- Standalone HTML website. You cannot import this into Folioz or another portfolio system again, but it is readable in a standard web browser and you do not need a Folioz in order to view it. To view this website, extract the zip file and click on the index.html file that is in the folder. This should open in your default browser for viewing or printing as a PDF.
- Leap2A: You can import this into another Leap2A-compliant system or you can import it into your own account again (see step 1, but click import, instead of export).
Exporting a Portfolio
- Click on the Main Menu > Manage > Export
- Choose what to export:
- All my data: Everything that is stored in your account in Content and Portfolio. Excluded are any of your group contributions.
- Just some of my pages: You can choose which pages and the artefacts that are contained within them you want to export.
- If you choose either 'some pages', choose them in the box below, and check the preview to ensure that everything that you want / expect is included.
- Click Generate export to start the export process. Wait for the process to complete.
- Save the export.