SmartEvidence
SmartEvidence allows you to work with competency frameworks in Folioz and associate them automatically with an evidence map for a visualisation of the competencies already gained, in progress, and not yet started.
“Competencies” is used in a wide sense here. SmartEvidence can be used for multiple purposes including competency-based assessment, graduate attributes, skills accomplishment and many more. It can also be used for self-assessment purposes.
The implementation of SmartEvidence is experimental. While the majority of the functionality works as intended there are a few areas that still need to be sorted out, e.g. the export of the SmartEvidence map in both HTML and Leap2A.
Set up a SmartEvidence framework
If you have an assessment matrix you can request an admin to create a framework for you.
Select a framework
When an institution allows SmartEvidence, any user in that institution can work with the frameworks that are available. The framework is selected on the collection’s Edit screen for institution or personal collections.
Create a collection
-
Click the New collection button under Portfolio → Collections. On the next screen…
-
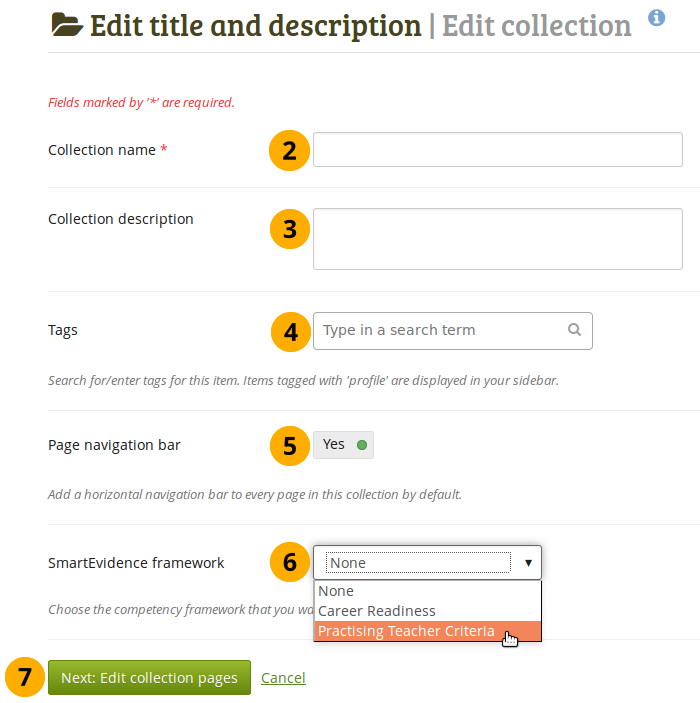
Collection name: Provide a title for your collection.
-
Collection description: Optionally, you can write a short description about your collection. You do not have a visual editor, but just a plain text box.
-
Tags: Enter tags to find your collection more easily at a later stage. You can choose from your existing tags by starting to type a letter and then selecting the tag you want to use. You can also type a new tag, and it is added to your list of tags.
You can find more information on how to use the tag selector in the “Tags” section.
-
Page navigation bar: Choose whether you wish to display a tabbed navigation or not. If you choose not to, you will have to include the navigation block for you to go from one page to the next on the individual pages that belong to this collection.
-
SmartEvidence framework: Select the framework that you want to associate with your collection. You can change the collection as long as you have not put an annotation onto a page within the collection.
-
Click the Next: Edit collection pages button or click Cancel if you want to abort adding your collection.
Add an annotation
You can add as many annotations to a page for different standards as you wish. When you place an annotation onto the SmartEvidence map, it is automatically added to your page.
Write an annotation
Configure the Annotation block
-
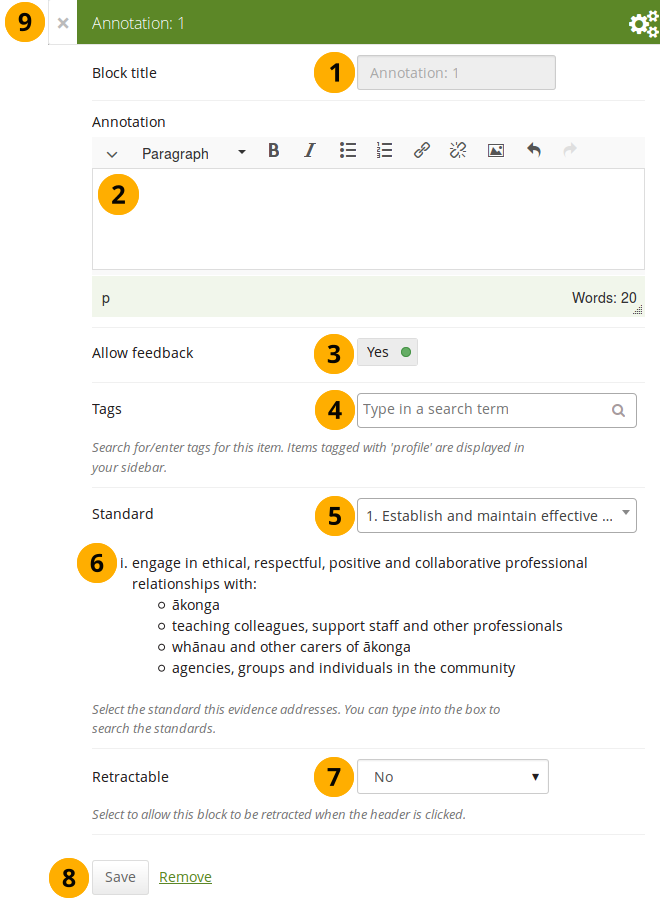
Block title: The block title is set automatically based on the standard selected. It takes the form of “Annotation: Shortname of the standard” and cannot be changed.
-
Annotation: Write your annotation for your portfolio page. The annotation helps connect the evidence on the page to the standard or competency you selected to associate it with in the competency framework.
You can change the text as long as no feedback has been placed on the block. In order to change the text, you go into Edit mode of the page and then choose the Configure icon of the Annotation block that you want to change. You cannot change the annotation from the SmartEvidence map.
-
Allow feedback: When you allow feedback on your annotation, others can leave feedback as usual. However, as soon as the first feedback has been added, you will not be able to make changes to your annotation text anymore. That is to ensure that the feedback still relates back to the annotation.
-
Tags: Enter tags to find your annotation more easily at a later stage. Separate your tags with commas. If you already have tags, you can click on the link Show my tags and select the ones that you think will fit for this collection as well. They will be entered into the text field for you.
-
Standard: When you place the Annotation block on the page, you can select the standard with which the page shall be associated based on the SmartEvidence framework selected for the collection. You can change the standard until somebody leaves feedback or makes an assessment. If you select the page from the SmartEvidence overview page, the standard is pre-selected and cannot be changed.
You can use the Annotation block without SmartEvidence, but then you can’t choose a competency standard.
-
The description of the selected standard is displayed so you can easily reference it.
-
Retractable: Choose whether you want to allow users to reduce the block to its heading on a page or see just the heading only automatically. The options are:
- No: The block and its content is displayed at all times.
- Yes: Allow users to reduce the block to just the heading by clicking the Retractable icon .
- Automatically retract: Only the heading of the block is visible, and the user can click the Retracted icon to view its content.
-
Click the Save button to accept your changes, or click Cancel to leave the block’s content as it is. Remove is shown only when you place the block into the page for the first time.
-
You can also click the Close button in the top left-hand corner of the modal window to either remove a newly created block before it is being saved or to cancel any changes and leave the block’s content as it is.
Respond to an annotation on the SmartEvidence map
When you have access to a collection that contains a SmartEvidence map, you can leave feedback on an annotation. You may be able to assess it if you have staff or institution administrator permissions in the same institution as the portfolio author unless it is a self-assessment framework.
Respond to an annotation
-
Click the annotation on the SmartEvidence map that you wish to take a closer look at. A modal window opens with the annotation.
-
Read the annotation.
-
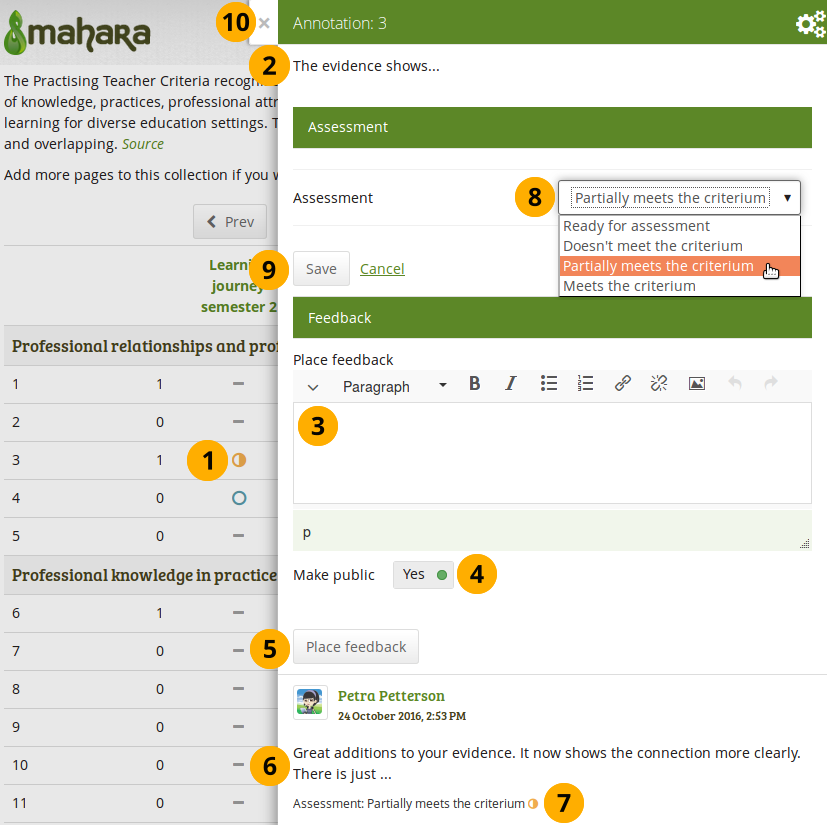
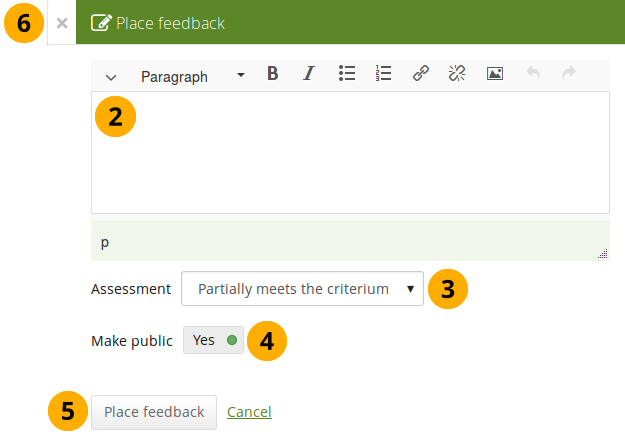
Place feedback: You can leave feedback on the annotation.
-
Make public: Decide whether everybody who has access to the page can view your feedback or just the portfolio author.
-
Click the Place feedback button to add your feedback to the annotation.
-
You can view the feedback of others.
-
If an assessment was already made, you can see it here. This also serves as log of the assessment changes throughout the lifetime of the annotation.
-
Assessment: If you have the permission to assess the standard, you see a drop-down menu here with the possible statuses that you can use. Select one of them.
The assessment statuses are defined in the SmartEvidence framework file.
-
Click the Save button to keep your selection or click Cancel to abort the assessment.
-
You can also click the Close button in the top left-hand corner of the modal window to either remove a newly created block before it is being saved or to cancel any changes and leave the block’s content as it is.
Respond to an annotation on a page
You can provide feedback to an annotation, and assess it if you have the appropriate permission, also from the portfolio page on which the annotation is placed.
Respond to an annotation on a page
-
Click the Place feedback link at the bottom of the Annotation block.
-
Write your feedback.
-
Assessment: If you have the permission to assess the standard, you see a drop-down menu with the possible statuses that you can use. Select one of them.
The assessment statuses are defined in the SmartEvidence framework file.
-
Make public: Decide whether everybody who has access to the page can view your feedback or just the portfolio author.
-
Click the Place feedback button to add your feedback to the annotation or click Cancel to abort the assessment.
-
You can also click the Close button in the top left-hand corner of the modal window to either remove a newly created block before it is being saved or to cancel any changes and leave the block’s content as it is.
Delete an annotation
When you delete an annotation, all its feedback is deleted as well. You cannot retrieve it again easily.
SmartEvidence map
The SmartEvidence map, which is displayed as the first page in a collection that is associated with a framework, is modelled after an evidence map. It visualizes which areas of the framework have already been completed and where there is still more work to be done.
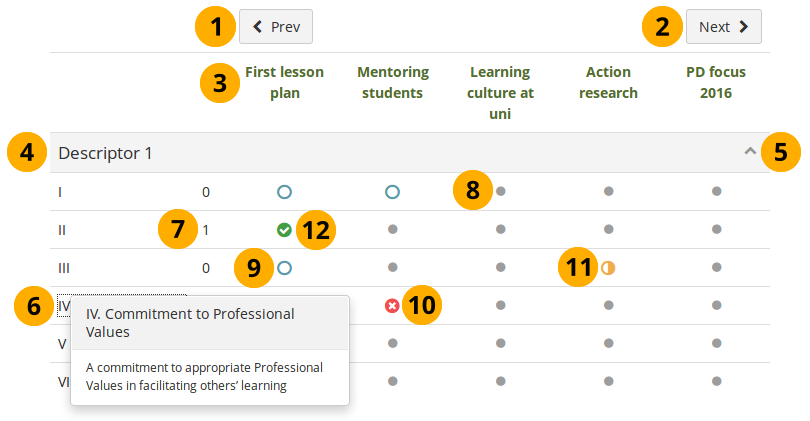
SmartEvidence map with competencies in different states of completion
-
Click the Previous button to go to a page in the collection that comes before the first one shown if there are many pages in the collection.
-
Click the Next button to go to a page in the collection that comes after the last one shown if there are many pages in the collection.
-
The titles of the pages are displayed.
-
Heading for the standard group.
-
Click the Collapse icon to only show the heading of the standard group. Click the Uncollapse icon to show all items in the group.
-
The shortname of a standard or sub-standard is displayed. Click it an a full description is shown.
-
A count of how many pages have been set to fulfill the criteria for a particular standard.
-
A dot means that the page has not been associated with the selected standard.
Everybody but the portfolio author sees a grey line.
-
The circle indicates that this page is ready for assessment for the selected standard.
-
The cross means that the evidence displayed on the page is not sufficient to demonstrate this particular standard.
-
The half moon shows that this page still needs some work before it can be marked as fulfilling the standard.
-
The checkmark is displayed when the assessor agreed that the page fulfills the criteria for this particular standard.
Copy a SmartEvidence collection
You can copy a SmartEvidence collection. When doing so, the annotations are retained, but the feedback on the annotations is not. You can then make changes to the collection and update the annotations before submitting the new collection for assessment.